The Nutkin Nook Potholder: A Free Knitting Pattern for a Textured, Forest-Inspired Kitchen Companion
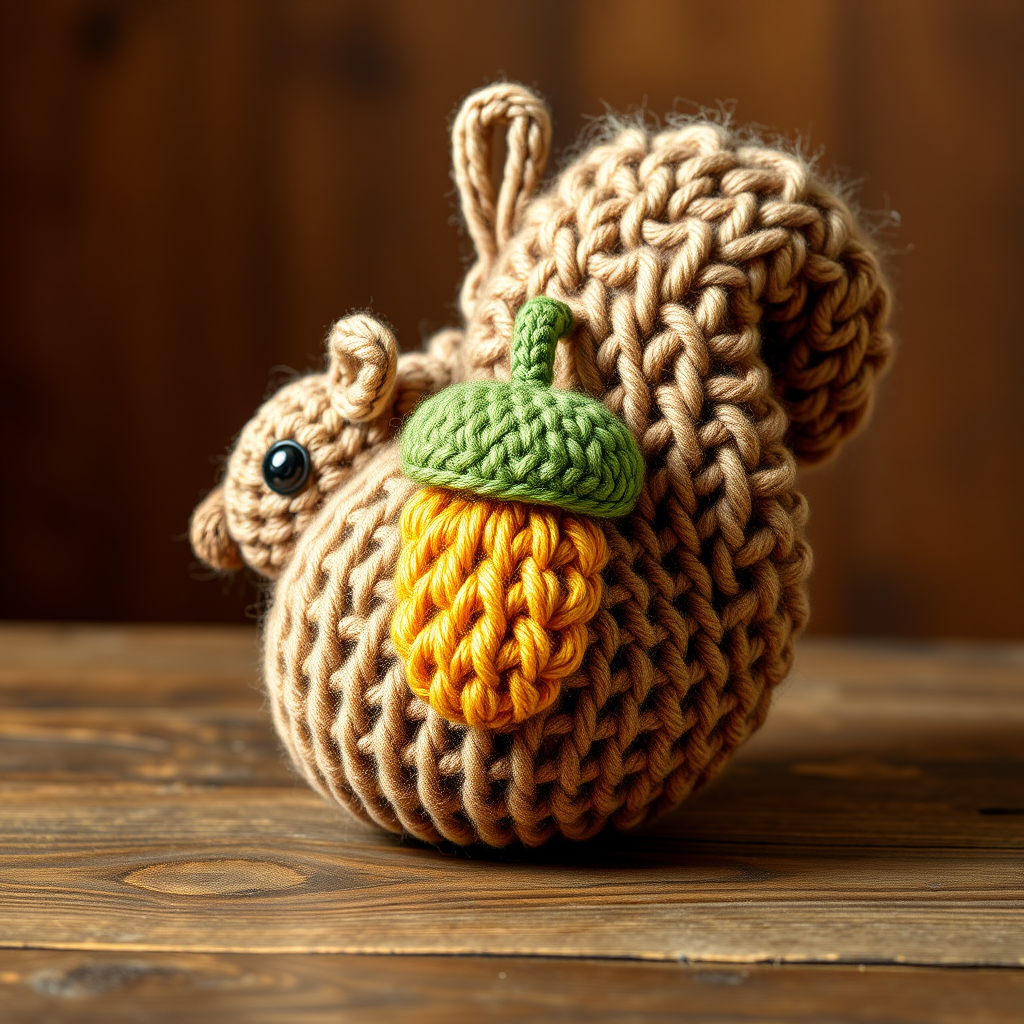
Bring the Woodland Charm to Your Kitchen with The Nutkin Nook Potholder
Transform your kitchen into a cozy forest retreat with this whimsical squirrel potholder. Inspired by the textures of the woodland, this free knitting pattern combines a playful squirrel silhouette with a textured acorn motif. Knitted in 100% heat-resistant cotton, it is both functional and decorative. The fluffy tail doubles as a hanging loop, making it a charming addition to any rustic kitchen. Whether you are a seasoned knitter or a beginner looking for a fun project, this pattern is designed to be clear, detailed, and easy to follow.
Materials Needed
Before you begin, gather the following materials. Using the exact yarn and needle size ensures your potholder matches the gauge and is heat-resistant.
- Yarn: Lily Sugar'n Cream 100% Cotton (worsted weight, 120 yds/85g per skein) in the following colors:
- Warm Brown (MC) – approximately 1 skein
- Golden Yellow (CC1) – approximately 1 skein
- Forest Green (CC2) – approximately 1 skein
- Cream (CC3) – approximately 1 skein
- Needles: US Size 6 (4.0 mm) knitting needles (or size to obtain gauge)
- Notions: Tapestry needle, stitch markers (optional), scissors
- Gauge: 20 stitches x 26 rows = 4 inches in stockinette stitch (blocked). Tip: Always knit a gauge swatch to ensure your potholder is the correct size and heat-resistant.
Step-by-Step Instructions
Follow these detailed steps to create your Nutkin Nook Potholder. The pattern is worked flat and seamed together. Take your time, and don't hesitate to use stitch markers to keep track of your rows.
Squirrel Body (Make 2 pieces, knit flat and seamed)
With MC (Warm Brown):
- Cast on 24 stitches.
- Row 1 (RS): Knit across.
- Row 2 (WS): Purl across.
- Rows 3-6: Repeat Rows 1-2 twice more. (You will have 6 rows total, ending with a WS row.)
- Shape the head:
- Row 7 (RS): K2, k2tog, k8, k2tog, k8, k2tog, k2. (21 sts)
- Row 8 (WS): Purl across.
- Row 9 (RS): K2, k2tog, k6, k2tog, k6, k2tog, k1. (18 sts)
- Row 10 (WS): Purl across.
- Row 11 (RS): K2, k2tog, k4, k2tog, k4, k2tog, k2. (15 sts)
- Row 12 (WS): Purl across.
- Row 13 (RS): K2, k2tog, k2, k2tog, k2, k2tog, k1. (12 sts)
- Row 14 (WS): Purl across.
- Row 15 (RS): K2, k2tog, k1, k2tog, k1, k2tog, k2. (9 sts)
- Row 16 (WS): Purl across.
- Row 17 (RS): K1, k2tog, k1, k2tog, k1, k2tog. (6 sts)
- Row 18 (WS): Purl across.
- Row 19 (RS): K2tog three times. (3 sts)
- Cut yarn, leaving a 6-inch tail. Thread through the remaining 3 stitches, pull tight, and fasten off. Weave in ends.
Acorn Motif (Make 2, one for each side)
With CC1 (Golden Yellow):
- Cast on 10 stitches.
- Row 1 (RS): Knit across.
- Row 2 (WS): Purl across.
- Row 3 (RS): K1, k2tog, k4, k2tog, k1. (8 sts)
- Row 4 (WS): Purl across.
- Row 5 (RS): K1, k2tog, k2, k2tog, k1. (6 sts)
- Row 6 (WS): Purl across.
- Row 7 (RS): K1, k2tog, k2tog, k1. (4 sts)
- Row 8 (WS): Purl across.
- Row 9 (RS): K2tog twice. (2 sts)
- Row 10 (WS): Purl across.
- Row 11 (RS): K2tog. (1 st)
- Cut yarn, pull through last stitch. Weave in ends.
Acorn Cap (Make 2)
With CC2 (Forest Green):
- Cast on 12 stitches.
- Row 1 (RS): Knit across.
- Row 2 (WS): Purl across.
- Row 3 (RS): K1, k2tog, k6, k2tog, k1. (10 sts)
- Row 4 (WS): Purl across.
- Row 5 (RS): K1, k2tog, k4, k2tog, k1. (8 sts)
- Row 6 (WS): Purl across.
- Row 7 (RS): K1, k2tog, k2, k2tog, k1. (6 sts)
- Row 8 (WS): Purl across.
- Row 9 (RS): K1, k2tog, k2tog, k1. (4 sts)
- Row 10 (WS): Purl across.
- Row 11 (RS): K2tog twice. (2 sts)
- Row 12 (WS): Purl across.
- Row 13 (RS): K2tog. (1 st)
- Cut yarn, pull through last stitch. Weave in ends.
Tail (Make 2)
With MC (Warm Brown):
- Cast on 6 stitches.
- Row 1 (RS): Knit across.
- Row 2 (WS): Purl across.
- Row 3 (RS): K1, M1, k4, M1, k1. (8 sts)
- Row 4 (WS): Purl across.
- Row 5 (RS): K1, M1, k6, M1, k1. (10 sts)
- Row 6 (WS): Purl across.
- Row 7 (RS): K1, M1, k8, M1, k1. (12 sts)
- Row 8 (WS): Purl across.
- Rows 9-14: Repeat Rows 7-8 three more times. (18 sts)
- Row 15 (RS): Knit across.
- Row 16 (WS): Purl across.
- Row 17 (RS): K1, k2tog, k12, k2tog, k1. (16 sts)
- Row 18 (WS): Purl across.
- Row 19 (RS): K1, k2tog, k10, k2tog, k1. (14 sts)
- Row 20 (WS): Purl across.
- Row 21 (RS): K1, k2tog, k8, k2tog, k1. (12 sts)
- Row 22 (WS): Purl across.
- Row 23 (RS): K1, k2tog, k6, k2tog, k1. (10 sts)
- Row 24 (WS): Purl across.
- Row 25 (RS): K1, k2tog, k4, k2tog, k1. (8 sts)
- Row 26 (WS): Purl across.
- Row 27 (RS): K1, k2tog, k2, k2tog, k1. (6 sts)
- Row 28 (WS): Purl across.
- Row 29 (RS): K1, k2tog, k2tog, k1. (4 sts)
- Row 30 (WS): Purl across.
- Row 31 (RS): K2tog twice. (2 sts)
- Row 32 (WS): Purl across.
- Row 33 (RS): K2tog. (1 st)
- Cut yarn, pull through last stitch. Weave in ends.
Assembly
- Block all pieces lightly with steam or water to flatten edges. This makes sewing easier and gives a professional finish.
- Sew the acorn cap (green) onto the top of the acorn body (yellow) using CC2 yarn and a tapestry needle. Repeat for the second acorn.
- Position the acorn onto the center of one squirrel body piece (the front). Sew in place using CC1 yarn, making small stitches around the edge. Repeat for the second squirrel body piece (the back) with the second acorn.
- Place the two squirrel body pieces together with wrong sides facing. Using MC yarn, sew around the edges with a whipstitch, leaving the top of the head open for about 1 inch (for hanging loop).
- Sew the tail pieces together with wrong sides facing, using MC yarn and whipstitch, leaving the base open. Stuff the tail lightly with a small amount of fiberfill or yarn scraps. Attach the tail to the back of the potholder at the lower edge, sewing securely.
- Create a hanging loop: Cut a 6-inch length of MC yarn. Fold in half and insert the folded end through the opening at the top of the head. Thread the cut ends through the loop and pull tight. Sew the opening closed.
- Weave in all ends and trim any excess yarn.
Finishing
Your squirrel potholder is ready to use! It is heat-resistant for handling hot pots and pans, but avoid direct contact with open flames. Hand wash in cool water and lay flat to dry to maintain its shape. Enjoy the cozy, woodland charm it brings to your kitchen!



