The Frosty Flurry Snowman: A Free Crochet Pattern for a Textured, Heirloom-Quality Amigurumi
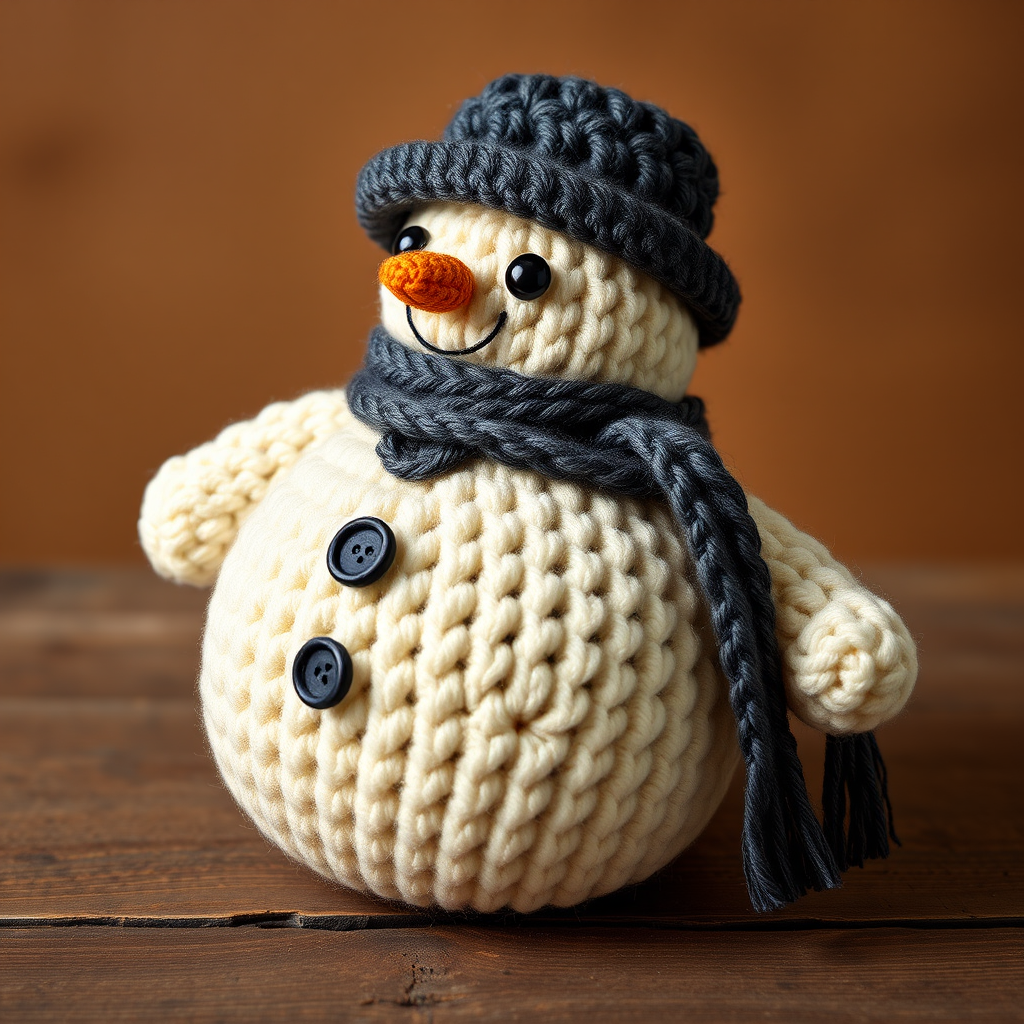
Introducing the Frosty Flurry Snowman
There's something truly magical about creating a winter companion with your own hands. The Frosty Flurry Snowman is more than just a crochet project—it's an heirloom-quality amigurumi that brings a cozy, vintage charm to any space. This free pattern features a unique bobble stitch body (though the pattern uses standard single crochet for a clean, textured look) and a soft, muted color palette of cream, charcoal, and burnt orange. Perfect for winter decor or a heartfelt handmade gift, this snowman is designed to be both beginner-friendly and beautifully detailed. Let's get started on creating your new frosty friend!
Materials Needed
Before you begin, gather the following supplies. The gauge is not critical for this project, but consistent tension will give you a neat, professional finish.
- Yarn: Worsted weight (#4) yarn in the following colors:
- Cream (MC) – for the body and head. Sample used Lion Brand Vanna's Choice in 'Fisherman'.
- Charcoal Grey (CC1) – for the hat, scarf, and buttons. Sample used Lion Brand Vanna's Choice in 'Charcoal Grey'.
- Burnt Orange (CC2) – for the nose. Sample used Lion Brand Vanna's Choice in 'Terracotta'.
- Small amount of black yarn – for embroidering eyes and mouth.
- Hook: Size G/6 (4.0 mm) crochet hook
- Other: Yarn needle, stitch marker, polyester fiberfill stuffing, scissors
- Gauge: 4 sc and 4 rows = 1 inch (2.5 cm) in single crochet. Gauge is not critical, but consistent tension ensures a neat finish.
Step-by-Step Instructions
Head
Work in continuous rounds (do not join unless specified). Use a stitch marker to keep track of your rounds.
- With MC (cream), make a magic ring.
- Round 1: 6 sc in ring. (6 stitches)
- Round 2: 2 sc in each st around. (12)
- Round 3: (Sc in next st, 2 sc in next st) repeat around. (18)
- Round 4: (Sc in next 2 sts, 2 sc in next st) repeat around. (24)
- Round 5: (Sc in next 3 sts, 2 sc in next st) repeat around. (30)
- Round 6: (Sc in next 4 sts, 2 sc in next st) repeat around. (36)
- Rounds 7-12: Sc in each st around. (36) – This creates the height of the head.
- Round 13: (Sc in next 4 sts, sc2tog) repeat around. (30) – Begin decreasing.
- Round 14: (Sc in next 3 sts, sc2tog) repeat around. (24)
- Round 15: (Sc in next 2 sts, sc2tog) repeat around. (18)
- Stuff firmly with fiberfill. Make sure the head is round and firm, but not overstuffed.
- Round 16: (Sc in next st, sc2tog) repeat around. (12)
- Round 17: Sc2tog around. (6)
- Fasten off, leaving a tail. Weave the tail through the front loops of the remaining 6 stitches and pull tight to close. Weave in the end securely.
Body
Work in continuous rounds.
- With MC, make a magic ring.
- Round 1: 6 sc in ring. (6)
- Round 2: 2 sc in each st around. (12)
- Round 3: (Sc in next st, 2 sc in next st) repeat around. (18)
- Round 4: (Sc in next 2 sts, 2 sc in next st) repeat around. (24)
- Round 5: (Sc in next 3 sts, 2 sc in next st) repeat around. (30)
- Round 6: (Sc in next 4 sts, 2 sc in next st) repeat around. (36)
- Round 7: (Sc in next 5 sts, 2 sc in next st) repeat around. (42)
- Rounds 8-14: Sc in each st around. (42) – This creates the height of the body.
- Round 15: (Sc in next 5 sts, sc2tog) repeat around. (36) – Begin decreasing.
- Round 16: (Sc in next 4 sts, sc2tog) repeat around. (30)
- Round 17: (Sc in next 3 sts, sc2tog) repeat around. (24)
- Stuff firmly with fiberfill. The body should be plump and round.
- Round 18: (Sc in next 2 sts, sc2tog) repeat around. (18)
- Round 19: (Sc in next st, sc2tog) repeat around. (12)
- Fasten off, leaving a long tail (about 12 inches) for sewing. Do not stuff the remaining opening fully—leave it slightly flat so it attaches neatly to the head.
- Attach body to head: Position the head on top of the body, aligning the decreases. Using the long tail, sew the body to the head with a whip stitch, going through the front loops of the body's last round and the back loops of the head's last round. Weave in the end securely.
Hat
Work in continuous rounds.
- With CC1 (charcoal), make a magic ring.
- Round 1: 6 sc in ring. (6)
- Round 2: 2 sc in each st around. (12)
- Round 3: (Sc in next st, 2 sc in next st) repeat around. (18)
- Round 4: (Sc in next 2 sts, 2 sc in next st) repeat around. (24)
- Round 5: Sc in each st around. (24)
- Round 6: Sc in back loops only around. (24) – This creates the fold line for the brim.
- Rounds 7-10: Sc in each st around. (24) – Work through both loops from now on.
- Round 11: (Sc in next 2 sts, sc2tog) repeat around. (18) – Begin shaping the top.
- Round 12: Sc in each st around. (18)
- Fasten off, leaving a tail. Weave in the end. Fold the brim up at the back-loop-only round so it sits naturally. Optionally, add a loop of yarn at the top for hanging.
Scarf
Work in rows.
- With CC1, ch 45.
- Row 1: Sc in 2nd ch from hook and across. (44 stitches)
- Row 2: Ch 1, turn, sc in each st across. (44)
- Fasten off, weave in ends. Tie the scarf around the snowman's neck, just below the head. You can leave the ends hanging or knot them for a cozy look.
Arms (Make 2)
Work in continuous rounds.
- With MC, make a magic ring.
- Round 1: 6 sc in ring. (6)
- Rounds 2-6: Sc in each st around. (6) – This creates a small tube.
- Fasten off, leaving a long tail (about 8 inches). Do not stuff the arms—they should remain slightly flat.
- Attach arms: Sew each arm to the sides of the body, about 2-3 rounds below the neck. Position them so they point slightly outward or downward. Weave in ends.
Nose
Work in continuous rounds.
- With CC2 (burnt orange), make a magic ring.
- Round 1: 4 sc in ring. (4)
- Round 2: Sc in each st around. (4)
- Round 3: (Sc in next st, 2 sc in next st) repeat around. (6)
- Fasten off, leaving a tail. Stuff lightly with a tiny bit of fiberfill. Sew the nose to the center of the face, between rounds 10-12 of the head. Weave in ends.
Buttons (Make 3)
Work in continuous rounds.
- With CC1, make a magic ring.
- Round 1: 6 sc in ring. (6)
- Fasten off, leaving a tail. Do not stuff. Sew the buttons down the front center of the body, spacing them evenly (about 3-4 rounds apart). Weave in ends.
Eyes
Using black yarn, embroider two French knots or sew on small black buttons for eyes. Position them on the face, about 4-5 stitches apart, between rounds 9-11 of the head. If using French knots, wrap the yarn around the needle 2-3 times for a neat, round eye.
Finishing
- Weave in all remaining ends securely.
- Optionally, add a loop of yarn at the top of the hat for hanging.
- Gently shape the snowman by adjusting the stuffing and positioning the arms, scarf, and hat.
Your Frosty Flurry Snowman is now complete! Display it proudly on a shelf, mantel, or give it as a heartfelt handmade gift. Enjoy the cozy, vintage charm of your new winter friend!



