The Enchanted Spire Top Hat: A Free Crochet Pattern for a Mysterious, Textured Hat
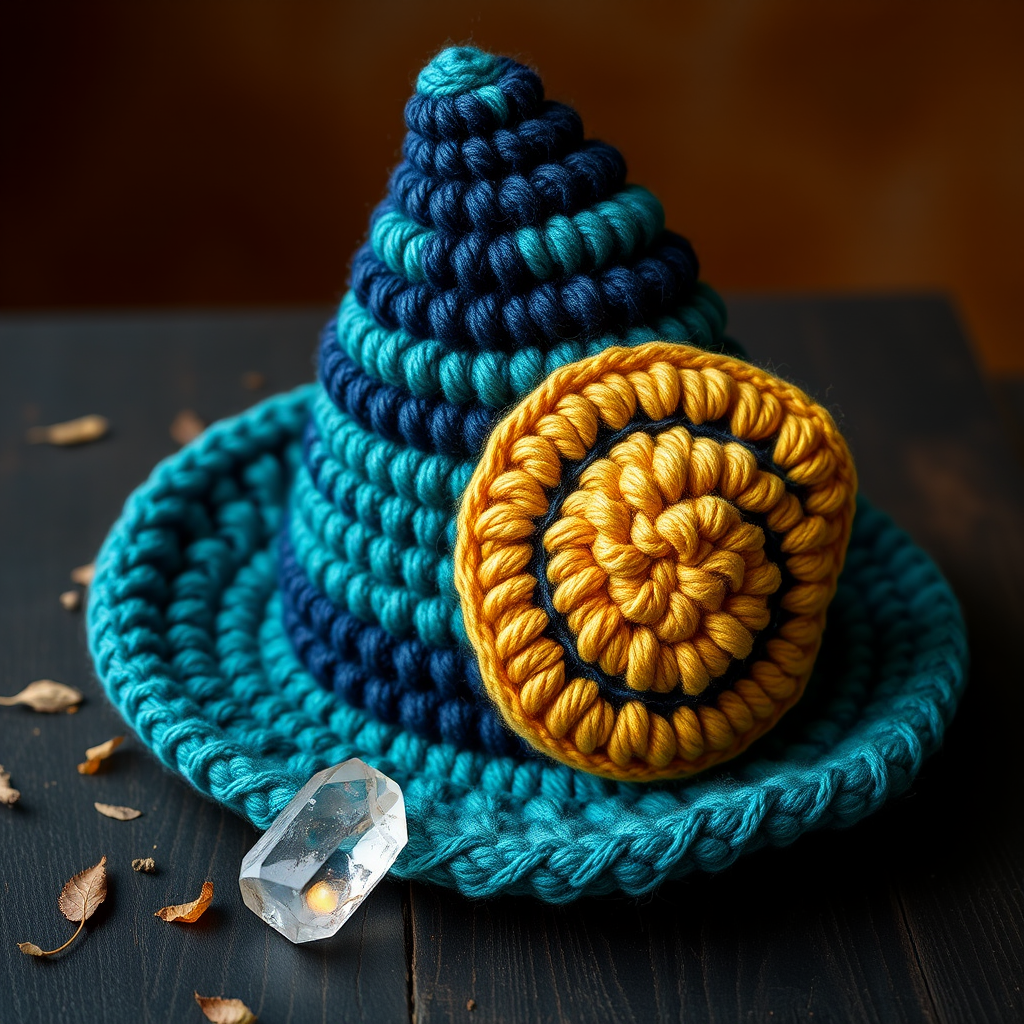
Introduction: Craft Your Own Enchanted Spire Top Hat
Step into a world of whimsy and mystery with this free crochet pattern for the Enchanted Spire Top Hat. This project is perfect for adding a touch of fantasy to your costume, home decor, or next creative photoshoot. Featuring a tall, pointed crown and a wide, textured brim with a mesmerizing spiral detail, this hat is crafted using Red Heart Super Saver yarn in rich jewel tones—Deep Teal, Midnight Blue, and Gold. The result is a soft yet structured hat that stands on its own, ready to become a magical centerpiece in your collection. Whether you're a seasoned crocheter or a confident beginner, this pattern will guide you through every step to create a truly enchanting accessory.
Materials Needed
Before you begin, gather the following materials to ensure a smooth and enjoyable crafting experience:
- Yarn: Red Heart Super Saver (100% acrylic, worsted weight, 7 oz/198 g, 364 yds/333 m) in the following colors:
- Deep Teal (main color) – for the crown
- Midnight Blue (accent) – for the brim
- Gold (trim) – for the spiral texture
- Crochet Hooks:
- Size H/8 (5.0 mm) – for the main body of the hat and brim
- Size G/6 (4.0 mm) – for the spiral texture detail
- Other Supplies:
- Stitch marker (to mark the beginning of rounds)
- Yarn needle (for weaving in ends and sewing pieces together)
- Scissors
- Gauge: 14 single crochet stitches x 16 rows = 4 inches (10 cm) using the H/8 (5.0 mm) hook. Note: Gauge is not critical for this project, but matching it will help achieve the intended size and structure.
Step-by-Step Instructions
Important Notes Before You Start
- Work in continuous rounds unless stated otherwise. Do not join at the end of each round; simply continue to the next round.
- Use a stitch marker to mark the first stitch of each round. Move the marker up as you work.
- All stitches are worked in single crochet (sc) unless otherwise specified.
- “2 sc in next st” means to work two single crochet stitches into the same stitch (an increase).
Part 1: Hat Crown (Pointed Top)
Using H/8 (5.0 mm) hook and Deep Teal yarn.
- Round 1: Make a magic ring. Work 6 single crochet (sc) into the ring. Pull the ring tight to close. (6 stitches)
- Round 2: Work 2 sc in each stitch around. (12 stitches)
- Round 3: *Sc in the next stitch, 2 sc in the next stitch* – repeat from * to * around. (18 stitches)
- Round 4: *Sc in the next 2 stitches, 2 sc in the next stitch* – repeat from * to * around. (24 stitches)
- Round 5: *Sc in the next 3 stitches, 2 sc in the next stitch* – repeat from * to * around. (30 stitches)
- Round 6: *Sc in the next 4 stitches, 2 sc in the next stitch* – repeat from * to * around. (36 stitches)
- Round 7: *Sc in the next 5 stitches, 2 sc in the next stitch* – repeat from * to * around. (42 stitches)
- Round 8: *Sc in the next 6 stitches, 2 sc in the next stitch* – repeat from * to * around. (48 stitches)
- Round 9: *Sc in the next 7 stitches, 2 sc in the next stitch* – repeat from * to * around. (54 stitches)
- Rounds 10-20: Sc in each stitch around. Do not increase. (54 stitches each round) – This creates the tall, pointed crown. Continue until the crown measures approximately 6-7 inches from the tip.
- Finish: Fasten off, leaving a long tail (about 18 inches) for sewing the crown to the brim. Weave in the starting tail from the magic ring.
Part 2: Hat Brim (Spiral Texture Base)
Using H/8 (5.0 mm) hook and Midnight Blue yarn.
- Round 1: Make a magic ring. Work 6 sc into the ring. Pull tight. (6 stitches)
- Round 2: 2 sc in each stitch around. (12 stitches)
- Round 3: *Sc in next stitch, 2 sc in next stitch* – repeat around. (18 stitches)
- Round 4: *Sc in next 2 stitches, 2 sc in next stitch* – repeat around. (24 stitches)
- Round 5: *Sc in next 3 stitches, 2 sc in next stitch* – repeat around. (30 stitches)
- Round 6: *Sc in next 4 stitches, 2 sc in next stitch* – repeat around. (36 stitches)
- Round 7: *Sc in next 5 stitches, 2 sc in next stitch* – repeat around. (42 stitches)
- Round 8: *Sc in next 6 stitches, 2 sc in next stitch* – repeat around. (48 stitches)
- Round 9: *Sc in next 7 stitches, 2 sc in next stitch* – repeat around. (54 stitches)
- Round 10: *Sc in next 8 stitches, 2 sc in next stitch* – repeat around. (60 stitches)
- Round 11: *Sc in next 9 stitches, 2 sc in next stitch* – repeat around. (66 stitches)
- Round 12: *Sc in next 10 stitches, 2 sc in next stitch* – repeat around. (72 stitches)
- Round 13: *Sc in next 11 stitches, 2 sc in next stitch* – repeat around. (78 stitches)
- Round 14: *Sc in next 12 stitches, 2 sc in next stitch* – repeat around. (84 stitches)
- Round 15: *Sc in next 13 stitches, 2 sc in next stitch* – repeat around. (90 stitches)
- Round 16: *Sc in next 14 stitches, 2 sc in next stitch* – repeat around. (96 stitches)
- Round 17: *Sc in next 15 stitches, 2 sc in next stitch* – repeat around. (102 stitches)
- Round 18: *Sc in next 16 stitches, 2 sc in next stitch* – repeat around. (108 stitches)
- Round 19: *Sc in next 17 stitches, 2 sc in next stitch* – repeat around. (114 stitches)
- Round 20: *Sc in next 18 stitches, 2 sc in next stitch* – repeat around. (120 stitches)
- Round 21: *Sc in next 19 stitches, 2 sc in next stitch* – repeat around. (126 stitches)
- Round 22: *Sc in next 20 stitches, 2 sc in next stitch* – repeat around. (132 stitches)
- Round 23: *Sc in next 21 stitches, 2 sc in next stitch* – repeat around. (138 stitches)
- Round 24: *Sc in next 22 stitches, 2 sc in next stitch* – repeat around. (144 stitches)
- Round 25: *Sc in next 23 stitches, 2 sc in next stitch* – repeat around. (150 stitches)
- Round 26: *Sc in next 24 stitches, 2 sc in next stitch* – repeat around. (156 stitches)
- Round 27: *Sc in next 25 stitches, 2 sc in next stitch* – repeat around. (162 stitches)
- Round 28: *Sc in next 26 stitches, 2 sc in next stitch* – repeat around. (168 stitches)
- Round 29: *Sc in next 27 stitches, 2 sc in next stitch* – repeat around. (174 stitches)
- Round 30: *Sc in next 28 stitches, 2 sc in next stitch* – repeat around. (180 stitches)
- Finish: Fasten off, leaving a long tail (about 18 inches) for sewing. Weave in the starting tail.
Part 3: Spiral Texture (Brim Detail)
Using G/6 (4.0 mm) hook and Gold yarn.
- Attach yarn: With the right side of the brim facing you, attach the Gold yarn to any stitch on the outer edge of the brim using a slip stitch.
- Round 1: Chain 1. *Single crochet (sc) in the next stitch, chain 3, skip 2 stitches* – repeat from * to * all the way around the brim. Join with a slip stitch to the first sc. You should have 60 chain-3 spaces. (Note: If your stitch count is slightly different, adjust the number of skipped stitches to maintain a consistent spiral pattern.)
- Round 2: Slip stitch into the first chain-3 space. Chain 1. *Work 5 double crochet (dc) into the same chain-3 space, slip stitch into the next chain-3 space* – repeat from * to * around. Join with a slip stitch to the first sc. Fasten off and weave in the end.
Part 4: Assembly
- Position the crown: Place the crown inside the brim, aligning the edges. The brim should be larger than the crown opening, so the crown sits centered on the brim. The right sides of both pieces should be facing outward.
- Sew the crown to the brim: Thread the long tail from the crown onto a yarn needle. Using a whip stitch, sew the crown to the brim, working through both layers. Make sure to catch the stitches of the crown’s last round and the brim’s inner edge (the first round of the brim). Sew all the way around, ensuring the crown is centered and secure.
- Weave in ends: Weave in all remaining yarn tails using the yarn needle. Trim any excess yarn.
Part 5: Finishing Touches (Optional)
For an extra magical touch, add a decorative band around the base of the crown:
- Using Gold yarn and the G/6 (4.0 mm) hook, chain a length that fits snugly around the base of the crown (where it meets the brim).
- Single crochet in each chain across. Fasten off, leaving a tail for sewing.
- Sew the band in place around the crown, just above the brim. Weave in ends.
Your Enchanted Spire Top Hat is now complete! Display it proudly on a shelf, use it as a costume piece, or gift it to a fellow fantasy lover. The rich jewel tones and spiral texture make it a truly one-of-a-kind creation.



