The Bonekeeper's Lament: A Free Crochet Pattern for a Hauntingly Beautiful Skull and Crossbones Amigurumi
Introduction: A Cozy Gothic Treasure
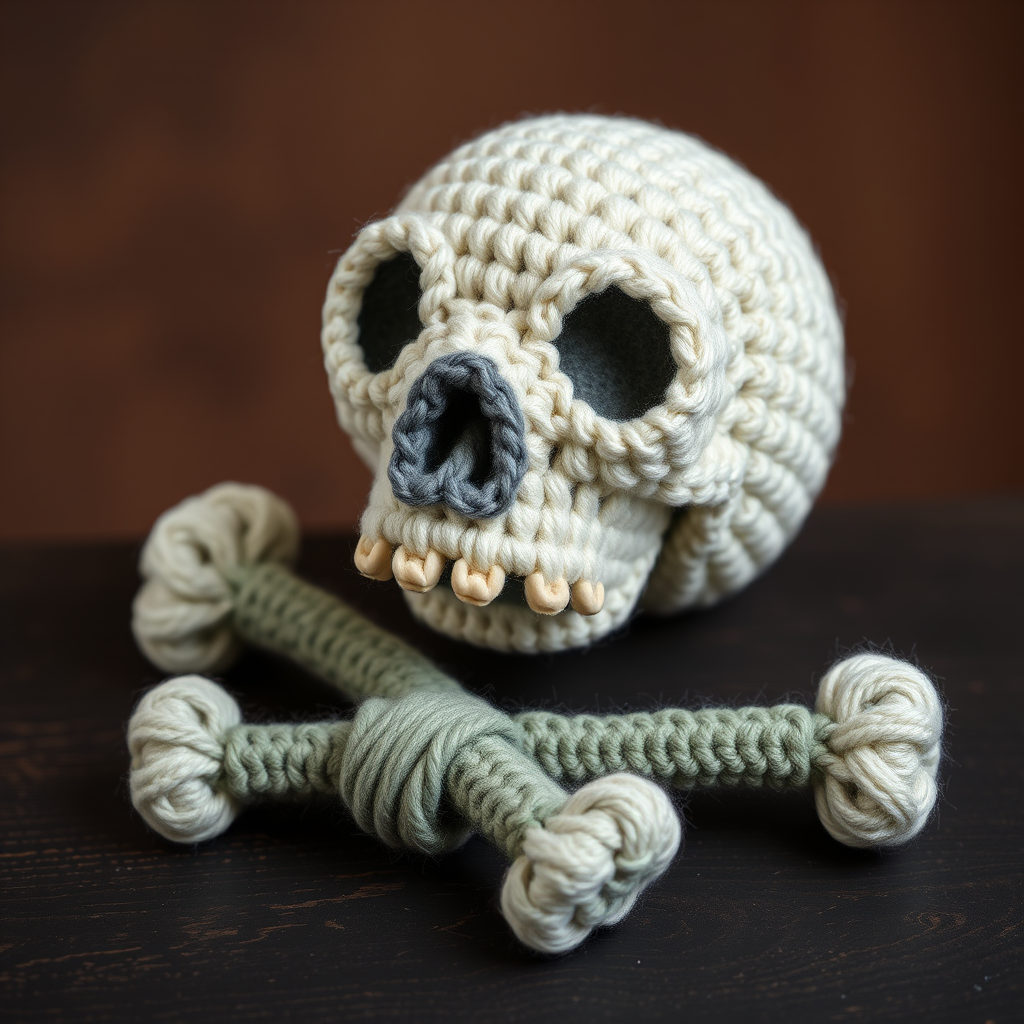
Welcome, fellow yarn enthusiasts! Today, we're diving into a project that perfectly balances the eerie with the adorable: The Bonekeeper's Lament. This isn't your typical Halloween decoration; it's a soft, textured amigurumi skull and crossbones designed to be a hauntingly beautiful piece for year-round display. Using a muted, earthy palette of warm cream, deep charcoal, and sage green, this pattern creates a cozy gothic aesthetic that feels more like a treasured heirloom than a spooky prop. Whether you're a seasoned amigurumi maker or a confident beginner looking for a rewarding challenge, this pattern will guide you through creating a truly unique and captivating piece. Let's get started on crafting your own soft, eerie treasure.
Materials Needed: Gathering Your Supplies
Before we begin, let's ensure you have everything you need. The key to a successful amigurumi is using the right materials to achieve a tight, firm fabric that holds its shape and hides the stuffing.
Yarn
You will need worsted weight (#4) yarn in three colors. The exact yardage is approximate, but having a bit extra is always a good idea.
- Color A (Bone): A warm, off-white or cream. Approximately 100g (about 200-220 yards).
- Color B (Shadow): A deep charcoal or dark grey. Approximately 50g (about 100-110 yards).
- Color C (Moss): A muted, sage green. Approximately 20g (about 40-50 yards).
Hook and Notions
- Crochet Hook: Size G/4.0mm (or the size needed to achieve a tight gauge).
- Stitch Markers: Essential for keeping track of your rounds.
- Tapestry Needle: For sewing pieces together and weaving in ends.
- Polyester Fiberfill Stuffing: For filling the skull and bones.
- Scissors: For cutting yarn.
Gauge
Gauge is not critical for amigurumi, but you should aim for a tight fabric to prevent the stuffing from showing through. A good target is 4 single crochets (sc) x 4 rows = 1 inch. If your stitches are loose, try using a smaller hook.
Step-by-Step Instructions: Crafting the Bonekeeper's Lament
Important Notes: This pattern is worked in continuous rounds (spiral) unless stated otherwise. Use a stitch marker to mark the beginning of each round. Stuff the pieces firmly as you go to ensure they hold their shape. Do not overstuff, as this can distort the stitches.
Part 1: The Skull (Make 1)
Using Color A (Bone).
Head
R1: Make a magic ring, work 6 single crochet (sc) into the ring. (6 stitches)
R2: Increase (inc) in each stitch around. (12 stitches)
R3: (Sc in next stitch, inc) repeat around. (18 stitches)
R4: (Sc in next 2 stitches, inc) repeat around. (24 stitches)
R5: (Sc in next 3 stitches, inc) repeat around. (30 stitches)
R6: (Sc in next 4 stitches, inc) repeat around. (36 stitches)
R7-12: Sc in each stitch around for 6 rounds. (36 stitches)
R13: (Sc in next 4 stitches, decrease (dec)) repeat around. (30 stitches)
R14: (Sc in next 3 stitches, dec) repeat around. (24 stitches)
R15: (Sc in next 2 stitches, dec) repeat around. (18 stitches)
R16: (Sc in next stitch, dec) repeat around. (12 stitches)
Fasten off, leaving a long tail (about 18 inches) for sewing. Stuff the head firmly, shaping it into a smooth, rounded dome.
Jaw
R1: Magic ring, 6 sc into ring. (6 stitches)
R2: Inc in each stitch around. (12 stitches)
R3: (Sc in next stitch, inc) repeat around. (18 stitches)
R4-5: Sc in each stitch around for 2 rounds. (18 stitches)
R6: (Sc in next 2 stitches, dec) repeat around. (12 stitches)
Fasten off, leaving a long tail for sewing. Stuff the jaw lightly, just enough to give it shape but keep it slightly flat.
Eye Sockets (Make 2)
Using Color B (Shadow).
R1: Magic ring, 6 sc into ring. (6 stitches)
R2: Inc in each stitch around. (12 stitches)
Fasten off, leaving a tail for sewing. Do not stuff.
Nose Cavity
Using Color B (Shadow).
R1: Magic ring, 6 sc into ring. (6 stitches)
R2: (Sc in next stitch, inc) repeat around. (9 stitches)
Fasten off, leaving a tail for sewing. Do not stuff.
Teeth (Make 6)
Using Color A (Bone).
R1: Magic ring, 4 sc into ring. (4 stitches)
R2: Sc in each stitch around. (4 stitches)
Fasten off, leaving a tail for sewing. Do not stuff. These are small, solid cylinders.
Skull Assembly
- Attach the Jaw: Position the jaw at the bottom of the head, aligning the back edges. The jaw should be slightly open, creating a gap between the top of the jaw and the bottom of the head. Using the long tail from the jaw, sew it securely to the head. Weave in the end.
- Attach the Eye Sockets: Position the eye sockets on the front of the head, centered and about 4 rounds apart. They should sit symmetrically. Using the tails, sew them in place, working around the edge. Weave in the ends.
- Attach the Nose Cavity: Position the nose cavity below and between the eye sockets, centered. Sew it in place using its tail. Weave in the end.
- Attach the Teeth: Sew 3 teeth along the top edge of the jaw (the lower teeth) and 3 along the bottom edge of the head (the upper teeth). Position them evenly spaced. Use the tails to sew each tooth securely. Weave in all ends.
Part 2: The Crossbones (Make 2)
Using Color C (Moss). Each crossbone is made from two long bones that are crossed and sewn together.
Long Bone (Make 4 total, 2 for each crossbone)
R1: Magic ring, 6 sc into ring. (6 stitches)
R2-8: Sc in each stitch around for 7 rounds. (6 stitches)
R9: (Sc in next stitch, inc) repeat around. (9 stitches)
R10-12: Sc in each stitch around for 3 rounds. (9 stitches)
R13: (Sc in next stitch, dec) repeat around. (6 stitches)
R14-20: Sc in each stitch around for 7 rounds. (6 stitches)
Fasten off, leaving a tail for sewing. Stuff the bone lightly, ensuring the bulbous end (from the increases) is slightly firmer than the shaft.
Crossbone Assembly
- Take two long bones. Cross them in an X shape, with the bulbous ends pointing outward.
- Using a tapestry needle and Color C yarn, sew the bones together at the center intersection. Wrap the yarn around the crossing point several times to secure them tightly. Weave in the ends.
- Repeat for the second crossbone.
Part 3: Final Assembly
- Position the Skull: Place the skull on top of the two crossbones, centered. The crossbones should be positioned so they are visible from the front, with one slightly in front of the other for depth.
- Attach the Skull: Using a tapestry needle and Color A yarn (the long tail from the head), sew the skull to the crossbones at the base of the skull. Make several passes through the crossbones and the bottom of the skull to ensure it is securely attached. Weave in the end.
- Final Touches: Weave in any remaining ends from the crossbones and skull. Ensure all pieces are securely attached.
- Optional Hanging Loop: If you wish to hang your creation, cut a length of Color A yarn (about 12 inches). Fold it in half and use a tapestry needle to pull the loop through the top of the skull. Thread the ends through the loop and pull tight to create a hanging loop. Weave in the ends.
Congratulations! You have completed The Bonekeeper's Lament. Display your hauntingly beautiful creation on a shelf, mantelpiece, or hang it for a touch of cozy gothic charm. Enjoy your new, soft, eerie treasure.



