Terra Stripe Crochet Ear Saver Band Free Pattern
Terra Stripe Crochet Ear Saver Band – Free Beginner Pattern
Introduction
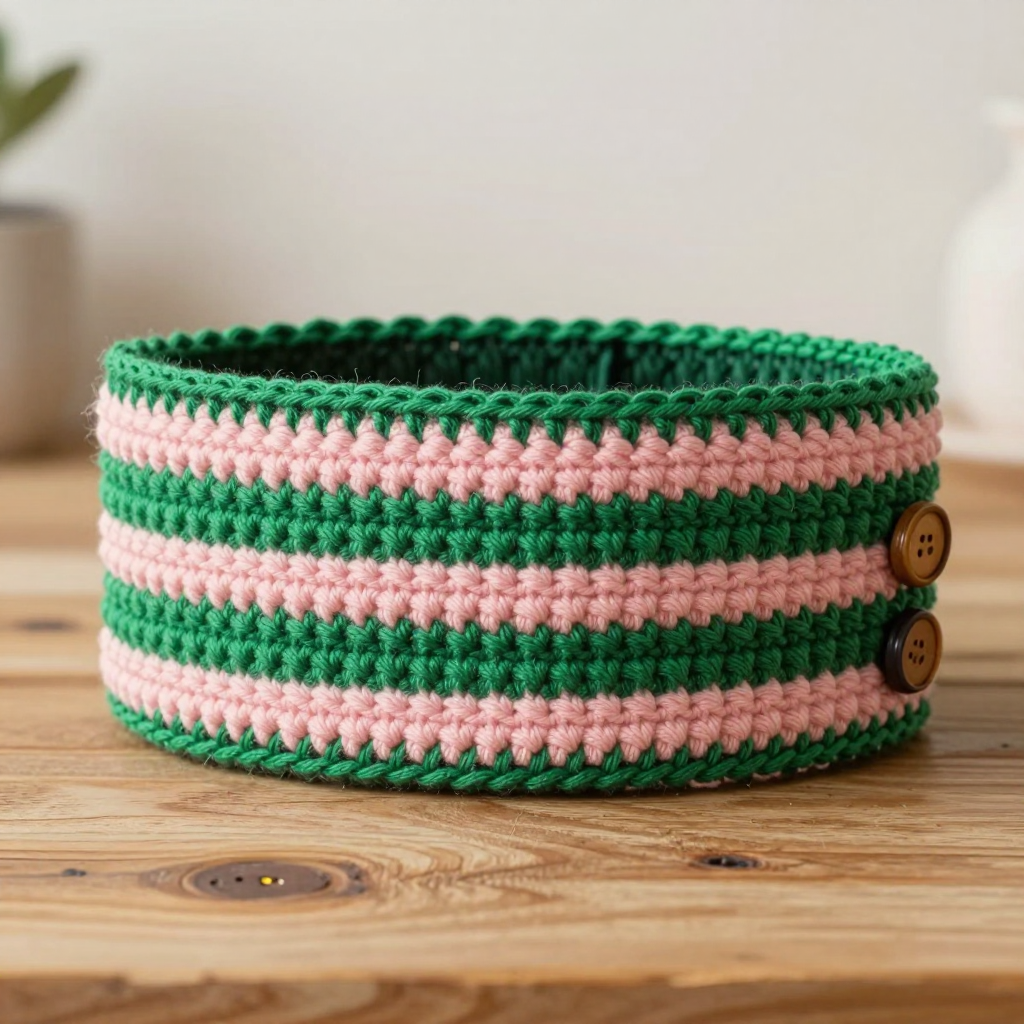
If you have ever worn a face mask for more than ten minutes and felt the straps digging into the backs of your ears, this little project is for you. The Terra Stripe Ear Saver Band is a wide, flat crocheted strip in bold emerald green and blush pink stripes, seamed into a short tube and finished with two button-and-loop closures that hold mask straps comfortably off your ears. It is perfect for complete beginners because it uses only one stitch — single crochet — worked back and forth in simple rows, and it takes most people under two hours from first chain to final button. The finished band feels firm but soft against the back of your head, with a dense, slightly ridged texture and crisp, visible stitch definition that makes the desert-boho stripes really pop. It is a small, satisfying project you can finish in an evening and gift the same week.
Materials Needed
- Yarn: Bulky (weight 5) acrylic or cotton-blend yarn, approximately 55 yards total: about 35 yards emerald green (Color A) and 20 yards blush pink (Color B).
- Crochet hook: K/10.5 (6.5 mm).
- Stitch markers: 2 (helpful for marking button and loop placement).
- Tapestry needle: a blunt-tipped needle with a large eye, for seaming and weaving in ends.
- Scissors.
- Two buttons: 3/4 inch (2 cm) round buttons.
- Finished size: 6 inches wide x 9 inches long (15 x 23 cm) before seaming; forms a tube approximately 6 inches tall x 4.5 inches around when closed.
Abbreviations and Beginner Glossary
- ch – chain. Make a loop with the yarn, pull the working yarn through it, and repeat. Each loop you pull through is one chain.
- sc – single crochet. Insert your hook into the stitch, yarn over (wrap the yarn around the hook), pull up a loop (you now have 2 loops on the hook), yarn over again, and pull through both loops. One single crochet made.
- st / sts – stitch / stitches. A "stitch" is one completed single crochet (or one chain).
- sl st – slip stitch. Insert your hook into the stitch, yarn over, and pull the yarn straight through both the stitch and the loop on your hook in one motion. It makes a nearly invisible joining stitch.
- turning ch 1 – the one chain you make at the start of a row before you flip your work around. It gives you height to start the next row. In this pattern it does not count as a stitch.
- yarn over – wrapping the working yarn around your hook from back to front.
- fasten off – cut the yarn a few inches from your work, pull the tail all the way through the last loop on your hook, and tug gently to lock it.
- weave in ends – thread a yarn tail onto a tapestry needle and run it back and forth through the fabric so it disappears and cannot unravel.
- whipstitch – a simple seaming stitch: pass the needle over the edge of both pieces and back through, over and over, like a spiral of small stitches.
- mattress stitch – a seaming stitch that goes back and forth between the two edges, creating a nearly invisible flat seam.
- row-end – the little side edge of your work where each row turns. You will work into these when you make the edging.
- right sides together – placing the two "good" (front) faces of the fabric against each other so the seam ends up hidden inside.
- steam-block – gently applying steam (from an iron held above, never touching) to relax the yarn and flatten the fabric.
Gauge
Gauge: 12 single crochet stitches x 13 rows = 4 inches (10 cm).
Gauge means how many stitches and rows fit into a square of fabric. It matters because it controls the finished size: if your stitches are much bigger than 12 to 4 inches, your band will be floppy and too large to hold mask straps snugly; if they are much smaller, the band will be stiff and too short. To check, crochet a small practice square about 5 inches wide and 5 inches tall in single crochet, lay it flat, and measure 4 inches across the middle with a ruler — count how many stitches fit in those 4 inches. If you get more than 12, try a larger hook; if you get fewer, try a smaller hook. Gauge is not critical for fit here, but matching it keeps the band firm enough to hold straps.
Beginner Tips Before You Start
- Count every row. Single crochet rows all look alike, so keep a tally on paper or with a row counter. You need exactly 30 rows before the edging.
- Do not pull the yarn too tight. Tension is how hard you tug the yarn. Aim for even, relaxed stitches — tight stitches make the band stiff and hard to work into.
- Carry Color A up the side. Do not cut the green yarn between stripes. Leave it hanging loosely along the edge and pick it up again when you need it. Loose carrying keeps the edge from puckering.
- Change color on the last stitch of the row. Work the final single crochet of the row until only two loops remain on your hook, then pull the new color through to finish it. This gives a clean stripe edge.
- Use stitch markers to mark where your two button loops will go (about 2 inches apart, centered) before you make them.
- Remember the turning chain is not a stitch. Your first single crochet of each row goes into the very first stitch, not into the chain.
Step-by-Step Instructions
Notes Before You Begin
The band is worked flat in single crochet, back and forth in rows, changing color every 4 rows for bold stripes. The turning ch 1 does not count as a stitch. All stitch counts are given in parentheses at the end of each row.
Body of the Band
Set-up: With Color A (emerald), ch 19.
Row 1: Sc in the 2nd ch from hook and in each ch across. (18 sc)
Row 2: Ch 1, turn. Sc in each st across. (18 sc)
Row 3: Ch 1, turn. Sc in each st across. (18 sc)
Row 4: Ch 1, turn. Sc in each st across. (18 sc) Change to Color B (blush) on the last stitch of this row.
Rows 5–8: With Color B, ch 1, turn. Sc in each st across. (18 sc) Change to Color A at the end of Row 8.
Rows 9–12: With Color A, ch 1, turn. Sc in each st across. (18 sc) Change to Color B at the end of Row 12.
Rows 13–16: With Color B, ch 1, turn. Sc in each st across. (18 sc) Change to Color A at the end of Row 16.
Rows 17–20: With Color A, ch 1, turn. Sc in each st across. (18 sc) Change to Color B at the end of Row 20.
Rows 21–24: With Color B, ch 1, turn. Sc in each st across. (18 sc) Change to Color A at the end of Row 24.
Rows 25–28: With Color A, ch 1, turn. Sc in each st across. (18 sc) Change to Color B at the end of Row 28.
Rows 29–30: With Color B, ch 1, turn. Sc in each st across. (18 sc)
Fasten off Color B. Do not fasten off Color A yet — you will use it for the edging. You now have a rectangle of 18 stitches wide and 30 rows tall, approximately 6 inches wide by 9 inches long.
Edging
Round 1: With Color A, work 1 round of sc evenly around the entire rectangle: 18 sc along each long edge and 1 sc in each row-end along the short edges (30 sc per short edge), working 3 sc in each corner to turn smoothly. Join with a sl st to the first sc. (18 + 30 + 18 + 30 + 4 corner stitches = 100 sc) Fasten off and weave in ends.
Seaming Into a Tube
Fold the rectangle in half with right sides together so the two short ends meet, forming a tube approximately 6 inches tall and 4.5 inches around. Using Color A and a tapestry needle, whipstitch or mattress-stitch the short ends together. Turn the tube right side out and gently flatten the seam to the inside.
Button Loops
Make 2 loops along one long edge of the tube, spaced about 2 inches apart and centered on the band. Mark both spots with stitch markers first.
Loop 1: Join Color A with a sl st at the marked spot. Ch 8, sl st in the same stitch to form a loop. Fasten off.
Loop 2: Repeat 2 inches from the first loop. Weave in ends.
Buttons
Sew one 3/4-inch button on the opposite long edge directly across from each loop, using Color A and a tapestry needle. Buttons should sit snugly so the loops hold securely.
Assembly and Finishing
Seaming: If you have not already seamed the tube, thread a tapestry needle with Color A, hold the two short ends together with right sides facing, and work small whipstitches over the edge of both layers, catching one stitch from each side every time. Keep the stitches even and not too tight, or the seam will pucker. When you reach the end, knot the yarn on the inside and trim.
Weaving in ends: Thread each yarn tail onto the tapestry needle and run it back and forth through the inside of the fabric for about 2 inches, changing direction once so it locks in place. Trim close to the fabric.
Blocking: Lay the band flat on a towel. Hold a steam iron an inch or two above the fabric (never touching it) and let the steam relax the yarn. Pat the band flat with your hands and let it dry completely. Avoid steaming directly over the buttons.
To use: Slip mask straps through the loops and button closed, or wrap the band around the back of the head and secure the loops over the buttons.
Pro Tips and Variations
- Change the stripe colors: Swap emerald and blush for any two bulky yarn colors you love — mustard and cream, navy and sage, or charcoal and rust all look great in this desert-boho style. Keep the same 4-row stripe rhythm.
- Adjust the size: For a wider band, add chains in multiples of 2 at the start (for example, ch 23 for a 7-inch-wide band). For a longer band, add rows in groups of 4 so the stripes stay even.
- Substitute yarn: Two strands of worsted (weight 4) yarn held together will substitute for bulky yarn. Always crochet a gauge swatch first so the band stays firm.
- Add a hanging loop or keychain: Make one extra loop at the end of the band and attach a small clip so the ear saver can hang from a bag or lanyard when not in use.