Teal Frost Messy Bun Beanie Free Crochet Pattern
Teal Frost Messy Bun Beanie — Free Beginner Crochet Pattern
Introduction
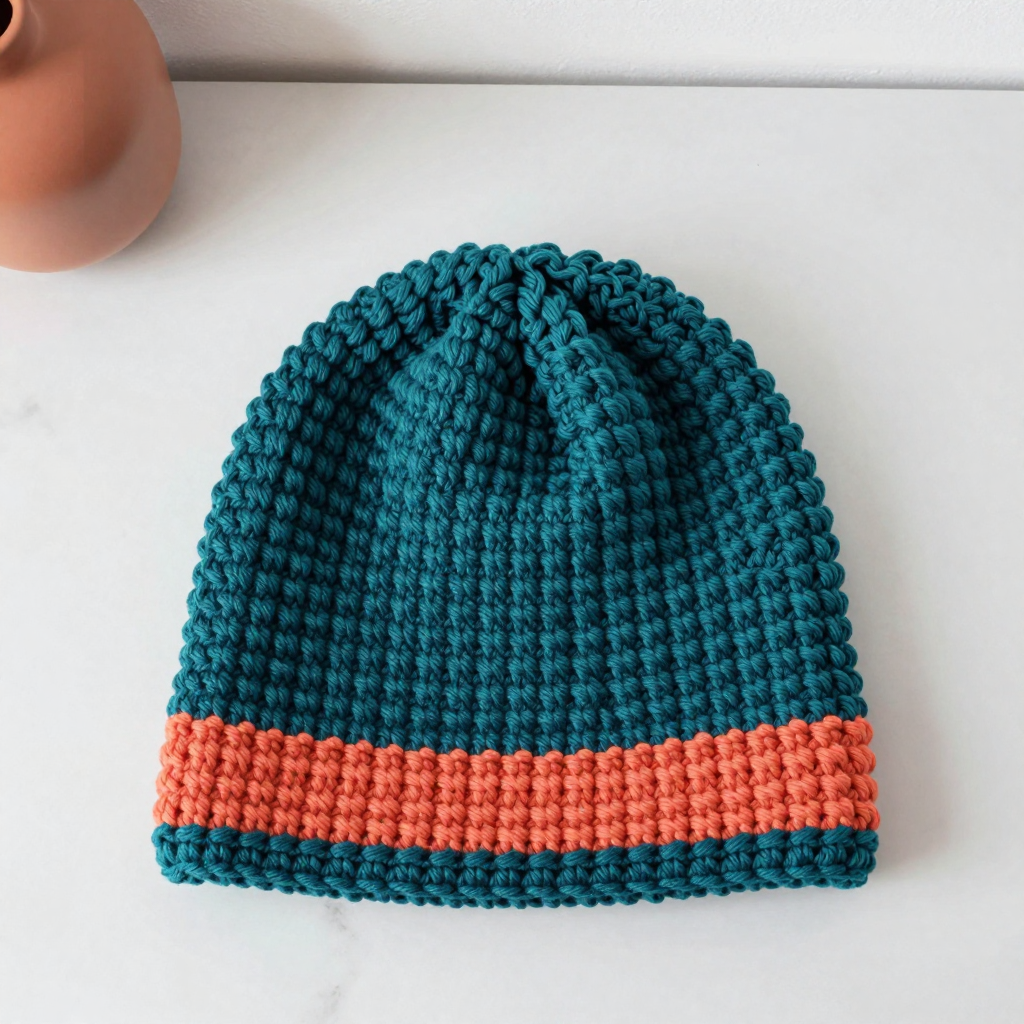
If you have never held a crochet hook before, this is the perfect first project for you. The Teal Frost Messy Bun Beanie is a simple straight tube of half double crochet stitches, worked in one continuous spiral from the brim upward, with an open circle at the top so your hair can pop out in a bun or ponytail. It is made from chunky, forgiving yarn and two bold coral stripes that make the finished hat look far more complicated than it actually is. When you are done, you will have a cozy, slightly stretchy, matte-finish beanie about 6.5 inches tall that sits snugly around your head and frames your bun with a clean teal ring. There is no shaping, no decreasing, and no sewing pieces together — just one tube, two colors, and a whole lot of "I can't believe I made this."
Materials Needed
- Yarn: Bulky (weight 5) acrylic yarn, approximately 110–120 yards total — 90 yards teal (Color A) and 20–25 yards coral (Color B). One standard skein of bulky yarn is usually enough for the teal, and a small leftover ball covers the coral.
- Crochet hook: Size I/9 (5.5 mm). (The number before the slash is the US size; the number in parentheses is the metric size in millimeters. They are the same hook.)
- Stitch marker: One removable marker or a scrap of contrasting yarn. This marks where each round begins.
- Tapestry needle: A blunt-tipped yarn needle with a large eye, for weaving in the yarn tails at the end.
- Scissors: Any sharp pair for cutting yarn.
- Finished size: Adult, approximately 6.5 inches tall × 10 inches wide when laid flat and unstretched, fitting a 21–23 inch head circumference. The open crown circle measures about 3 inches in diameter for the bun.
Abbreviations and Beginner Glossary
Every abbreviation used in this pattern is listed below with a plain-English explanation. Read through this once before you start — it will make the instructions feel like a normal sentence instead of code.
- ch — chain: Make a loop of yarn on your hook (a slip knot), then wrap the yarn over the hook and pull it through the loop already on the hook. That is one chain. A row of chains is the foundation you build stitches into.
- hdc — half double crochet: Wrap the yarn over your hook once, insert the hook into the next stitch, wrap the yarn over again and pull up a loop (you now have 3 loops on the hook), then wrap the yarn over one more time and pull it through all 3 loops at once. One loop remains — that is your finished hdc.
- sl st — slip stitch: Insert the hook into the stitch, wrap the yarn over, and pull it straight through both the stitch and the loop on your hook in one motion. It makes a nearly invisible joining stitch.
- st / sts — stitch / stitches: A single completed stitch, or several of them.
- rnd — round: One complete trip around the circle of the hat. (A "row" goes back and forth; a "round" goes around in a circle. This hat is all rounds.)
- join with a sl st: After working all the way around, slip stitch into the first stitch of that round to close the circle.
- fasten off: Cut the yarn leaving a tail, then pull the tail all the way through the last loop on your hook to lock it.
- Color A / Color B: Color A is teal (the main color). Color B is coral (the stripes).
Gauge
Gauge: 8 hdc × 7 rounds = 2 inches square, worked in the round.
Why gauge matters: Gauge is simply how big your stitches turn out. If your stitches are larger than the pattern's, the hat will be too big and slide off; if they are smaller, it will be too tight to fit. Checking first saves you from ripping out a finished hat.
How to make a gauge swatch: With your 5.5 mm hook and teal yarn, ch 18 and join into a ring. Work 1 hdc in each ch around (18 hdc). Work 7 more rounds of 1 hdc in each st around, joining each round. Lay the swatch flat and measure across the middle: 8 stitches should measure 2 inches, and 7 rounds should measure 2 inches. If you have more stitches per 2 inches than 8, your stitches are too small — try a larger hook. If you have fewer, your stitches are too big — try a smaller hook.
Beginner Tips Before You Start
- Use your stitch marker every single round. Place it in the first stitch of each round so you always know where the round began. Without it, it is very easy to lose your place in a spiral.
- Do not pull the yarn too tight. Tension is the number-one beginner struggle. Hold the yarn gently — snug, not strangling. Tight stitches make a stiff, undersized hat.
- Count your stitches at the end of every round. You should always have 40. Catching a mistake right away takes ten seconds to fix; catching it ten rounds later takes an hour.
- Keep the starting ring untwisted. Before you join your first chain into a ring, lay it flat on the table and make sure it forms a neat circle with no twist — like a rubber band, not a figure-eight.
- Change colors at the join. When you fasten off one color and join the next, join the new color with a slip stitch into any stitch of the round. The join will sit at the back of the hat.
- Relax and go slow. This hat is only 22 rounds. Even at a slow, careful pace, most beginners finish it in two or three evenings.
Step-by-Step Instructions
Pattern note: This hat is worked as a straight tube in rounds from the brim upward. Each round is joined with a slip stitch and then the next round begins with a chain 1. The chain 1 does not count as a stitch — your first hdc of each round goes into the very first stitch. The crown is left open to form the messy bun hole. All stitch counts are given in parentheses at the end of each round.
Setup and Brim
Setup: With Color A (teal), ch 40. Being careful not to twist the chain, join with a sl st to the first ch to form a ring.
Rnd 1: Ch 1 (does not count as a st). Work 1 hdc in each ch around. Join with a sl st to the first hdc. (40 hdc)
Rnds 2–3: Ch 1. Work 1 hdc in each st around. Join with a sl st to the first hdc. (40 hdc)
Fasten off Color A.
First Coral Stripe
Rnd 4: Join Color B (coral) with a sl st in any st. Ch 1. Work 1 hdc in each st around. Join with a sl st to the first hdc. (40 hdc)
Rnd 5: Ch 1. Work 1 hdc in each st around. Join with a sl st to the first hdc. (40 hdc)
Fasten off Color B.
Teal Spacer
Rnds 6–7: Join Color A with a sl st in any st. Ch 1. Work 1 hdc in each st around. Join with a sl st to the first hdc. (40 hdc)
Fasten off Color A.
Second Coral Stripe
Rnd 8: Join Color B with a sl st in any st. Ch 1. Work 1 hdc in each st around. Join with a sl st to the first hdc. (40 hdc)
Rnd 9: Ch 1. Work 1 hdc in each st around. Join with a sl st to the first hdc. (40 hdc)
Fasten off Color B.
Body
Rnds 10–21: Join Color A with a sl st in any st. Ch 1. Work 1 hdc in each st around. Join with a sl st to the first hdc. (40 hdc)
Repeat Rnds 10–21 for a total of 12 teal rounds above the second coral stripe. (You will work this exact round 12 times, ending on Rnd 21.)
Crown Edge
Rnd 22 (final round): Ch 1. Work 1 hdc in each st around. Join with a sl st to the first hdc. Fasten off Color A, leaving a 6-inch tail. (40 hdc)
Total: 22 rounds. At 7 rounds per 2 inches, 21 rounds give you 6 inches of height, plus the final crown edge round brings the hat to approximately 6.5 inches tall — exactly the finished size.
Assembly and Finishing
There is no seaming in this pattern — the hat is already one complete tube. Finishing is all about tidying up.
- Weave in the ends: Thread each yarn tail onto your tapestry needle. Working on the wrong side (the inside of the hat), poke the needle through the backs of several stitches, going in one direction for about 2 inches, then reverse direction and go back through a few stitches the other way. This locks the tail so it will not work loose in the wash. Trim the yarn close to the fabric. Do this for every tail — the starting tail, each color-change tail, and the final 6-inch tail.
- Block lightly: Lightly mist the hat with water and smooth it flat with your hands, or lay it flat on a towel and let it dry. Do not stretch the crown opening — you want that circle to stay about 3 inches across so it hugs your bun.
- Try it on: The tube should sit snugly around your head with the open crown circle framing your bun. If the brim feels loose, work one additional round of single crochet (sc) around the bottom edge with Color A to tighten it slightly. (Single crochet: insert hook into stitch, pull up a loop, yarn over, pull through both loops.)
Measurements check: 40 hdc at 8 hdc per 2 inches = 10 inches flat width (20 inches circumference, stretching to fit 21–23 inches). 22 rounds at 7 rounds per 2 inches = approximately 6.5 inches tall. Open crown circle: approximately 3 inches in diameter.
Pro Tips and Variations
- Change the stripe colors: Swap the coral for mustard yellow, hot pink, or cream for a totally different look. You can also move the stripes — try one stripe at Rnd 4 and the second at Rnd 12 for a wider gap.
- Adjust the size: For a child's hat, start with a ch 32 instead of 40 (that gives 32 hdc per round, about 8 inches flat width). For a larger adult hat, start with a ch 44. Keep all other rounds the same, working 1 hdc in each stitch around.
- Substitute yarn: Any bulky (weight 5) yarn will work — chenille, wool blend, or a soft acrylic. Just check your gauge again, because different fibers stretch differently. Avoid super-bulky (weight 6) yarn unless you go up a hook size.
- Add a ribbed brim: For a stretchier, more professional-looking edge, work Rnds 1–3 in back-loop-only hdc (insert your hook only under the back loop of each stitch instead of both loops). This creates a subtle ridge and extra grip around the forehead.