Farmhouse Strawberry Crochet Beanie Free Pattern
Farmhouse Strawberry Crochet Beanie Free Pattern
Introduction
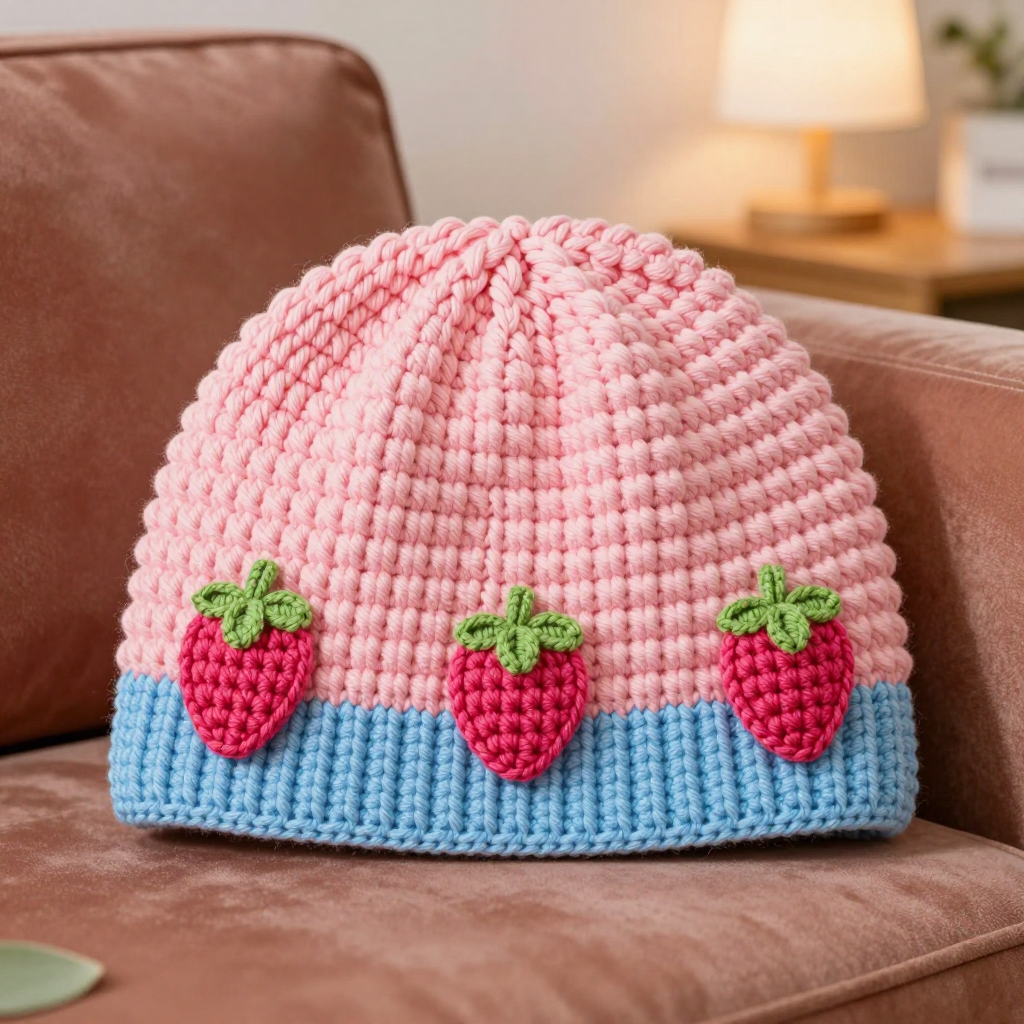
If you have never held a crochet hook before, this is the perfect first hat for you. The Farmhouse Strawberry Beanie is a sweet, rustic little hat with a soft cotton candy pink crown, a baby blue ribbed brim, and three tiny strawberry appliqués with green leaves stitched across the front. It is worked from the top of the head down in simple joined rounds, so you only ever need to know a handful of basic stitches, and the ribbed brim is made as a flat strip and sewn on at the end. The finished hat is soft, slightly slouchy, and looks like something you would find hanging in a farmhouse kitchen — cozy, handmade, and full of charm. Whether you are making it for a child, a teenager, or yourself, this pattern walks you through every single stitch so you never have to guess.
Materials Needed
- Yarn: DK weight (category 3) yarn, approximately 200–250 yards total. You will need 150–180 yards of cotton candy pink (Color A) for the hat body, 40–50 yards of baby blue (Color B) for the brim, and small amounts of strawberry pink/red (Color C) and leaf green (Color D) for the appliqués.
- Crochet hook: US G/6 (4.0 mm) for the hat body and appliqués. Optional: US H/8 (5.0 mm) if you want a looser, stretchier brim.
- Stitch marker (one is enough, but a few are handy).
- Tapestry needle (a blunt, large-eyed needle for sewing seams and weaving in ends).
- Scissors.
- Finished sizes: Child fits 18–20 in (46–51 cm) head circumference; Teen/Small Adult fits 20–22 in (51–56 cm); Large Adult fits 22–24 in (56–61 cm). Finished hat height from crown top to bottom of brim is approximately 8 (8.5, 9) inches including the brim.
Abbreviations and Beginner Glossary
- ch – chain: yarn over the hook and pull it through the loop on your hook to make one chain.
- sl st – slip stitch: insert your hook into the stitch, yarn over, and pull the loop straight through both the stitch and the loop on your hook. It joins without adding height.
- sc – single crochet: insert hook into stitch, yarn over, pull up a loop (2 loops on hook), yarn over, pull through both loops. One loop remains.
- hdc – half double crochet: yarn over first, insert hook into stitch, yarn over, pull up a loop (3 loops on hook), yarn over, pull through all 3 loops at once.
- hdc2tog – half double crochet 2 together (a decrease): yarn over, insert hook into first stitch, pull up a loop, yarn over, insert hook into next stitch, pull up a loop, yarn over, pull through all loops on hook. Two stitches become one.
- sc2tog – single crochet 2 together (a decrease): insert hook into first stitch, pull up a loop, insert hook into next stitch, pull up a loop, yarn over, pull through all 3 loops. Two stitches become one.
- st(s) – stitch(es).
- rnd – round: one complete circle of stitches worked around.
- BLO – back loop only: work into the loop of the stitch that is farthest away from you, leaving the front loop untouched. This creates ribbing.
- FLO – front loop only: work into the loop closest to you.
- magic ring – an adjustable loop of yarn you crochet into to start a circle with no hole in the middle. If it feels tricky, you can chain 4 and join with a slip stitch to make a ring instead.
- join with sl st – finish a round by making a slip stitch into the first stitch of that round so the circle closes.
- fasten off – cut the yarn leaving a tail, then pull the tail through the last loop to secure it.
- turn – flip your work over so you can work back the other way.
Gauge
Hat body: 16 hdc x 12 rounds = 4 inches (10 cm) with the G/6 (4.0 mm) hook.
Brim ribbing: 14 sc x 16 rows = 4 inches with the G/6 hook.
Gauge matters because it tells you whether your hat will actually fit the head you are making it for. If your stitches are bigger than the gauge, the hat will come out too large; if they are smaller, it will be too tight. To check, crochet a small square about 5 inches wide in hdc, then lay a ruler across the middle and count how many stitches fit in 4 inches. If you have more than 16, try a larger hook; if you have fewer, try a smaller hook. It is completely normal to need a different hook size than the pattern says — your hands are unique!
Beginner Tips Before You Start
- Use a stitch marker. Place it in the first stitch of each round so you always know where the round begins and ends. Move it up as you go.
- Do not pull your yarn too tight. Tension is the number one thing beginners struggle with. Hold the yarn gently — tight stitches make a stiff, small hat.
- Count your stitches at the end of every round. The numbers in parentheses tell you exactly how many you should have. Catching a mistake early is much easier than fixing it later.
- The chain 1 at the start of each round does not count as a stitch. Skip it when you count, and always join into the first real hdc.
- Try the hat on as you go. Once the crown is done, slip it onto the head (or a similar-sized ball) to check the fit before you keep going.
- Keep your appliqués simple. They are small and forgiving — no one will notice a slightly wobbly strawberry, and the charm is in the handmade look.
Step-by-Step Instructions
Hat Crown (worked in joined rounds — do not turn)
Instructions are written for the Child size, with larger sizes in parentheses. With Color A (pink), make a magic ring.
Rnd 1: Ch 1 (does not count as a stitch), work 8 hdc into the ring, join with sl st to the first hdc. (8 hdc)
Rnd 2: Ch 1, work 2 hdc in each stitch around, join. (16 hdc)
Rnd 3: Ch 1, *2 hdc in next st, hdc in next st; repeat from * around, join. (24 hdc)
Rnd 4: Ch 1, *2 hdc in next st, hdc in next 2 sts; repeat from * around, join. (32 hdc)
Rnd 5: Ch 1, *2 hdc in next st, hdc in next 3 sts; repeat from * around, join. (40 hdc)
Rnd 6: Ch 1, *2 hdc in next st, hdc in next 4 sts; repeat from * around, join. (48 hdc)
Rnd 7: Ch 1, *2 hdc in next st, hdc in next 5 sts; repeat from * around, join. (56 hdc)
Rnd 8: Ch 1, *2 hdc in next st, hdc in next 6 sts; repeat from * around, join. (64 hdc)
Child size: Your crown is complete — continue to the Hat Body below.
Teen/Small Adult: Work one more increase round: Ch 1, *2 hdc in next st, hdc in next 7 sts; repeat from * around, join. (72 hdc) Then continue to the Hat Body.
Large Adult: Work two more increase rounds. Rnd 9: Ch 1, *2 hdc in next st, hdc in next 7 sts; repeat from * around, join. (72 hdc) Rnd 10: Ch 1, *2 hdc in next st, hdc in next 8 sts; repeat from * around, join. (80 hdc) Then continue to the Hat Body.
Hat Body
All sizes: Ch 1, hdc in each stitch around, join with sl st. This is one even round with no increases.
Repeat this even round until the hat measures approximately 6.5 (7, 7.5) inches from the crown top, or until it sits just above the ear. At the stated gauge of 12 rounds per 4 inches, that is roughly 8–10 even rounds after the crown. Fasten off Color A and weave in the ends.
Ribbed Brim (worked sideways in rows, then sewn on)
With Color B (baby blue), leave a long 24-inch tail for sewing later. Ch 9 (9, 11).
Row 1: Sc in the 2nd ch from hook and in each ch across. (8 [8, 10] sc)
Row 2: Ch 1, turn, working in the BLO, sc in each st across. (8 [8, 10] sc)
Repeat Row 2 until the brim strip measures approximately 17 (19, 21) inches unstretched, or long enough to wrap around the hat opening with a slight stretch. Fasten off, leaving a long tail.
Strawberry Appliqué (make 3)
With Color C (strawberry pink/red), make a magic ring.
Rnd 1: Ch 1, 8 sc in ring, join with sl st. (8 sc)
Rnd 2: Ch 1, 2 sc in each st around, join. (16 sc)
Rnd 3: Ch 1, *2 sc in next st, sc in next st; repeat from * around, join. (24 sc)
Rnd 4: Ch 1, sc in each st around, join. (24 sc)
Rnd 5: Ch 1, *sc2tog, sc in next 2 sts; repeat from * around, join. (18 sc)
Rnd 6: Ch 1, *sc2tog, sc in next st; repeat from * around, join. (12 sc)
Stuff lightly if you like a puffy berry, or leave it flat. Fasten off, leaving a 12-inch tail. Using the tail, sew a small vertical line of stitches up the center of each strawberry to suggest seeds, or embroider tiny seed stitches with Color C or a contrasting yarn.
Leaves (make 3 sets, or 3 individual leaves per strawberry)
With Color D (leaf green), ch 6.
Row 1: Sl st in the 2nd ch from hook, sc in next ch, hdc in next ch, dc in next ch, then (2 dc, ch 1, sl st) in the last ch. Do not turn. Working along the opposite side of the chain: sl st in next ch, sc in next ch, hdc in next ch, dc in next ch, sl st in the final ch. Fasten off, leaving a 6-inch tail. This makes one small leaf. Make 3 leaves per strawberry, or one 3-leaf cluster per strawberry.
Assembly and Finishing
1. Join the brim into a ring. Bring the two short ends of the blue brim strip together with right sides facing and sew them with your tapestry needle and the long tail, using small whip stitches (a simple over-and-over stitch). Turn the ring right side out.
2. Attach the brim to the hat. With the right side of the hat facing you, pin the top edge of the brim ring to the bottom edge of the pink hat, easing the brim to fit evenly all the way around. Sew them together with small, even stitches, going through both layers. Remove the pins and weave in the ends.
3. Place the strawberries. Arrange the three strawberries evenly across the front of the hat, about 1 inch above the brim. Pin them in place.
4. Sew on the strawberries. Using matching Color C yarn, sew each strawberry securely with small stitches around its outer edge. Do not sew through to the inside of the hat — catch only the surface of the hat fabric.
5. Add the leaves. Sew one leaf cluster (or three individual leaves) at the top of each strawberry, using Color D yarn and the leaf tails.
6. Weave in all ends. Thread each loose tail onto the tapestry needle and weave it back and forth through the inside of the fabric for about an inch, then trim close to the work.
7. Block lightly. If you like, lightly steam the brim and appliqués with an iron held a few inches above the fabric (never press directly onto acrylic yarn). Avoid flattening the ribbing — you want those ridges to stay bouncy.
Pro Tips and Variations
- Change the colors. Swap the pink and blue for any two colors you love — sage green and cream, mustard and rust, or classic red and white all look lovely in this farmhouse style.
- Adjust the size. To make the hat taller or shorter, simply work more or fewer even rounds in the Hat Body before adding the brim. To make it wider, add one more increase round to the crown.
- Substitute the yarn. Any DK weight (category 3) yarn works well. Cotton gives a crisp, farmhouse look; acrylic is soft and easy to wash; a wool blend adds warmth for winter.
- Make it a set. Crochet a second strawberry as a brooch or a tiny keychain charm, or add a pom-pom to the top of the hat for a playful finish.