Striped Nesting Basket Duo Free Pattern: Modern Sand & Terracotta Crochet Baskets
Introduction
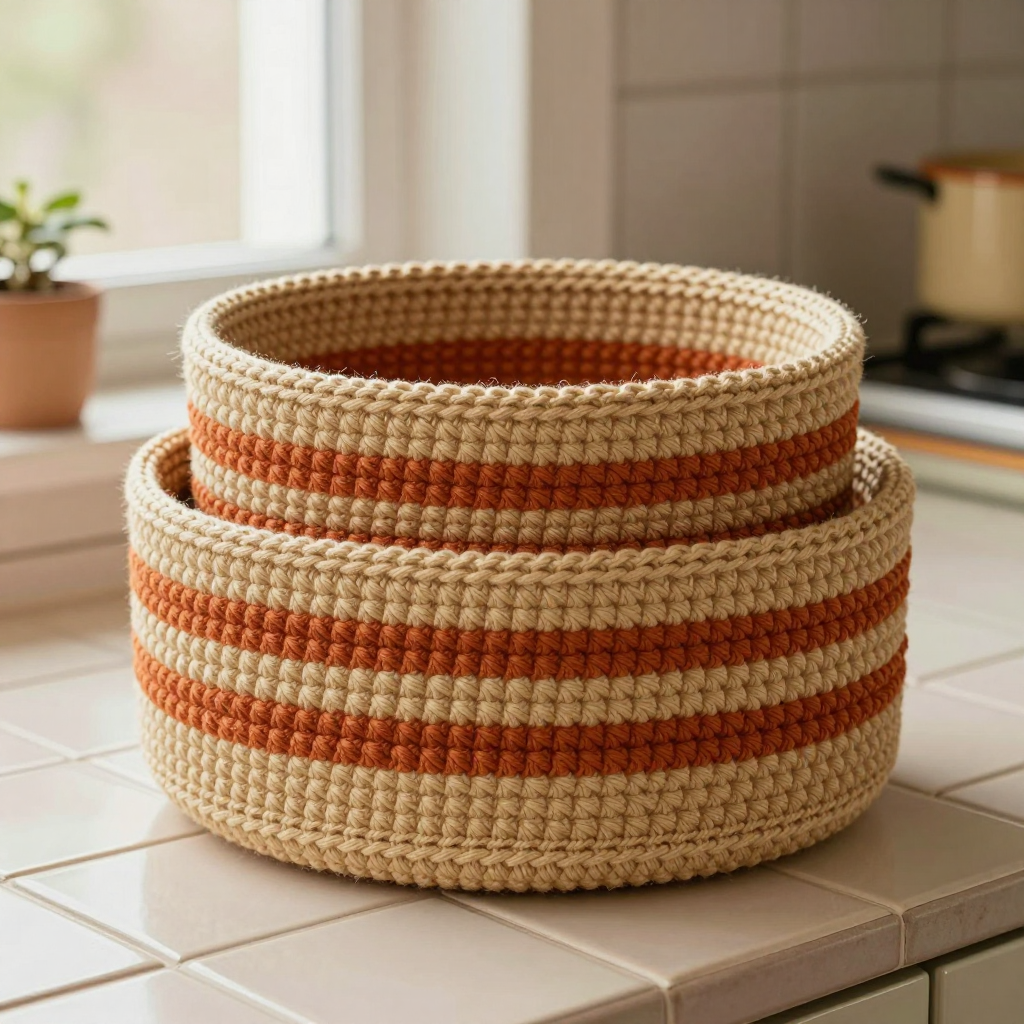
Welcome to your very first crochet project — a pair of modern, striped nesting baskets in warm sand and terracotta that look far more impressive than the simple stitches used to make them. This duo is perfect for absolute beginners because it uses only one stitch (single crochet) worked in easy, continuous spiral rounds, so there are no complicated joins or turning chains to worry about. The finished baskets are sturdy, upright cylinders with flat circular bases, a crisp folded edge where the base meets the side, and neat two-round stripes that give them a calm, handmade, Scandinavian-inspired look. The smaller basket nests snugly inside the larger one, making them a beautiful set for storing yarn, keys, plants, or bathroom bits — and a lovely gift. If you can hold a hook and pull up a loop, you can make these.
Materials Needed
- Yarn: Worsted weight (category 4) cotton or cotton-blend yarn. Total for both baskets: approximately 220 yd (200 m) sand and 180 yd (165 m) terracotta. Specifically: large basket uses about 130 yd sand and 110 yd terracotta; small basket uses about 90 yd sand and 70 yd terracotta.
- Crochet hook: I/9 (5.5 mm).
- Stitch marker (one is enough; a scrap of contrasting yarn works too).
- Tapestry needle (a blunt, large-eye needle for weaving in ends).
- Scissors.
- Finished measurements: Large basket: 7 in (18 cm) diameter x 5 in (13 cm) tall. Small basket: 5.5 in (14 cm) diameter x 4 in (10 cm) tall. The small basket nests inside the large one with room to spare.
Abbreviations and Beginner Glossary
- ch – chain: yarn over the hook and pull it through the loop on your hook to make one chain. (Used only once here, at the very start.)
- sc – single crochet: insert your hook into the stitch, yarn over, pull up a loop (2 loops on hook), yarn over again, pull through both loops. One single crochet made.
- sl st – slip stitch: insert hook into the stitch, yarn over, and pull straight through both the stitch and the loop on your hook in one motion. Used only for the optional rim.
- sc2tog – single crochet 2 stitches together (a decrease): insert hook into the first stitch, pull up a loop, insert hook into the next stitch, pull up a loop, yarn over and pull through all three loops. (Listed for reference; this pattern does not use it.)
- st(s) – stitch(es): one completed loop/unit of crochet.
- rnd – round: one complete circle of stitches worked around the basket.
- [ ] – brackets: repeat the instructions inside the brackets the number of times stated after them.
- Magic ring – an adjustable loop you crochet into, then pull tight to close the center hole. (Instructions given in Round 1.)
- Back loop only (BLO) – each stitch top has two loops (front and back). Working "in the back loop only" means you insert your hook under just the loop farthest from you, leaving the front loop free. This creates a crisp fold.
- Continuous spiral rounds – you work round after round without joining or turning, so the rounds spiral upward like a coil.
- Fasten off – cut the yarn a few inches from your work and pull the tail through the last loop to secure it.
Gauge
14 sc x 16 rounds = 4 inches (10 cm) in single crochet worked in continuous rounds.
Why gauge matters: Gauge is how many stitches and rounds fit into 4 inches. If your stitches are looser than the pattern, your basket will be bigger and floppier; if tighter, it will be smaller and firmer. Gauge is not critical for this project, but a tighter gauge gives a firmer basket that stands upright on its own.
How to make a gauge swatch: Chain 20, then work single crochet into each chain and back and forth for about 16 rows. Lay it flat, place a ruler across the middle, and count how many stitches fit in 4 inches and how many rows fit in 4 inches. If you have far more stitches than 14, go up a hook size; if far fewer, go down a hook size.
Beginner Tips Before You Start
- Use a stitch marker. Place it in the first stitch of each round and move it up as you go. In spiral rounds there is no seam to guide you, so the marker tells you where each new round begins.
- Do not pull your yarn too tight. Keep an even, relaxed tension. Tight, grippy stitches make it hard to insert the hook; loose, sloppy stitches make a floppy basket.
- Count every round. The stitch count in parentheses at the end of each round is your safety net. If it doesn't match, recount before moving on.
- Carry the unused color loosely up the inside. Do not cut the yarn at each color change — just let it travel up the inside of the basket, loose enough that it doesn't pucker.
- Change color on the last stitch of the round. Work the final sc until 2 loops remain on the hook, drop the old color, pick up the new color, and pull it through to finish the stitch.
- Work the base in sand and the striped body in alternating 2-round bands of sand and terracotta, exactly as written below.
Step-by-Step Instructions
Large Basket — Base (worked in sand)
Rnd 1: Make a magic ring: wrap the yarn around two fingers to form a loop, insert your hook into the loop, ch 1, then work 8 sc into the ring. Pull the ring tail tight to close the center. (8 sc)
Rnd 2: Work 2 sc in each st around (this is an increase — two stitches into one). (16 sc)
Rnd 3: [2 sc in next st, sc in next st] around. (24 sc)
Rnd 4: [2 sc in next st, sc in next 2 sts] around. (32 sc)
Rnd 5: [2 sc in next st, sc in next 3 sts] around. (40 sc)
Rnd 6: [2 sc in next st, sc in next 4 sts] around. (48 sc)
Rnd 7: [2 sc in next st, sc in next 5 sts] around. (56 sc)
Rnd 8: [2 sc in next st, sc in next 6 sts] around. (64 sc)
Rnd 9: [2 sc in next st, sc in next 7 sts] around. (72 sc)
Rnd 10: [2 sc in next st, sc in next 8 sts] around. (80 sc)
Do not fasten off. The base should measure about 7 in (18 cm) across.
Large Basket — Body (striped)
Rnd 11: Working in the back loop only, sc in each st around. This creates a crisp fold between base and side. (80 sc)
Rnd 12: Sc in each st around. (80 sc)
Rnds 13–14: Change to terracotta, sc in each st around. (80 sc)
Rnds 15–16: Change to sand, sc in each st around. (80 sc)
Rnds 17–18: Change to terracotta, sc in each st around. (80 sc)
Rnds 19–20: Change to sand, sc in each st around. (80 sc)
Rnds 21–22: Change to terracotta, sc in each st around. (80 sc)
Rnds 23–24: Change to sand, sc in each st around. (80 sc)
Rnds 25–26: Change to terracotta, sc in each st around. (80 sc)
Rnd 27: Change to sand, sc in each st around. (80 sc)
Rnd 28: Sc in each st around. (80 sc)
Fasten off sand and terracotta. Weave in all ends on the inside of the basket.
Small Basket — Base (worked in sand)
Rnd 1: Make a magic ring, ch 1, work 8 sc into the ring, pull the ring closed. (8 sc)
Rnd 2: Work 2 sc in each st around. (16 sc)
Rnd 3: [2 sc in next st, sc in next st] around. (24 sc)
Rnd 4: [2 sc in next st, sc in next 2 sts] around. (32 sc)
Rnd 5: [2 sc in next st, sc in next 3 sts] around. (40 sc)
Rnd 6: [2 sc in next st, sc in next 4 sts] around. (48 sc)
Rnd 7: [2 sc in next st, sc in next 5 sts] around. (56 sc)
Rnd 8: [2 sc in next st, sc in next 6 sts] around. (64 sc)
Do not fasten off. The base should measure about 5.5 in (14 cm) across.
Small Basket — Body (striped)
Rnd 9: Working in the back loop only, sc in each st around. (64 sc)
Rnd 10: Sc in each st around. (64 sc)
Rnds 11–12: Change to terracotta, sc in each st around. (64 sc)
Rnds 13–14: Change to sand, sc in each st around. (64 sc)
Rnds 15–16: Change to terracotta, sc in each st around. (64 sc)
Rnds 17–18: Change to sand, sc in each st around. (64 sc)
Rnds 19–20: Change to terracotta, sc in each st around. (64 sc)
Rnd 21: Change to sand, sc in each st around. (64 sc)
Rnd 22: Sc in each st around. (64 sc)
Fasten off sand and terracotta. Weave in all ends on the inside of the basket.
Optional Rim Firming (each basket)
If you want a sturdier top edge, work one final round of sc in sand around the top of each basket, then sl st in the first st to join. Fasten off and weave in ends.
Assembly and Finishing
Weaving in ends: Thread each yarn tail onto your tapestry needle and run it back and forth through the inside of several stitches (about 1 inch), then trim close. Always weave on the inside so the outside stays clean.
Blocking: Gently steam-block each basket over a bowl or jar to encourage a round, upright shape. Hold a steam iron a few inches above the fabric (never press it down on cotton crochet) and let the steam relax the stitches, then leave the basket on the bowl until fully dry. Do not over-stretch.
Nesting: Once both baskets are dry, place the small basket inside the large basket to nest. Check that the small one sits comfortably with room to spare.
Pro Tips and Variations
- Change the colors: Swap sand and terracotta for any two worsted cotton shades — cream and sage, charcoal and mustard, or navy and white all work beautifully. Keep the 2-round stripe rhythm for the same modern look.
- Adjust the size: To make a wider basket, add one more increase round to the base (each round adds 8 stitches) and then work the body straight without increasing. To make it taller, simply work more plain sc rounds in your stripe sequence.
- Substitute yarn: A cotton-blend or a slightly thicker aran-weight cotton will give an even firmer basket; just check your gauge and adjust your hook size so the sides stand upright.
- Add a firmer rim: Work the optional rim-firming round, or work two rounds of sc around the top for an extra-sturdy edge that holds its shape when empty.