Rustic Harvest Tote Basket Free Pattern
Rustic Harvest Tote Basket: A Free Crochet Pattern for Cozy Storage
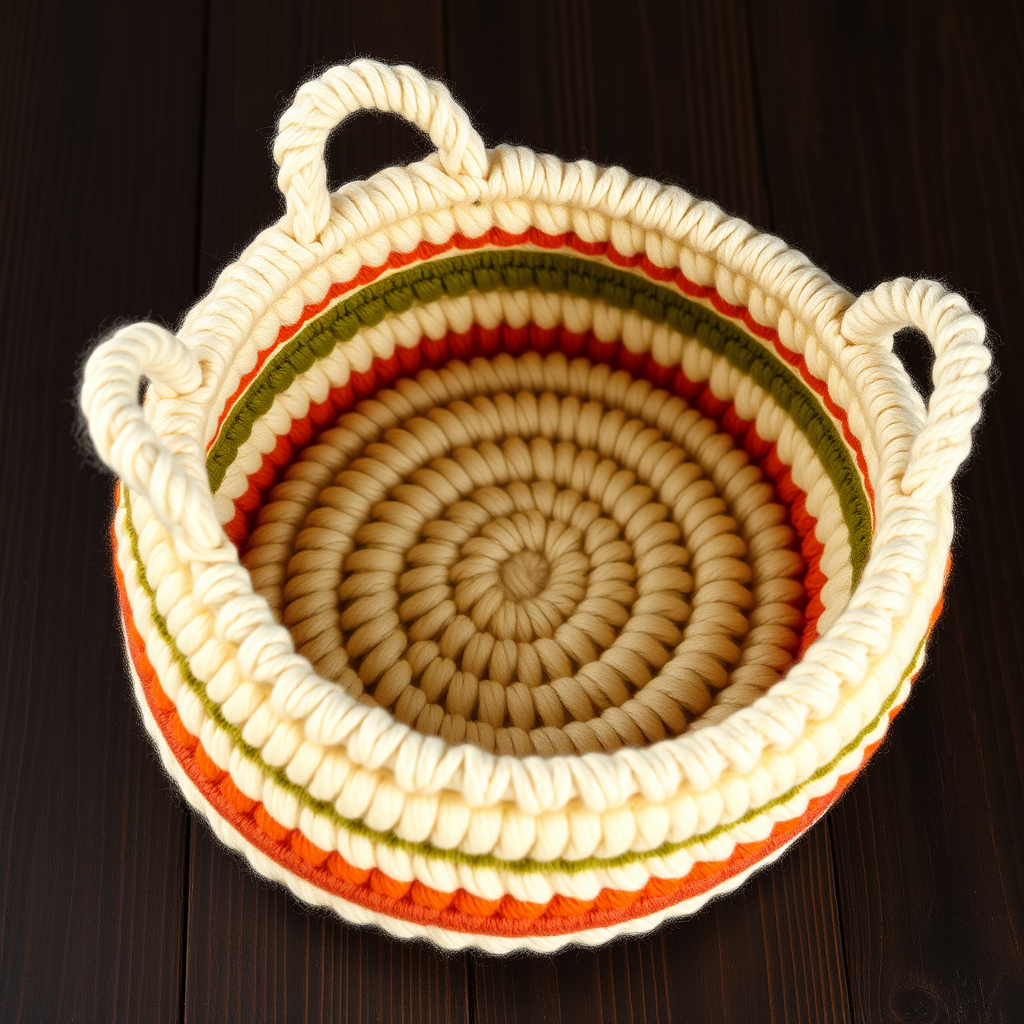
There's something deeply satisfying about creating a beautiful, functional piece for your home with your own two hands. The Rustic Harvest Tote Basket is exactly that—a charming, textured crochet basket with earthy stripes that brings warmth and organization to any space. Whether you're corralling yarn, storing toys, or carrying your farmers' market finds, this sturdy yet soft design adds a cozy, handcrafted touch to any room. Best of all, this is a free crochet basket pattern that's perfect for beginners and experienced crocheters alike.
The design features a round base that builds upward into straight, textured sides, finished with two sturdy handles. The color palette—warm cream, terracotta, and olive green—evokes a rustic, natural aesthetic that complements any decor. Let's dive into this delightful project!
Materials Needed
Before you begin, gather the following materials. This crochet storage basket pattern uses simple, accessible supplies:
Yarn
- Yarn A (Cream): 150g of worsted weight cotton yarn
- Yarn B (Terracotta): 100g of worsted weight cotton yarn
- Yarn C (Olive Green): 100g of worsted weight cotton yarn
Note: Cotton yarn is recommended for its sturdiness and structure, which helps the basket hold its shape.
Tools & Notions
- 5.0 mm (H/8) crochet hook
- Tapestry needle for weaving in ends and sewing handles
- Stitch marker to keep track of rounds
- Scissors
Gauge
14 sc x 16 rows = 4 inches (10 cm) in single crochet. Gauge is important for achieving the correct finished size, so be sure to check your tension before starting.
Abbreviations
Familiarize yourself with these standard crochet abbreviations:
- ch = chain
- sc = single crochet
- hdc = half double crochet
- sl st = slip stitch
- rnd = round
- st(s) = stitch(es)
Step-by-Step Instructions
Follow these detailed instructions to create your own handmade crochet basket. The pattern is worked in continuous rounds for the base, then in joined rounds for the sides. Let's get started!
Part 1: The Base
The base is worked in a spiral, increasing evenly each round to create a flat circle.
Rnd 1: With Yarn A, make a magic ring, ch 1, work 8 sc into ring. Pull tight to close. (8 sts)
Rnd 2: Work 2 sc in each st around. (16 sts)
Rnd 3: *Sc in next st, 2 sc in next st* repeat around. (24 sts)
Rnd 4: *Sc in next 2 sts, 2 sc in next st* repeat around. (32 sts)
Rnd 5: *Sc in next 3 sts, 2 sc in next st* repeat around. (40 sts)
Rnd 6: *Sc in next 4 sts, 2 sc in next st* repeat around. (48 sts)
Rnd 7: *Sc in next 5 sts, 2 sc in next st* repeat around. (56 sts)
Rnd 8: *Sc in next 6 sts, 2 sc in next st* repeat around. (64 sts)
Rnd 9: *Sc in next 7 sts, 2 sc in next st* repeat around. (72 sts)
Rnd 10: *Sc in next 8 sts, 2 sc in next st* repeat around. (80 sts)
Rnd 11: *Sc in next 9 sts, 2 sc in next st* repeat around. (88 sts)
Rnd 12: *Sc in next 10 sts, 2 sc in next st* repeat around. (96 sts)
Fasten off Yarn A. Your base should be a flat, even circle approximately 8-9 inches in diameter.
Part 2: The Sides
Now we'll build the walls of the basket. The first round of the sides is worked in the back loops only to create a crisp, defined edge where the base meets the sides.
Rnd 13: With Yarn B, ch 1, working in back loops only, sc in each st around. Sl st to first sc to join. (96 sts)
Rnd 14-15: Ch 1, sc in each st around. Sl st to first sc. (96 sts)
Fasten off Yarn B.
Rnd 16-18: With Yarn C, repeat Rnd 14-15. (96 sts)
Fasten off Yarn C.
Rnd 19-21: With Yarn A, repeat Rnd 14-15. (96 sts)
Fasten off Yarn A.
Rnd 22-24: With Yarn B, repeat Rnd 14-15. (96 sts)
Fasten off Yarn B.
Rnd 25-27: With Yarn C, repeat Rnd 14-15. (96 sts)
Fasten off Yarn C.
Rnd 28-30: With Yarn A, repeat Rnd 14-15. (96 sts)
Fasten off Yarn A.
Tip: When changing colors, fasten off the old color and join the new color with a slip stitch in the first stitch of the round. This creates clean, seamless color transitions.
Part 3: The Top Edge
The top edge adds a decorative finish with alternating single and half double crochet stitches.
Rnd 31: With Yarn B, ch 1, *sc in next st, hdc in next st* repeat around. Sl st to first sc. (96 sts)
Fasten off and weave in all ends securely.
Part 4: The Handles (Make 2)
The handles are worked flat in rows, then sewn to the inside of the basket.
With Yarn A, ch 40.
Row 1: Sc in 2nd ch from hook and in each ch across. (39 sts)
Row 2: Ch 1, turn, sc in each st across. (39 sts)
Repeat Row 2 until handle is 2 inches wide. This will take approximately 6-8 rows total.
Fasten off, leaving a long tail (at least 12 inches) for sewing.
Part 5: Assembly
Now it's time to attach the handles to your basket.
- Position the handles on the inside of the basket, opposite each other.
- Place each handle about 1 inch below the top edge.
- Using the long yarn tail and your tapestry needle, sew the handle securely to the inside of the basket. Use a whip stitch or running stitch, going through both the handle and the basket wall.
- Repeat for the second handle on the opposite side.
- Weave in all remaining ends securely.
Finishing Touches
Once all ends are woven in, give your basket a gentle shaping. If desired, you can lightly steam block the basket to help it hold its shape, but this is optional—the cotton yarn will naturally hold its structure well.
Your Rustic Harvest Tote Basket is now complete! This crochet basket for beginners is a wonderful project that teaches you how to work in the round, change colors, and create functional home decor. The textured single crochet stitches and warm earthy tones make it a beautiful addition to any room.
Use it to store yarn, toys, blankets, or take it to your local farmers' market. However you use it, this handmade basket is sure to bring a touch of rustic charm to your home. Happy crocheting!