Purrfect Whiskers Baby Beanie Free Pattern – Knit a Cozy Kitten Crown
Introducing the Purrfect Whiskers Baby Beanie
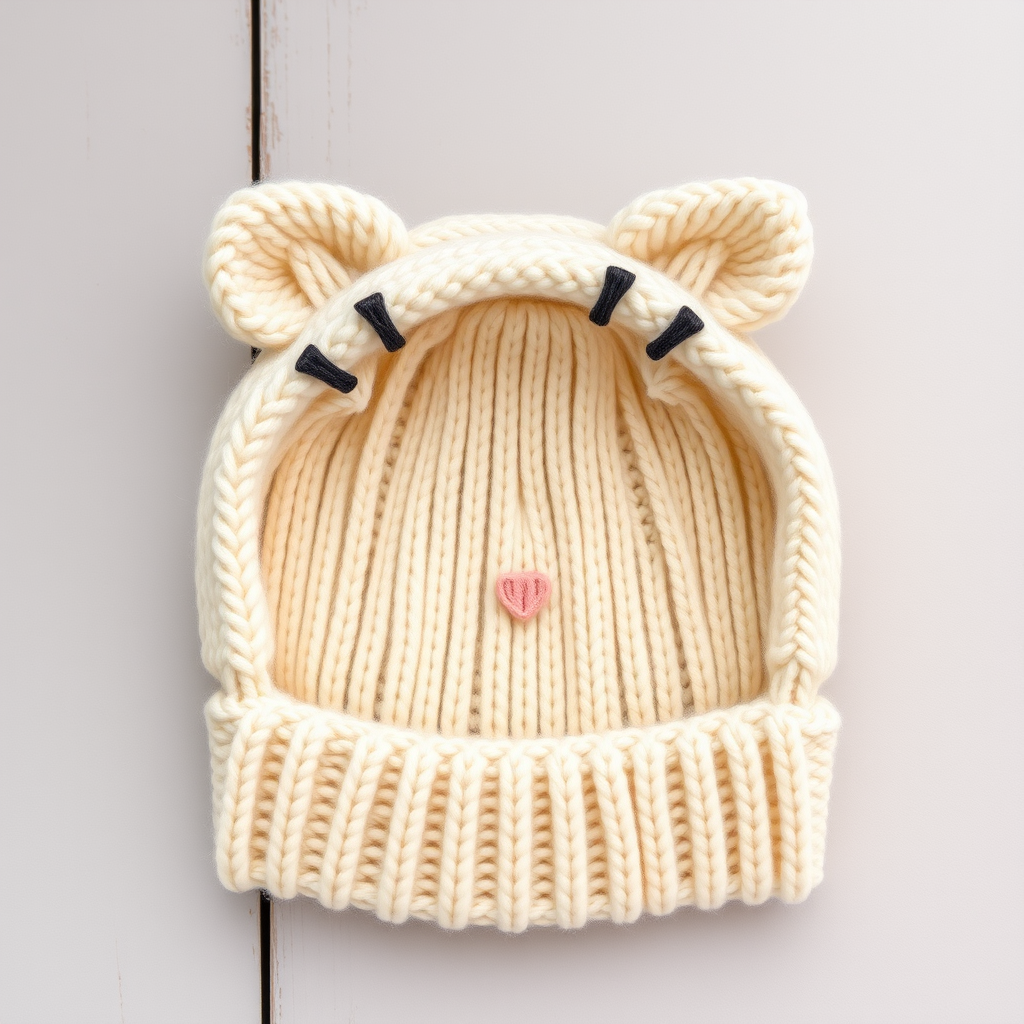
There's something undeniably heartwarming about knitting for a little one, and this Purrfect Whiskers Baby Beanie is the perfect project to channel that cozy energy. This adorable kitten-inspired hat features sweet triangular ears, delicate charcoal whiskers, and a tiny blush pink nose, all worked in a soft, warm cream color. It's a quick, satisfying knit that works up beautifully in worsted weight yarn, making it an ideal gift for baby showers, newborn photoshoots, or simply wrapping your own little one in winter snuggles. The minimalist design is both charming and modern, and the pattern is straightforward enough for confident beginners to tackle with ease.
This free knitting pattern includes sizes for newborn, 0-3 months, and 3-6 months, so you can knit the perfect fit as your baby grows. The hat features a classic ribbed brim, a smooth stockinette body, and a simple crown shaping that creates a neat, rounded finish. The ears are knitted flat and sewn on, while the whiskers and nose are added with simple embroidery techniques. Let's dive into everything you'll need to create this purr-fect little crown.
Materials Needed
Before you begin, gather the following materials. The pattern calls for worsted weight yarn, which is widely available and easy to work with, making it a great choice for beginners.
Yarn
- Main Color (MC): Worsted weight yarn in cream (approximately 100-150 yards, depending on size)
- Contrast Color 1 (CC1): Worsted weight yarn in blush pink (small amount for the nose)
- Contrast Color 2 (CC2): Worsted weight yarn in charcoal (small amount for the whiskers)
Needles & Notions
- US 7 (4.5 mm) 16-inch circular needles for knitting in the round
- US 7 (4.5 mm) double-pointed needles (DPNs) for crown shaping (or use the magic loop method with your circular needle)
- Tapestry needle for weaving in ends and sewing the ears
- Stitch marker to mark the beginning of the round
- Scissors
Gauge
20 stitches and 28 rows = 4 inches in stockinette stitch (knit every round). Always knit a gauge swatch to ensure your hat fits correctly. If your gauge is off, adjust your needle size accordingly.
Step-by-Step Instructions
This pattern is written for three sizes: Newborn (0-3 months, 3-6 months). The sample shown is the 0-3 months size. Instructions for different sizes are given in parentheses in the order: Newborn (0-3 months, 3-6 months). Follow the numbers that correspond to your desired size throughout the pattern.
Abbreviations
- CO: Cast on
- K: Knit
- P: Purl
- K2tog: Knit two stitches together (right-leaning decrease)
- SSK: Slip, slip, knit (left-leaning decrease)
- St(s): Stitch(es)
- Rnd(s): Round(s)
- MC: Main color (cream)
- CC1: Blush pink
- CC2: Charcoal
Knitting the Hat Body
Step 1: Cast On and Join
With your MC yarn and circular needle, loosely CO 72 (80, 88) sts. Place a stitch marker on your right needle to mark the beginning of the round. Carefully join in the round, ensuring that your cast-on edge is not twisted. This is a crucial step—take a moment to lay your work flat and check that all stitches are facing the same direction before joining.
Step 2: Ribbed Brim
Work in a K1, P1 ribbing pattern for 1 inch. To do this, simply alternate knitting one stitch and purling one stitch around. This creates a stretchy, snug-fitting brim that will keep the hat securely on your baby's head. Continue this ribbing until your piece measures 1 inch from the cast-on edge.
Step 3: Stockinette Body
Switch to stockinette stitch by knitting every round. This creates the smooth, classic fabric of the hat body. Continue knitting every round until your piece measures 4 (4.5, 5) inches from the cast-on edge. This measurement is taken from the bottom of the ribbing, not including the cast-on edge itself.
Shaping the Crown
Now we'll shape the top of the hat with a series of decrease rounds. This creates a gentle, rounded crown. You'll notice that the decreases are spaced evenly around the hat, and the number of stitches between decreases changes with each decrease round.
Round 1: *K6 (7, 8), K2tog*; repeat from * to end of round. You will now have 63 (72, 81) sts remaining.
Round 2 and all even-numbered rounds: Knit all stitches around. These plain knit rounds allow the decreases to be spaced out evenly and create a smooth crown shape.
Round 3: *K5 (6, 7), K2tog*; repeat from * to end. You will now have 54 (63, 72) sts.
Round 5: *K4 (5, 6), K2tog*; repeat from * to end. You will now have 45 (54, 63) sts.
Round 7: *K3 (4, 5), K2tog*; repeat from * to end. You will now have 36 (45, 54) sts.
Round 9: *K2 (3, 4), K2tog*; repeat from * to end. You will now have 27 (36, 45) sts.
Round 11: *K1 (2, 3), K2tog*; repeat from * to end. You will now have 18 (27, 36) sts.
Round 13: *K0 (1, 2), K2tog*; repeat from * to end. You will now have 18 (18, 27) sts.
For 3-6 months size only: Work Round 15: *K1, K2tog*; repeat from * to end. You will now have 18 sts.
Finishing the Crown:
Cut your yarn, leaving a long tail of about 8-10 inches. Thread this tail through a tapestry needle. Carefully slide the needle through all 18 remaining stitches on your needles, removing them from the needles as you go. Pull the yarn tight to gather the top of the hat closed. Secure the yarn with a knot on the inside of the hat, and weave in the end.
Knitting the Ears (Make 2)
The ears are knitted flat in a simple triangle shape, then folded and sewn to create a cute, dimensional kitten ear.
Step 1: Cast On
With MC yarn and your DPNs or straight needles, CO 10 sts.
Step 2: First Row
Row 1: Knit all stitches across.
Step 3: Decrease Rows
Row 2: K1, SSK, knit to the last 3 sts, K2tog, K1. This decreases 2 stitches, leaving you with 8 sts.
Step 4: Repeat Decreases
Repeat Row 2 until only 2 sts remain. Each repeat will decrease your stitch count by 2. You'll work this row a total of 4 times, going from 10 sts to 8, then 6, then 4, and finally 2 sts.
Step 5: Final Decrease
With 2 sts remaining, K2tog. Cut your yarn, leaving a tail, and pull it through the remaining stitch to secure.
Step 6: Shape the Ear
Fold the knitted triangle in half lengthwise, with the right sides together. Using the yarn tail, sew the two side edges together to form a neat triangle shape. This creates a slightly rounded, 3D ear. Weave in the ends.
Step 7: Attach the Ears
Position the ears on the top of the hat, about 1 inch apart, centered on the crown. Angle them slightly outward for a cute, alert look. Using a tapestry needle and MC yarn, sew each ear securely to the hat, stitching around the base of the ear. Make sure they are firmly attached, as they'll be the most handled part of the hat.
Adding the Whiskers (Make 2 Sets)
The whiskers are simple to create using short strands of charcoal yarn. They add the perfect feline touch.
Step 1: Cut the Yarn
With CC2 (charcoal), cut 3 strands of yarn, each 6 inches long for each side of the face. You'll need 6 strands total.
Step 2: Thread the Whiskers
Thread one strand through a tapestry needle. Insert the needle from the inside of the hat out to the front, at the cheek area—about 1.5 inches below the ear and slightly to the side of the center front.
Step 3: Secure the Whisker
Remove the needle, leaving the yarn strand in place. Tie a small, tight knot close to the surface of the hat to secure the whisker. Trim the ends to about 1 inch in length, so they stick out like whiskers.
Step 4: Repeat for All Whiskers
Repeat this process for the remaining whiskers. On each side of the face, place 3 whiskers, spacing them slightly apart in a fan-like arrangement. The center whisker can be slightly longer if you like, but 1 inch is a good uniform length.
Embroidering the Nose
The final touch is a tiny blush pink nose, embroidered between the whiskers.
Step 1: Position the Nose
With CC1 (blush pink), locate the center front of the hat, about 1 inch below the center point between the ears. This should be right between the two sets of whiskers.
Step 2: Embroider the Nose
Using a tapestry needle and CC1 yarn, embroider a small triangle. You can do this by making three small straight stitches that form a triangle shape, or use a satin stitch to fill in a tiny oval. A simple triangle of three or four overlapping stitches works beautifully and is very quick.
Step 3: Secure the Yarn
Weave in the yarn ends on the inside of the hat to secure the nose.
Finishing Touches
Weave in All Ends:
Using your tapestry needle, carefully weave in all remaining yarn ends on the inside of the hat. This ensures a clean, professional finish and prevents any loose ends from bothering your baby.
Optional Pompom:
For extra cuteness, you can add a small pompom to the top of the hat, between the ears. Use MC yarn to create a small, fluffy pompom and attach it securely to the crown. This is entirely optional but adds a playful touch.
Your Purrfect Whiskers Baby Beanie is now complete! This adorable hat is sure to be a favorite for photos, outings, and cozy days at home. The combination of the soft cream color, sweet ears, and delicate facial features creates a truly charming accessory that any parent would cherish. Happy knitting!


