Poppy Field Drift Blanket Free Pattern – A Knitted Wildflower Meadow Throw
Introducing the Poppy Field Drift Blanket
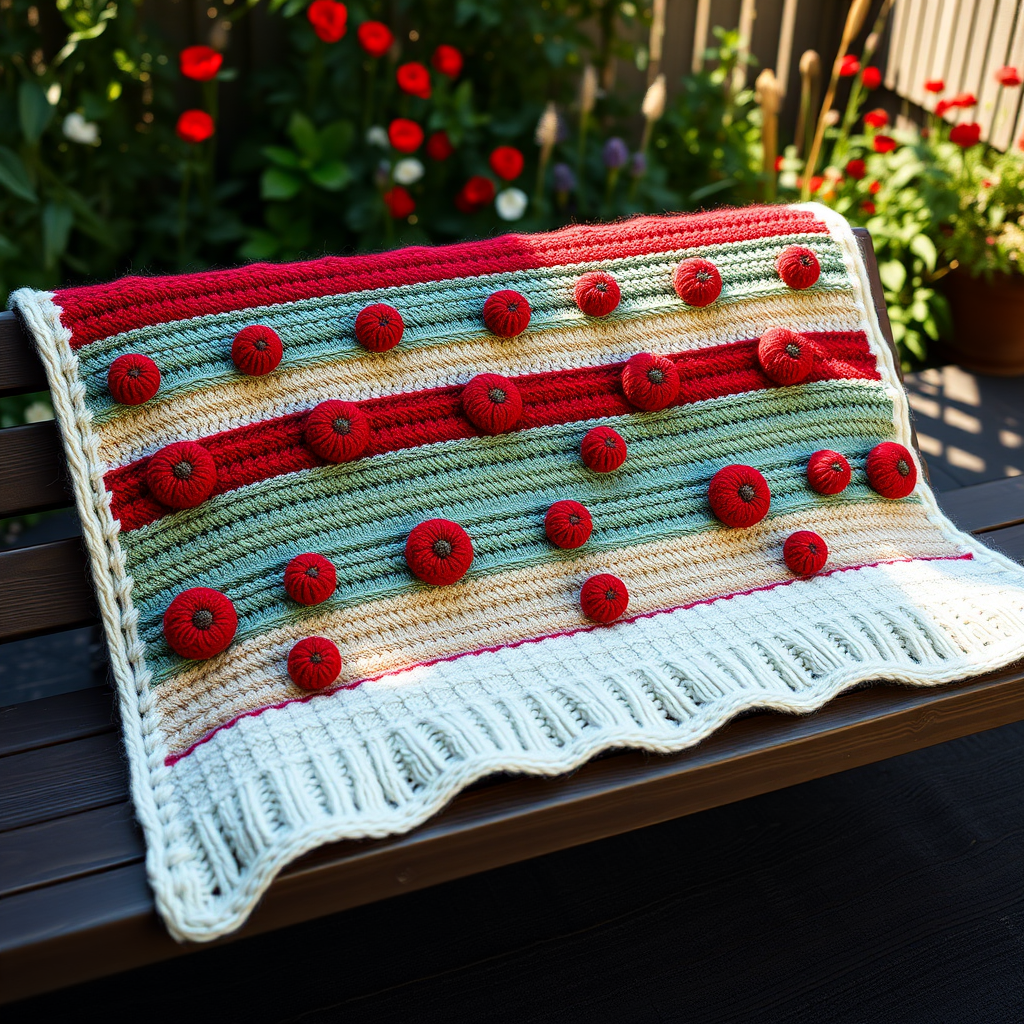
Imagine wrapping yourself in a hand-knitted meadow of deep crimson poppies and soft sage greens. That's exactly the experience the Poppy Field Drift Blanket delivers. This textured throw is more than just a cozy accessory—it's a dimensional floral landscape created through a beautiful interplay of bobble and seed stitches. The all-over pattern produces a lush, garden-like escape that you can snuggle under on cool evenings or drape over a favorite chair for a rustic, handcrafted touch.
This free knitting pattern is perfect for intermediate knitters looking to expand their skills with bobble techniques, but it's also accessible to confident beginners who are ready for a rewarding project. The repetitive 12-row sequence makes it meditative once you get into the rhythm, and the result is a stunning 50" x 60" throw that will become a cherished heirloom piece.
Materials Needed
Before you begin your knitting journey, gather these essential supplies:
Yarn
- Worsted weight yarn in three colors:
- Color A (Deep Crimson Red): Approximately 1200 yards
- Color B (Sage Green): Approximately 800 yards
- Color C (Cream): Approximately 400 yards
Needles
- US Size 8 (5.0 mm) knitting needles – straight or circular (circular recommended for large projects to accommodate the stitch count)
Additional Supplies
- Tapestry needle for weaving in ends
- Stitch markers (optional, but helpful for tracking pattern repeats)
- Measuring tape
- Blocking mats and pins (for finishing)
Gauge
18 stitches x 24 rows = 4 inches in stockinette stitch. Always knit a gauge swatch to ensure your blanket matches the finished dimensions.
Step-by-Step Instructions
Follow these detailed instructions to create your own Poppy Field Drift Blanket. The pattern is worked in one piece from bottom to top, making it a straightforward yet engaging project.
Understanding the Pattern
Finished Size: Approximately 50" x 60" (adjustable by changing cast-on and row counts)
Abbreviations:
- CO: Cast on
- K: Knit
- P: Purl
- K2tog: Knit two together
- P2tog: Purl two together
- MB: Make bobble (K1, P1, K1, P1, K1 into same stitch, then pass the 2nd, 3rd, 4th, 5th stitches over the 1st – bobble complete)
- RS: Right side
- WS: Wrong side
Pattern Notes:
- The blanket is worked in one piece from bottom to top.
- Each 'poppy' is a cluster of bobbles in Color A, surrounded by seed stitch in Color B (leaves) and Color C (background).
- The pattern is a 12-row repeat, with a simple seed stitch border.
Border Setup
Step 1: CO 225 stitches with Color C.
Step 2: Work 6 rows in seed stitch: (K1, P1) repeat to last stitch, K1. This creates a neat, sturdy edge that will frame your blanket beautifully.
Main Pattern (12-Row Repeat)
Now you'll begin the main body of the blanket. Repeat this 12-row sequence until your blanket reaches the desired length.
Row 1 (RS): With Color C, K1 (edge), *K1, P1* repeat to last stitch, K1. (Seed stitch row)
Row 2 (WS): With Color C, K1, *P1, K1* repeat to last stitch, K1.
Row 3 (RS): With Color B, K1, *K1, P1, K1, P1, K1, P1, K1, P1, K1, P1, K1, P1, K1, P1, K1, P1, K1, P1, K1, P1, K1, P1, K1, P1* repeat to last stitch, K1. (This sets up a seed stitch band in green.)
Row 4 (WS): With Color B, K1, *P1, K1* repeat to last stitch, K1.
Row 5 (RS): With Color A, K1, *K1, P1, K1, P1, K1, P1, K1, P1, K1, P1, K1, P1, K1, P1, K1, P1, K1, P1, K1, P1, K1, P1, K1, P1* repeat to last stitch, K1. (Red seed stitch band)
Row 6 (WS): With Color A, K1, *P1, K1* repeat to last stitch, K1.
Row 7 (RS): With Color A, K1, *K1, P1, K1, P1, K1, P1, K1, P1, K1, P1, K1, P1, K1, P1, K1, P1, K1, P1, K1, P1, K1, P1, K1, P1* repeat to last stitch, K1. (Another red seed stitch band)
Row 8 (WS): With Color A, K1, *P1, K1* repeat to last stitch, K1.
Row 9 (RS): With Color B, K1, *K1, P1, K1, P1, K1, P1, K1, P1, K1, P1, K1, P1, K1, P1, K1, P1, K1, P1, K1, P1, K1, P1, K1, P1* repeat to last stitch, K1. (Green seed stitch band)
Row 10 (WS): With Color B, K1, *P1, K1* repeat to last stitch, K1.
Row 11 (RS): With Color C, K1, *K1, P1, K1, P1, K1, P1, K1, P1, K1, P1, K1, P1, K1, P1, K1, P1, K1, P1, K1, P1, K1, P1, K1, P1* repeat to last stitch, K1. (Cream seed stitch band)
Row 12 (WS): With Color C, K1, *P1, K1* repeat to last stitch, K1.
Adding Bobbles (Poppies)
This is where the magic happens! Every 4th repeat of the 12-row sequence, on Row 5 (the first red band), you'll insert bobbles in a scattered pattern to create your poppy field.
Step 1: On Row 5, instead of working the seed stitch in red, work as follows: K1 (edge), *work seed stitch for 10 stitches, then MB in the next stitch (using Color A), work seed stitch for 10 stitches* repeat across, ending with K1.
Step 2: On the next row (WS), simply purl or knit the bobble stitches as normal. They will pop out on the RS, creating your dimensional poppies.
Step 3: Space the bobbles randomly – some clusters of 2-3, some single – to mimic a natural poppy field. This irregularity is what gives the blanket its organic, meadow-like charm.
Continuing the Pattern
Repeat the 12-row sequence until the blanket measures approximately 58 inches from the cast-on edge, ending with a Row 12. This ensures you finish on a complete pattern repeat for a polished look.
Border Finish
Step 1: Work 6 rows in seed stitch with Color C, matching your initial border.
Step 2: Bind off loosely in pattern. To bind off in seed stitch, continue the (K1, P1) pattern while binding off to maintain the stretchy edge.
Finishing Touches
Step 1: Weave in all ends carefully with your tapestry needle, making sure to secure them on the wrong side of the work.
Step 2: Gently block the blanket to open up the stitches and flatten the bobbles. This step is crucial for achieving that beautiful, professional finish.
Step 3: Lay flat to dry completely before using or gifting.
Tips for Success
- Keep your tension consistent – especially when switching between colors. This ensures your seed stitch bands look even and professional.
- Use stitch markers at the beginning of each pattern repeat to help you keep track of where you are in the sequence.
- Don't stress about perfect bobble placement – the beauty of this pattern is in its natural, organic feel. Random placement creates the most realistic poppy field effect.
- Consider using a circular needle even though you're knitting flat – the large stitch count (225 stitches) is much more comfortable on a circular needle.
Your Poppy Field Drift Blanket will be a stunning addition to your home or a heartfelt handmade gift for someone special. The combination of textured bobbles and soothing seed stitch creates a piece that's both visually striking and wonderfully cozy. Happy knitting!


