Pink Plush Basketweave Gear Shift Cozy Free Pattern
Pink Plush Basketweave Gear Shift Cozy
Introduction
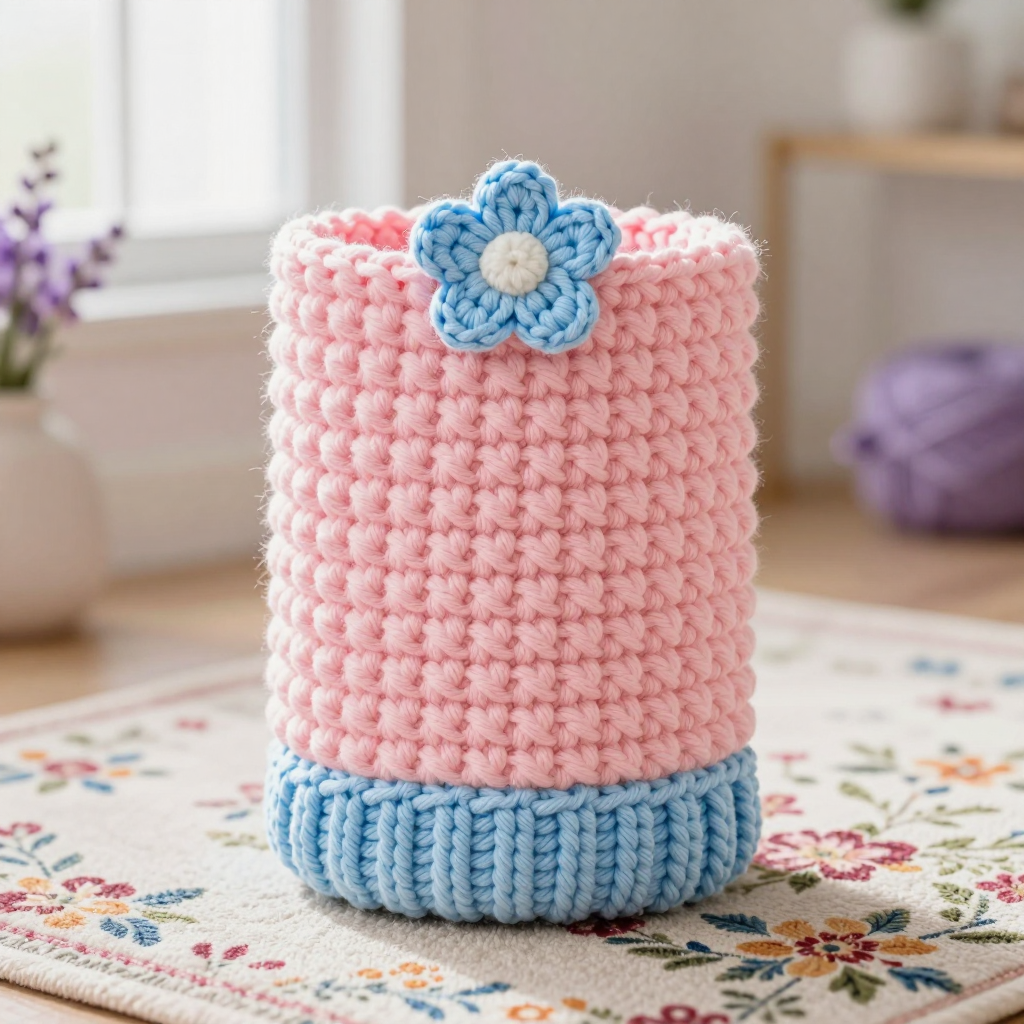
If you have never held a crochet hook before, this is the perfect first project to fall in love with. This cozy is a soft, chunky little sleeve that slips right over your car's gear shift knob, turning a plain plastic knob into a plush, bohemian accent you will smile at every time you drive. The body is worked in cotton candy pink chenille yarn with a woven basketweave texture, finished with a baby blue ribbed band and a tiny five-petal flower that cinches the top. Because it is small, thick yarn and a big hook do most of the work, so it grows fast and feels forgiving in your hands. The finished piece is about 2.5 inches wide and 3 inches tall, squishy and fuzzy to the touch, and it fits a standard gear shift knob up to 2 inches across. You only need two colors, one hook, and about an hour of your time.
Materials Needed
- Yarn: Chenille plush yarn, super bulky (weight 6). Approximately 40 yards cotton candy pink and 10 yards baby blue.
- Hook: 6.5 mm (US K-10.5) crochet hook.
- Stitch marker (one is enough, but a few help).
- Tapestry needle (a large-eye, blunt-tip needle for sewing in yarn ends).
- Scissors.
- Finished size: Approximately 2.5 inches wide x 3 inches tall, with a flat circular base about 2.5 inches in diameter. Fits a standard gear shift knob up to 2 inches in diameter.
Abbreviations and Beginner Glossary
- ch - chain. Make a loop of yarn over the hook and pull it through the loop on your hook. This creates a small "chain" link.
- sc - single crochet. Insert your hook into the stitch, yarn over (wrap yarn around hook), pull up a loop (you now have 2 loops on the hook), yarn over again, and pull through both loops. One single crochet made.
- dc - double crochet. Yarn over first, insert hook into the stitch, yarn over and pull up a loop (3 loops on hook), yarn over and pull through 2 loops, yarn over and pull through the last 2 loops.
- fpdc - front post double crochet. Work a double crochet, but instead of going into the top of the stitch, insert your hook from front to back around the post (the vertical body) of the stitch below, bringing the hook out the front again. This pushes the stitch forward.
- bpdc - back post double crochet. Work a double crochet, but insert your hook from back to front around the post of the stitch below, bringing the hook out the back. This makes the stitch recede.
- sc blo - single crochet in back loop only. A normal single crochet, but you insert your hook only under the back loop of the "V" at the top of the stitch, leaving the front loop alone. This creates a ridge.
- sl st - slip stitch. Insert hook into the stitch, yarn over, and pull the loop straight through both the stitch and the loop on your hook. Used to join rounds.
- st / sts - stitch / stitches.
- magic ring - an adjustable loop of yarn you crochet into, then pull tight to close the center hole. Make a loop, hold the crossing point, and work your stitches into the loop.
- yarn over - wrapping the working yarn around your hook from back to front.
- fasten off - cut the yarn a few inches from your work and pull the tail through the last loop to lock it.
- join with sl st - close the round by making a slip stitch into the first stitch (or chain) of that round.
Gauge
Gauge: 8 sts x 8 rounds = 4 inches in basketweave stitch pattern.
Gauge means how many stitches and rounds fit into 4 inches of your fabric. It matters here because this cozy must hug the gear shift knob snugly. If your stitches are too loose, the cozy will slide around; if too tight, it will not fit over the knob. To check your gauge, crochet a small swatch: make a magic ring, work 3 rounds of single crochet increasing to about 24 stitches, then work 4 rounds of the basketweave pattern. Lay it flat and measure 4 inches across. If you have more than 8 stitches in 4 inches, go up a hook size; if fewer, go down a hook size. Chenille yarn is fuzzy, so measure gently and do not stretch the fabric.
Beginner Tips Before You Start
- Use a stitch marker. Place it in the first stitch of each round so you always know where the round begins and ends. This prevents losing your place.
- Do not pull the yarn too tight. Chenille yarn is thick and can snap or shed if you yank it. Keep an even, relaxed tension so the plush texture stays soft.
- Count your stitches every round. The counts are written in parentheses at the end of each round. Pause and count before moving on.
- Work the post stitches loosely. Front and back post stitches can feel awkward at first. Go slowly and keep them relaxed so the basketweave texture shows clearly.
- Keep your base flat. After Round 5 the base should lie flat like a little pancake. If it curls, your tension is too tight.
- Do not worry about perfection. Chenille yarn hides small mistakes beautifully, and the fuzzy texture is very forgiving.
Step-by-Step Instructions
Base (Closed End)
Work with cotton candy pink. Each round is joined with a slip stitch, so you will work in joined rounds.
Round 1: Make a magic ring. Ch 1, work 6 sc into the ring. Join with sl st to first sc. (6 sc)
Round 2: Ch 1, 2 sc in each st around. Join with sl st to first sc. (12 sc)
Round 3: Ch 1, [2 sc in next st, sc in next st] around. Join with sl st to first sc. (18 sc)
Round 4: Ch 1, [2 sc in next st, sc in next 2 sts] around. Join with sl st to first sc. (24 sc)
Round 5: Ch 1, sc in each st around. Join with sl st to first sc. (24 sc)
Do not fasten off. Your flat circular base should measure about 2.5 inches in diameter.
Basketweave Body
The basketweave texture comes from alternating front post and back post double crochet. Work each round in the same direction without turning.
Round 6: Ch 2 (counts as first dc), dc in each st around. Join with sl st to top of ch 2. (24 dc)
Round 7: Ch 2, fpdc around next 3 sts, bpdc around next 3 sts, repeat this 3-stitch sequence around. Join with sl st to top of ch 2. (24 sts: 12 fpdc, 12 bpdc)
Round 8: Ch 2, bpdc around next 3 sts, fpdc around next 3 sts, repeat around. Join with sl st to top of ch 2. (24 sts: 12 bpdc, 12 fpdc)
Rounds 9-14: Repeat Rounds 7-8 three more times, always alternating the placement of front and back post stitches so the woven blocks stack correctly. (24 sts each round)
After Round 14 the body should measure approximately 2.5 inches tall. Do not fasten off.
Baby Blue Ribbed Band
Change to baby blue yarn now.
Round 15: Ch 1, sc in each st around. Join with sl st to first sc. (24 sc)
Round 16: Ch 1, sc blo in each st around. Join with sl st to first sc. (24 sc)
Round 17: Ch 1, sc in each st around. Join with sl st to first sc. (24 sc)
Fasten off baby blue, leaving a 6-inch tail for sewing.
Tiny Crochet Flower (Cinch)
Work with baby blue.
Round 1: Make a magic ring. Ch 1, work 5 sc into the ring. Join with sl st to first sc. (5 sc)
Round 2: Ch 1, [sl st in next st, ch 2, 2 dc in same st, ch 2, sl st in same st] repeat 5 times to create 5 petals. Join with sl st to first sl st. Fasten off, leaving a 4-inch tail. (5 petals)
Assembly and Finishing
Step 1 - Weave in ends. Thread each yarn tail onto your tapestry needle and weave it back and forth through the inside of the fabric for about an inch, then trim. Leave the baby blue tail from the band and the flower tail loose for now.
Step 2 - Cinch the top. Use the baby blue tail from the band to gently cinch the top opening slightly, gathering it so the opening is a little smaller than the base. Do not pull too tight; the cozy still needs to slide over the knob.
Step 3 - Attach the flower. Thread the flower tail onto your tapestry needle and sew the flower to the top center of the cozy, right where you cinched. Knot securely on the inside and weave in the remaining tail.
Step 4 - Block. Lightly mist the cozy with cool water, reshape it into a neat cylinder with your fingers, and let it air dry completely. Do not wring or twist chenille yarn.
Step 5 - Test the fit. Slip the cozy over the gear shift knob. It should fit snugly with the flower sitting at the top. If it is too loose, gently cinch the top a little more.
Pro Tips and Variations
- Change colors. Swap cotton candy pink for lavender, mint, or mustard for a different mood. Keep the baby blue band for contrast, or match it to your car's interior.
- Adjust the size. For a larger knob, add one more increase round to the base (Round 6: [2 sc in next st, sc in next 3 sts] around = 30 sc) and add two extra basketweave rounds before the band. For a smaller knob, stop the base at Round 4 (18 sc) and work fewer basketweave rounds.
- Substitute yarn. Any super bulky (weight 6) yarn works, but chenille gives the plushest feel. If you use a smoother yarn, check your gauge again because the texture will change.
- Add a hanging loop. After the band, ch 8 and sl st back to the same stitch to make a small loop, then fasten off. This lets you hang the cozy when not in use.