Orchard Guardian Gnome Free Pattern – Knit a Whimsical Apple-Keeper Amigurumi
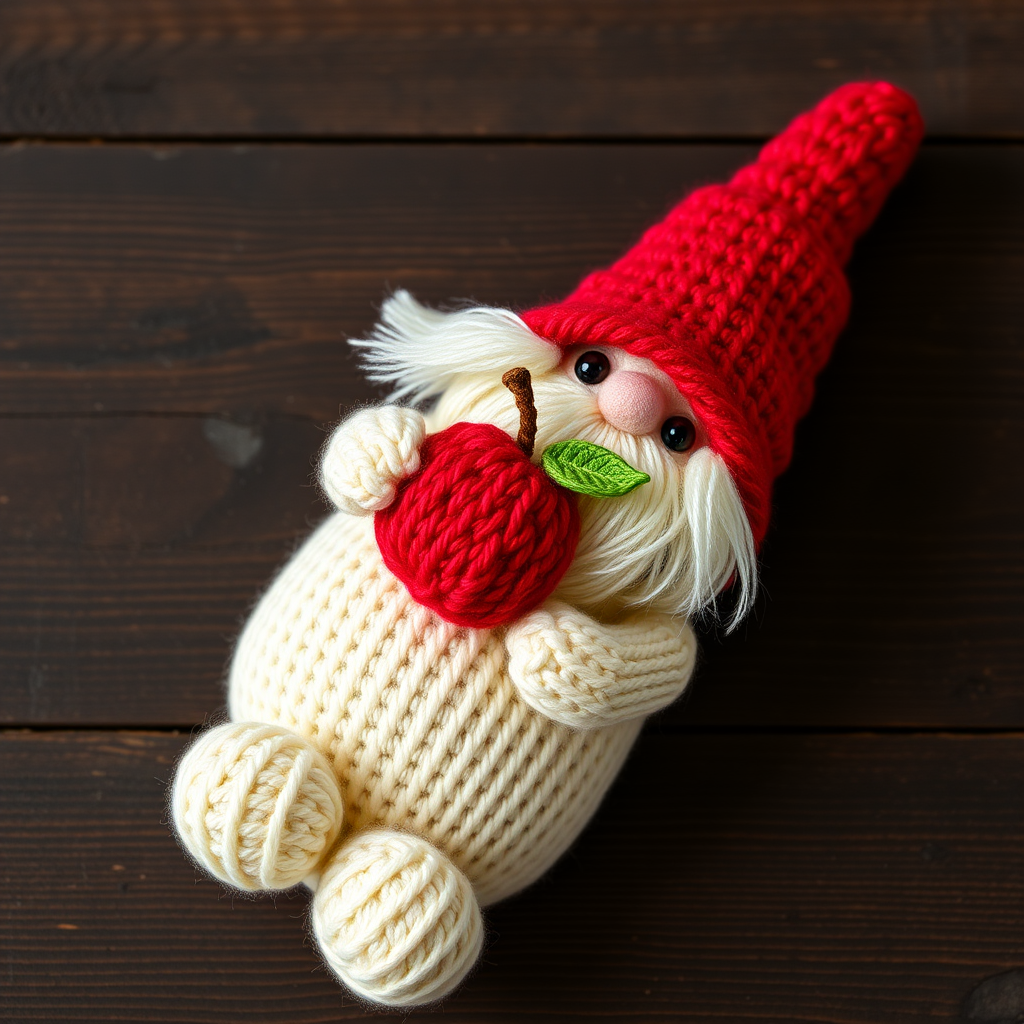
Bring Orchard Magic to Life: The Orchard Guardian Gnome Knitting Pattern
There's something undeniably charming about a little knitted gnome, especially one who's taken on the important job of guarding a shiny red apple. This whimsical amigurumi project is the perfect way to add a touch of storybook magic to your shelf, mantelpiece, or fall decor. Whether you're looking for a heartfelt handmade gift or a cozy weekend project, this Orchard Guardian Gnome is sure to bring a smile to anyone's face. With its soft, textured stockinette surface and handcrafted charm, this little fellow is as delightful to make as he is to display.
This pattern is designed with beginners in mind, using simple knit and purl stitches, basic increases and decreases, and straightforward seaming. You'll be amazed at how quickly this little guardian comes together, and the result is a truly unique piece of handmade art. Let's gather our supplies and get started on this enchanting knitting adventure!
Materials Needed
Before you begin, make sure you have all the necessary supplies on hand. This project uses worsted weight yarn, which is easy to work with and perfect for creating a sturdy, cuddly amigurumi.
- Yarn: Worsted weight yarn in the following colors:
- Red (for the apple and hat)
- Green (for the apple leaf)
- Cream (for the gnome's body, head, and arms)
- Brown (for the apple stem)
- White (for the beard)
- Small amount of black (for embroidering the face)
- Knitting Needles: US 5 (3.75 mm) knitting needles, or size needed to match gauge
- Tapestry Needle: For seaming pieces and weaving in ends
- Stuffing: Polyester fiberfill or your preferred stuffing material
- Scissors: For cutting yarn
Gauge: 5 stitches and 7 rows = 1 inch in stockinette stitch. (Gauge is important for achieving the correct size, but since this is an amigurumi, a slight variation won't ruin the project.)
Step-by-Step Instructions
This pattern is knitted flat in pieces and then seamed together. All pieces are worked in stockinette stitch (knit one row, purl one row) unless otherwise noted. Let's start with the star of the show—the apple!
The Apple (Make 1)
Using your red yarn, cast on 6 stitches.
- Row 1: Knit all stitches.
- Row 2: Increase in each stitch (kfb - knit into the front and back of the same stitch). You should now have 12 stitches.
- Row 3: Knit all stitches.
- Row 4: (Kfb, k1) repeat to end of row. You should now have 18 stitches.
- Rows 5-8: Knit all stitches (4 rows of even knitting).
- Row 9: (K2tog - knit two together, k1) repeat to end of row. You should now have 12 stitches.
- Row 10: Knit all stitches.
- Row 11: K2tog across the row. You should now have 6 stitches.
Cut your yarn, leaving a long tail. Thread the tail through a tapestry needle, then pass it through the remaining 6 stitches on your knitting needle. Pull tight to gather the stitches together. Now, seam the sides of the apple together using the mattress stitch or whip stitch. Important: Before you close the seam completely, firmly stuff the apple with your fiberfill. Once it's nicely plump, finish seaming the side closed.
Apple Leaf (Make 1)
Using your green yarn, cast on 3 stitches.
- Row 1: Knit all stitches.
- Row 2: Kfb, k1, kfb. You should now have 5 stitches.
- Rows 3-4: Knit all stitches.
- Row 5: K2tog, k1, k2tog. You should now have 3 stitches.
- Row 6: K3tog (knit three stitches together). Bind off.
Use your tapestry needle to sew the leaf securely to the top center of the apple.
Apple Stem (Make 1)
Using your brown yarn, cast on 4 stitches.
- Rows 1-4: Knit all stitches (4 rows total).
Bind off. Sew the stem to the top of the apple, right next to the leaf. Set the apple aside for now.
Gnome Body (Make 1)
Using your cream yarn, cast on 10 stitches.
- Row 1: Knit all stitches.
- Row 2: Kfb across the row. You should now have 20 stitches.
- Rows 3-6: Knit all stitches (4 rows of even knitting).
- Row 7: (K2tog, k2) repeat to end of row. You should now have 15 stitches.
- Row 8: Knit all stitches.
- Row 9: (K2tog, k1) repeat to end of row. You should now have 10 stitches.
- Row 10: Knit all stitches.
- Row 11: K2tog across the row. You should now have 5 stitches.
Cut your yarn, leaving a long tail. Thread the tail through the remaining 5 stitches, pull tight, and seam the sides of the body together. Lightly stuff the body—it should be soft and squishy, not too firm.
Gnome Head (Make 1)
Using your cream yarn, cast on 8 stitches.
- Row 1: Knit all stitches.
- Row 2: Kfb across the row. You should now have 16 stitches.
- Rows 3-6: Knit all stitches (4 rows of even knitting).
- Row 7: K2tog across the row. You should now have 8 stitches.
Cut your yarn, leaving a long tail. Thread the tail through the remaining 8 stitches, pull tight, and seam the sides. Stuff the head firmly so it holds its shape well. Sew the head securely to the top of the gnome's body.
Gnome Hat (Make 1)
Using your red yarn, cast on 12 stitches.
- Row 1: Knit all stitches.
- Row 2: Kfb, k10, kfb. You should now have 14 stitches.
- Rows 3-4: Knit all stitches.
- Row 5: Kfb, k12, kfb. You should now have 16 stitches.
- Rows 6-8: Knit all stitches (3 rows of even knitting).
- Row 9: K2tog, k12, k2tog. You should now have 14 stitches.
- Row 10: Knit all stitches.
- Row 11: K2tog, k10, k2tog. You should now have 12 stitches.
- Row 12: Knit all stitches.
- Row 13: K2tog, k8, k2tog. You should now have 10 stitches.
- Row 14: Knit all stitches.
- Row 15: K2tog, k6, k2tog. You should now have 8 stitches.
- Row 16: Knit all stitches.
- Row 17: K2tog, k4, k2tog. You should now have 6 stitches.
- Row 18: Knit all stitches.
- Row 19: K2tog, k2, k2tog. You should now have 4 stitches.
- Row 20: K2tog twice. You should now have 2 stitches.
Bind off. Fold the hat in half lengthwise and seam the side edge together to form a cone shape. Sew the hat onto the gnome's head, positioning it so the tip flops charmingly to one side.
Gnome Beard (Make 1)
Using your white yarn, cast on 6 stitches.
- Row 1: Knit all stitches.
- Row 2: Kfb across the row. You should now have 12 stitches.
- Rows 3-5: Knit all stitches (3 rows of even knitting).
- Row 6: K2tog across the row. You should now have 6 stitches.
Bind off. Sew the beard onto the gnome's face, directly under the hat, so it covers the lower portion of the head and creates that classic gnome look.
Gnome Arms (Make 2)
Using your cream yarn, cast on 4 stitches.
- Row 1: Knit all stitches.
- Row 2: Kfb, k2, kfb. You should now have 6 stitches.
- Rows 3-5: Knit all stitches (3 rows of even knitting).
- Row 6: K2tog, k2, k2tog. You should now have 4 stitches.
Bind off. Seam the sides of each arm together, leaving the top open. Stuff lightly, then sew the arms securely to the sides of the gnome's body.
Assembly and Finishing Touches
Now for the most magical part—bringing your gnome to life!
- Position the Apple: Sew the apple to the gnome's arms, positioning it as if he's cradling it in his hands. Make sure it's secure and looks natural.
- Embroider the Face: Using your black yarn and a tapestry needle, embroider two small eyes and a gentle smile onto the gnome's face. Keep the stitches small and neat for a cute expression.
- Weave in Ends: Carefully weave in all loose yarn ends using your tapestry needle to give your gnome a polished, professional finish.
And there you have it—your very own Orchard Guardian Gnome! This little fellow is ready to watch over your apples, guard your bookshelf, or bring a touch of whimsy to any corner of your home. Enjoy your new handmade friend, and happy knitting!



