Mossy Glen Felted Slippers Free Pattern – A Knitted Woodland Retreat
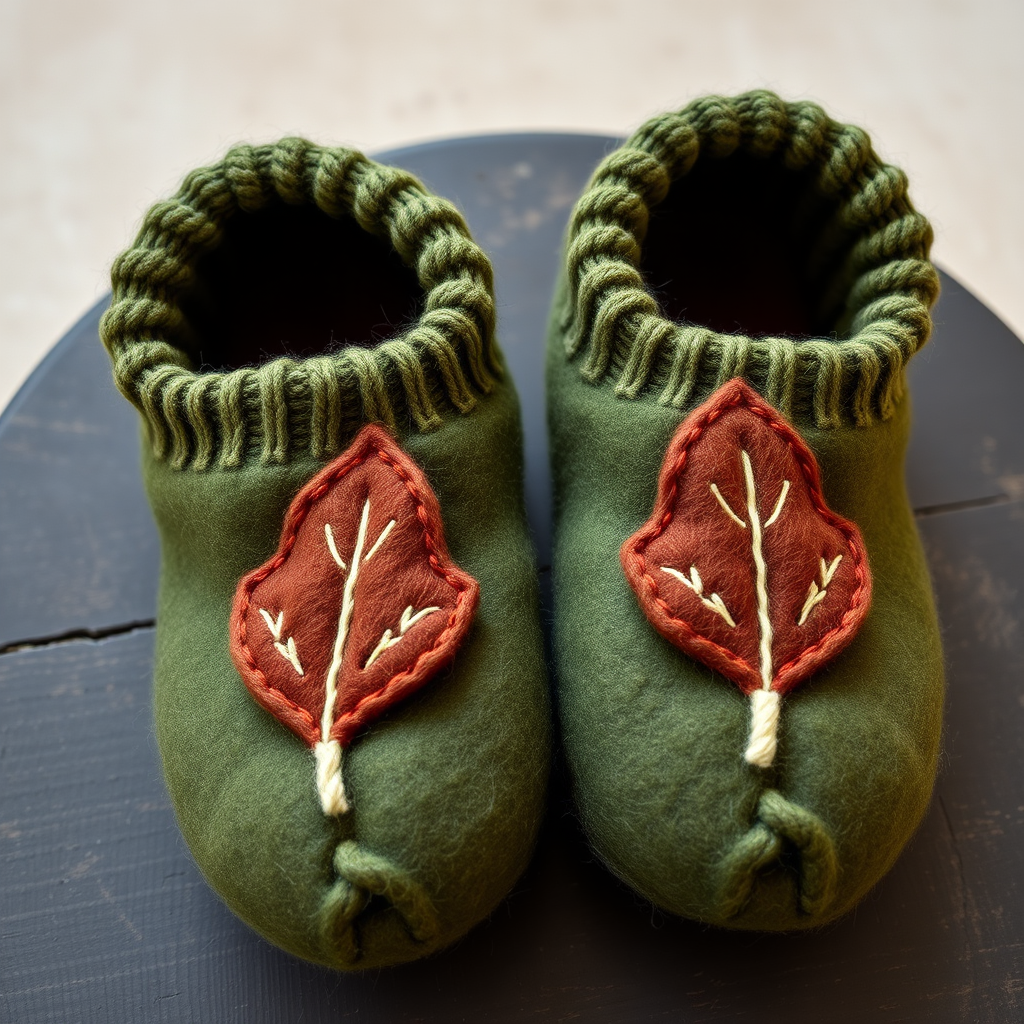
Mossy Glen Felted Slippers Free Pattern – A Knitted Woodland Retreat
Step into the serene comfort of a forest floor with these hand-knitted, felted slippers that mold perfectly to your feet. The rich, earthy palette of deep moss green, bark brown, and cream makes every step a cozy escape into nature. This beginner-friendly pattern uses simple stockinette stitch and a magical felting process that transforms your knitting into dense, warm, and durable footwear. Whether you're curling up by the fire or padding across cold floors, these slippers are your personal woodland retreat.
Materials Needed
Before you begin, gather the following supplies. The felting process requires 100% wool yarn (not superwash) to achieve the proper shrinkage and texture.
- Yarn: Worsted weight 100% wool (e.g., Cascade 220) – approximately 200g in Moss Green (MC), 100g in Bark Brown (CC1), and 50g in Cream (CC2).
- Needles: US 9 (5.5 mm) knitting needles (straight or circular for magic loop).
- Notions: Tapestry needle for weaving ends and assembly, stitch markers, and a pillowcase or mesh bag for felting.
- Gauge: Before felting: 18 stitches and 24 rows = 4 inches in stockinette stitch. Note: Gauge is flexible; felting will shrink and tighten the fabric significantly.
Sizes and Abbreviations
Sizes: Women's US 6-8 (Small), 8-10 (Medium), 10-12 (Large). Adjust by adding or subtracting stitches in multiples of 4.
Abbreviations:
- CO = cast on
- K = knit
- P = purl
- K2tog = knit two together
- SSK = slip slip knit (slip 2 stitches knitwise, then knit them together through the back loop)
- St(s) = stitch(es)
- MC = main color (Moss Green)
- CC1 = contrast color 1 (Bark Brown)
- CC2 = contrast color 2 (Cream)
- YO = yarn over
- K3tog = knit three together
Step-by-Step Instructions
Slipper Body (Make 2)
Step 1: Cast On
With MC, cast on 40 (44, 48) stitches. Use a long-tail cast on for a neat, stretchy edge.
Step 2: Stockinette Body
Work in stockinette stitch (knit on the right side, purl on the wrong side) for 20 rows. This forms the main body of the slipper that will eventually wrap around your foot.
Step 3: Heel Shaping
This is where the slipper begins to take shape. You'll work short rows to create the heel cup.
- Row 21 (RS): K25 (27, 29), turn. Leave the remaining stitches on the needle unworked.
- Row 22 (WS): P10 (10, 12), turn.
- Row 23: K9 (9, 11), SSK, turn. (You are knitting to one stitch before the gap, then decreasing to close it.)
- Row 24: P8 (8, 10), P2tog, turn.
- Continue in this manner, working one more stitch before the decrease each row, until 10 (10, 12) stitches remain on the heel needle. End on a wrong-side row.
Step 4: Gusset (Picking Up Stitches)
Now you'll rejoin the instep stitches and pick up stitches along the heel edges to create the gusset.
- Pick up and knit 10 (11, 12) stitches along the left heel edge.
- Knit across the remaining instep stitches (15 (17, 17) stitches).
- Pick up and knit 10 (11, 12) stitches along the right heel edge.
- Total stitches on needle: 45 (49, 53).
Step 5: Foot Section
Work in stockinette stitch for 30 (34, 38) rows, or until the foot length is 1 inch less than your desired finished length. Remember: felting will shrink the slipper by about 20-25%, so err on the side of longer.
Step 6: Toe Shaping
Decrease stitches to close the toe.
- Row 1 (RS): K1, SSK, knit to last 3 stitches, K2tog, K1. (Decreases 2 stitches.)
- Row 2 (WS): Purl all stitches.
- Repeat these 2 rows until 15 (17, 19) stitches remain.
- Next row (RS): K1, SSK, knit to last 3 stitches, K2tog, K1. (13 (15, 17) stitches.)
- Next row (WS): Purl.
- Cut yarn, leaving a long tail (at least 12 inches). Thread the tail through a tapestry needle, pass it through the remaining stitches, pull tight to gather, and secure with a knot.
Step 7: Cuff
With the right side facing, pick up and knit 20 (22, 24) stitches around the top edge of the slipper, starting at the center back. Work in K1, P1 ribbing for 10 rows. Bind off in pattern (knit the knits and purl the purls as you bind off).
Felted Leaf Motif (Make 2)
These charming leaves add a woodland touch to the top of each slipper.
- With CC1 (Bark Brown), cast on 3 stitches.
- Row 1: K1, YO, K1, YO, K1. (5 stitches)
- Row 2 and all even rows: Purl all stitches.
- Row 3: K2, YO, K1, YO, K2. (7 stitches)
- Row 5: K3, YO, K1, YO, K3. (9 stitches)
- Row 7: K4, YO, K1, YO, K4. (11 stitches)
- Row 9: K5, YO, K1, YO, K5. (13 stitches)
- Row 11: K6, YO, K1, YO, K6. (15 stitches)
- Row 13: K7, YO, K1, YO, K7. (17 stitches)
- Row 14: Purl.
- Row 15: K1, SSK, knit to last 3 stitches, K2tog, K1. (15 stitches)
- Row 16: Purl.
- Repeat rows 15-16 until 3 stitches remain.
- K3tog, fasten off. Weave in ends.
Felting Process
This is the magical step that transforms your loose knitting into dense, cozy slippers.
- Place the slippers and leaves in a pillowcase or mesh bag. Add a few old towels to the washing machine to increase friction and agitation.
- Wash on hot water with a small amount of detergent, using the longest cycle. Important: Check every 5 minutes after the first 15 minutes to monitor shrinkage.
- When the slippers have shrunk to about 20-25% smaller and the stitches are no longer visible (the fabric looks smooth and felted), remove them from the washer.
- Rinse in cold water to stop the felting process and remove any soap residue.
Shaping and Drying
While the slippers are still damp, shape them over your feet or a pair of shoe forms to ensure a perfect fit. Gently pull and mold the fabric to your desired shape. Let them air dry completely, which may take 24-48 hours.
Assembly
- Once the slippers and leaves are completely dry, sew the felted leaf motif onto the top of each slipper, centered over the instep. Use a tapestry needle and CC1 yarn, stitching through the leaf and the slipper fabric securely.
- Optionally, add a small embroidered stem down the center of each leaf using CC2 (Cream) and a backstitch. This adds a lovely detail that echoes the natural woodland theme.
- Weave in all remaining ends with a tapestry needle.
Final Thoughts
Your Mossy Glen Felted Slippers are now ready to warm your feet! The felting process makes them incredibly durable and perfectly molded to your unique foot shape. These slippers make wonderful handmade gifts for friends and family, and the earthy color palette pairs beautifully with cozy sweaters and blankets. Enjoy your knitted woodland retreat!


