Moonlit Moth Amigurumi Free Pattern – Crochet a Glowing Night Visitor
Moonlit Moth Amigurumi Free Pattern – Crochet a Glowing Night Visitor
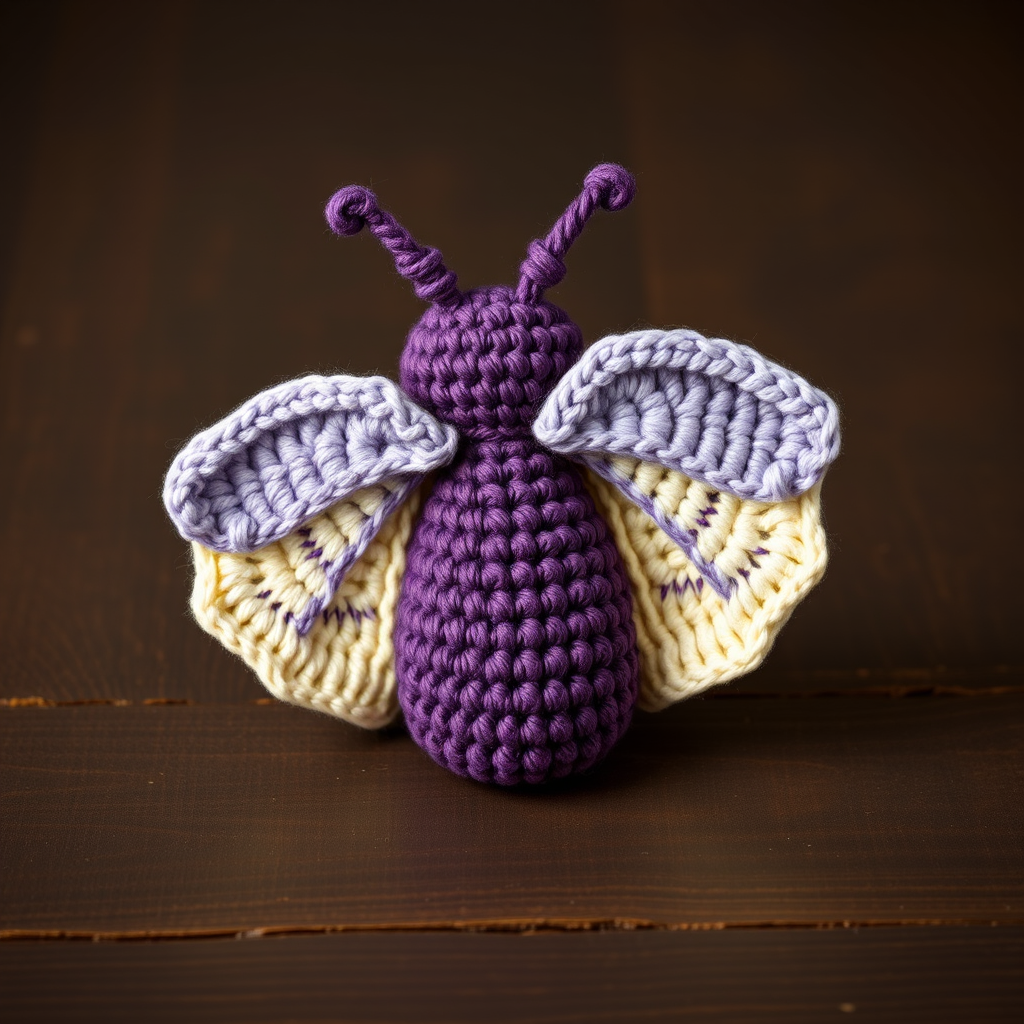
Bring a touch of twilight magic to your shelf with this ethereal moth amigurumi, featuring softly glowing wings and a plush, huggable body. Perfect for fans of gothic-cute decor and cozy handmade gifts, this pattern is beginner-friendly and works up quickly. The deep purple body, dusty lavender upper wings, and cream lower wings create a striking nocturnal palette, while the optional glow-in-the-dark yarn adds a whimsical surprise when the lights go out. Whether you're crafting for yourself or gifting to a fellow night owl, this moonlit moth is sure to become a cherished companion.
Materials Needed
Before you begin, gather the following supplies to ensure a smooth crochet session:
- Yarn: Worsted weight cotton or acrylic in:
- Deep purple (body and head)
- Dusty lavender (upper wings)
- Cream (lower wings and antennae)
- Small amount of glow-in-the-dark yarn (optional, for wing accents)
- Hook: 3.5mm crochet hook (or size needed to meet gauge)
- Gauge: 4 sc x 4 rows = 1 inch in single crochet (not critical for this project, but helps achieve the right size)
- Other: Yarn needle, stitch marker, polyester fiberfill stuffing, black yarn or safety eyes (6mm recommended), scissors
Step-by-Step Instructions
This pattern uses standard US crochet terms. Work in continuous rounds unless otherwise noted. Use a stitch marker to track the beginning of each round.
Body (make 1)
Round 1: With deep purple, make a magic ring, work 6 sc into the ring. (6 sts)
Round 2: Inc in each st around. (12 sts)
Round 3: (Sc in next st, inc) around. (18 sts)
Round 4: (Sc in next 2 sts, inc) around. (24 sts)
Round 5-8: Sc in each st around. (24 sts) – This creates the body's height.
Round 9: (Sc in next 2 sts, dec) around. (18 sts)
Round 10: (Sc in next st, dec) around. (12 sts)
Stuff firmly with polyester fiberfill, shaping the body into a plump oval.
Round 11: Dec around. (6 sts)
Fasten off, leaving a tail to weave in. Weave the end through the remaining stitches and pull tight to close the hole.
Head (make 1)
Round 1: With deep purple, make a magic ring, work 6 sc into the ring. (6 sts)
Round 2: Inc in each st around. (12 sts)
Round 3: (Sc in next st, inc) around. (18 sts)
Round 4-6: Sc in each st around. (18 sts) – This forms the head's rounded shape.
Round 7: (Sc in next st, dec) around. (12 sts)
Stuff lightly – the head should be soft but not overly firm, so it sits naturally on the body.
Round 8: Dec around. (6 sts)
Fasten off, leaving a long tail (about 12 inches) for sewing to the body.
Wings (make 4 – 2 upper, 2 lower)
Note: Wings are worked in rows, not rounds. Turn at the end of each row.
Upper Wing (make 2)
Row 1: With dusty lavender, ch 6, sc in 2nd ch from hook and in each ch across. (5 sts)
Row 2: Ch 1, turn, sc in each st. (5 sts)
Row 3: Ch 1, turn, sc in first st, inc in next, sc in next, inc in next, sc in last. (7 sts)
Row 4: Ch 1, turn, sc in each st. (7 sts)
Row 5: Ch 1, turn, sc in first 2 sts, inc in next, sc in next, inc in next, sc in last 2. (9 sts)
Row 6: Ch 1, turn, sc in each st. (9 sts)
Row 7: Ch 1, turn, sc in first 3 sts, inc in next, sc in next, inc in next, sc in last 3. (11 sts)
Row 8: Ch 1, turn, sc in each st. (11 sts)
Row 9: Ch 1, turn, sc in first 4 sts, inc in next, sc in next, inc in next, sc in last 4. (13 sts)
Row 10: Ch 1, turn, sc in each st. (13 sts)
Fasten off, leaving a long tail (about 12 inches) for sewing.
Lower Wing (make 2)
Row 1: With cream, ch 4, sc in 2nd ch from hook and in each ch across. (3 sts)
Row 2: Ch 1, turn, sc in each st. (3 sts)
Row 3: Ch 1, turn, sc in first st, inc in next, sc in last. (4 sts)
Row 4: Ch 1, turn, sc in each st. (4 sts)
Row 5: Ch 1, turn, sc in first st, inc in next, sc in next, inc in last. (6 sts)
Row 6: Ch 1, turn, sc in each st. (6 sts)
Row 7: Ch 1, turn, sc in first 2 sts, inc in next, sc in next, inc in last 2. (8 sts)
Row 8: Ch 1, turn, sc in each st. (8 sts)
Fasten off, leaving a long tail (about 12 inches) for sewing.
Antennae (make 2)
With cream, ch 10. Sc in 2nd ch from hook, sc in next 3 ch, sl st in next 2 ch, sc in last 3 ch. This creates a gently curled, tapered shape. Fasten off, leaving a tail (about 6 inches) for sewing.
Assembly
Now it's time to bring your moth to life! Follow these steps in order:
- Sew the head to the body: Position the head on top of the body, slightly centered. Using the long tail from the head, whipstitch around the opening, catching stitches from both pieces. Sew securely, then weave in the end.
- Attach the upper wings: Place the upper wings on the sides of the body, near the top (just below the head). The wider edge (Row 10) should face outward, and the narrower edge (Row 1) should point toward the body. Using the long tail, sew each wing securely to the body with a whipstitch. Make sure they are symmetrical.
- Attach the lower wings: Position the lower wings slightly below the upper wings, also on the sides. The wider edge (Row 8) faces outward. Sew each lower wing to the body using the long tail. The lower wings should sit just beneath the upper wings, creating a layered look.
- Sew the antennae: Place the antennae on the top of the head, slightly apart. The curled end should point upward and slightly outward. Sew each antennae securely using its tail, then weave in the ends.
- Embroider the eyes: Using black yarn or embroidery floss, embroider simple French knots or small satin stitches for the eyes. Place them about 3-4 stitches apart on the front of the head, slightly above the center. Alternatively, attach 6mm safety eyes before stuffing the head (insert them between Rounds 4 and 5, about 4 stitches apart).
- Optional glow-in-the-dark accent: To add a magical touch, use a small amount of glow-in-the-dark yarn to embroider a few tiny dots or a subtle pattern on the upper wings. This will catch the light and glow softly in the dark.
Finishing
Weave in all remaining ends with your yarn needle, making sure they are hidden inside the work. Gently shape the wings by hand, curving them slightly outward for a natural, fluttering look. Fluff the body and head to ensure the stuffing is evenly distributed. Your moonlit moth is now complete!
This pattern is perfect for beginners and experienced crocheters alike. The simple stitches and clear construction make it a relaxing project, while the unique design ensures a stunning result. Display your moth on a shelf, desk, or nightstand – it's sure to be a conversation starter. Happy crocheting!



