Harbor Light Washcloth Trio Free Pattern: Modern Lace Crochet Cloths
Harbor Light Washcloth Trio: A Beginner-Friendly Lace Crochet Pattern
Introduction
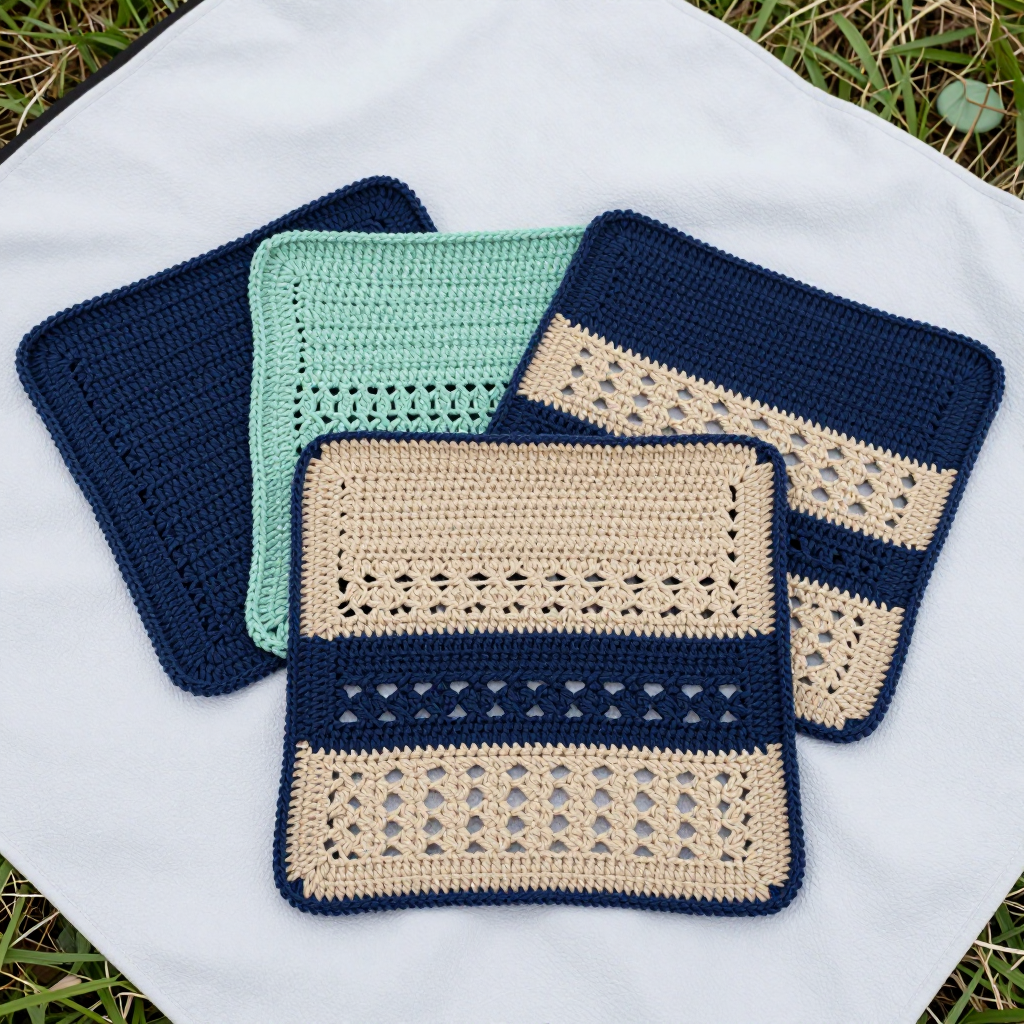
If you have never held a crochet hook before, the Harbor Light Washcloth Trio is the perfect first project for you. These three flat, square washcloths are worked in simple back-and-forth rows, alternating calm bands of solid single crochet with airy bands of open lace, so you practice one easy stitch while creating something genuinely beautiful. The finished cloths measure about 8 x 8 inches (20 x 20 cm) and feel soft but sturdy in the hand, with a matte cotton texture and a gentle drape. Made in three solid nautical colors — deep navy, soft seafoam, and warm sand — they look lovely stacked on a bathroom shelf or folded beside the sink. Best of all, each cloth works up quickly, so you can finish your very first one in an evening and feel proud of what you made.
Materials Needed
- Yarn: Super fine (weight category 1) cotton yarn, approximately 27–32 stitches to 4 inches. You need about 90–110 yards per washcloth. The sample uses three solid nautical colors: 1 skein each of navy, seafoam, and sand.
- Crochet hook: Size D/3 (3.25 mm).
- Stitch markers: At least 4, to mark corners and the first stitch of a row.
- Tapestry needle: A blunt-tipped needle with a large eye for weaving in ends.
- Scissors: Any sharp pair for cutting yarn.
- Finished size: Each washcloth measures approximately 8 x 8 inches (20 x 20 cm) after blocking.
Abbreviations and Beginner Glossary
- ch – chain: wrap the yarn over your hook and pull it through the loop already on your hook. This makes one chain stitch.
- sc – single crochet: insert your hook into the stitch, yarn over, pull up a loop (2 loops on hook), yarn over again, and pull through both loops. One single crochet made.
- sk – skip: do not work into the next stitch; simply move past it to the following stitch.
- sp – space: the open gap created by a chain (for example, a "ch-3 sp" is the hole made by three chains).
- st / sts – stitch / stitches: one completed stitch, or several.
- slip stitch (sl st) – insert hook into the stitch, yarn over, and pull through both the stitch and the loop on your hook at once. Used here to join the border round.
- turn – flip your work over so you can work back in the other direction.
- fasten off – cut the yarn, pull the tail through the last loop, and tighten to secure.
- row-end – the side edge of your work, where each row begins and ends.
- perimeter – the entire outer edge of the square (all four sides).
Gauge
Gauge: 28 stitches and 14 rows = 4 inches in the alternating solid/lace pattern.
Gauge matters because it tells you how big your finished washcloth will be. If your stitches are looser than the gauge, your cloth will come out larger than 8 x 8 inches; if tighter, it will be smaller. To check, crochet a small swatch about 5 inches square following the row pattern, then lay a ruler across the middle and count how many stitches fit in 4 inches and how many rows fit in 4 inches. If you have too many stitches, try a larger hook; if too few, try a smaller hook.
Beginner Tips Before You Start
- Count your stitches every row. The solid rows should always have 56 stitches, and the lace rows should always have 14 single crochets and 14 chain-3 spaces. Counting keeps your edges straight.
- Use stitch markers. Place one in the first stitch of each row and one in each corner as you work the border, so you never lose your place.
- Do not pull the yarn too tight. Keep your chains relaxed and even; tight chains make the lace rows pucker and shrink the cloth.
- Remember the ch 1 does not count as a stitch. Work your first single crochet into the very first stitch, not into the chain.
- Work the three cloths one at a time. Finish and block each color before starting the next so you can compare sizes and keep them consistent.
- Keep your turning chain short. A single chain at the start of each row keeps the side edges neat and easy to border later.
Step-by-Step Instructions
Notes
Each washcloth is worked flat in rows, back and forth, turning at the end of every row. The pattern uses a 4-row repeat: two solid rows (single crochet) followed by two open-lace rows (chain spaces and single crochet). The ch 1 at the beginning of a row does not count as a stitch. Make three washcloths, one in each color: Navy, Seafoam, and Sand.
Body (make 3, one in each color)
Foundation: Ch 57.
Row 1 (solid): Sc in 2nd ch from hook and in each ch across. Turn. (56 sc)
Row 2 (solid): Ch 1, sc in each st across. Turn. (56 sc)
Row 3 (lace): Ch 1, sc in first st, *ch 3, sk 3 sts, sc in next st; repeat from * across to last 4 sts, ch 3, sk 3 sts, sc in last st. Turn. (14 sc, 14 ch-3 sps)
Row 4 (lace): Ch 1, sc in first st, *ch 3, sc in next ch-3 sp; repeat from * across, ch 3, sc in last st. Turn. (14 sc, 14 ch-3 sps)
Rows 5–6: Repeat Rows 1–2 (solid rows). (56 sc)
Rows 7–8: Repeat Rows 3–4 (lace rows). (14 sc, 14 ch-3 sps)
Repeat Rows 1–4 a total of 7 times (this brings you through Row 28), then work Rows 1–2 once more (Rows 29–30). Do not fasten off. (56 sc)
Border
Round 1: Ch 1, sc evenly around the entire perimeter, working 1 sc in each st along the top and bottom edges and 1 sc in each row-end along the side edges, with 3 sc in each corner. Join with a slip stitch to the first sc. Fasten off and weave in ends.
Assembly and Finishing
There is no seaming in this project — each washcloth is complete once the border is joined. To finish:
- Weave in ends: Thread each yarn tail onto the tapestry needle and run it back and forth through the back of several stitches, then trim close to the fabric so it disappears.
- Block each washcloth: Soak the cloth in cool water, gently squeeze out the excess (do not wring), and lay it flat on a towel. Pin it to exactly 8 x 8 inches (20 x 20 cm), squaring the corners and smoothing the lace rows open. Allow it to dry completely before removing the pins.
- Check your size: Once dry, measure again; blocking evens out the stitches and gives the cloth its crisp, square shape.
Pro Tips and Variations
- Change colors: Make a striped cloth by switching colors every two solid rows, carrying the unused yarn loosely up the side edge.
- Adjust the size: For a smaller cloth, begin with a shorter foundation chain in a multiple of 4 plus 1 (for example, ch 45 for about 6 inches wide); for a larger cloth, add chains in the same multiple.
- Substitute yarn: Any super fine (1) cotton works well; just check your gauge first, since a different fiber may change the finished size.
- Add a hanging loop: After the border, ch 12 and slip stitch back into the corner to create a small loop for hanging by the sink.