Frosty Nook Tissue Box Cover Free Pattern – Knit Snowman Head with Scarf
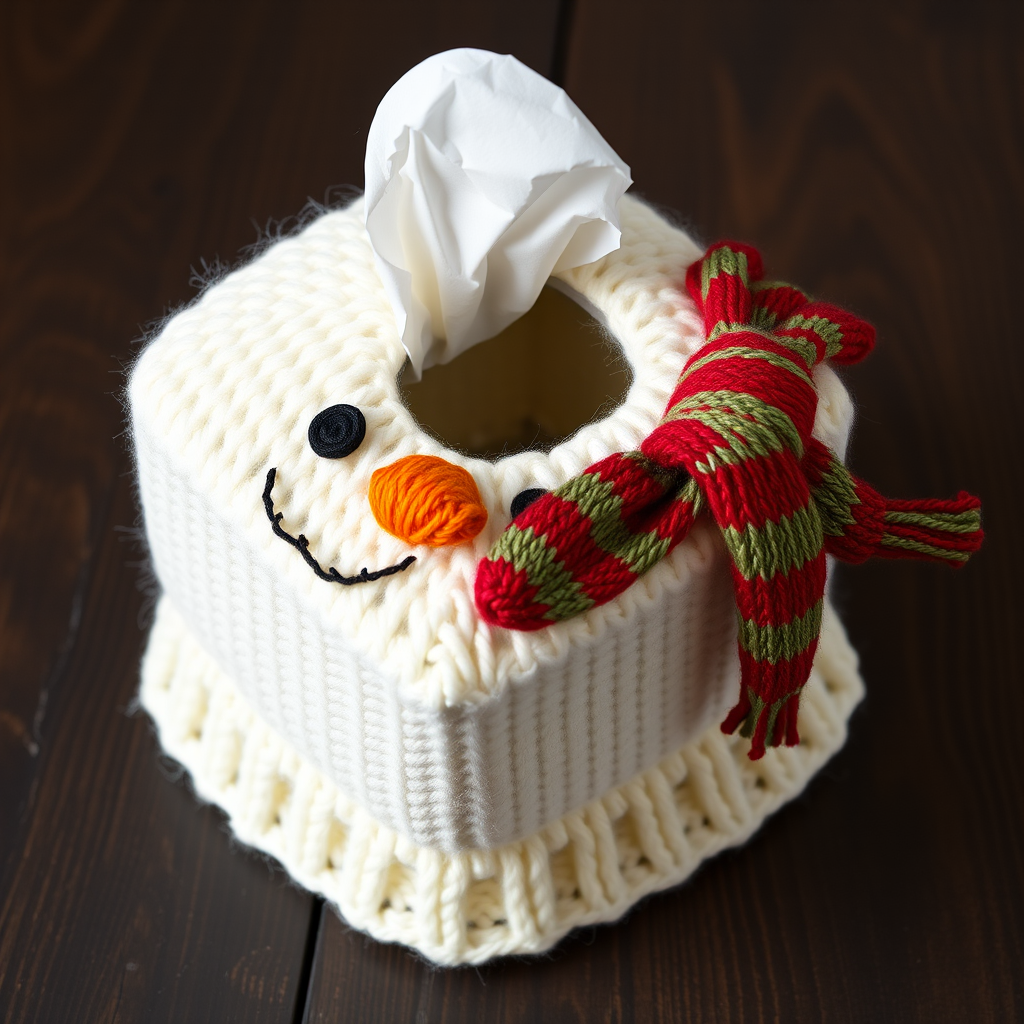
Frosty Nook Tissue Box Cover Free Pattern – Knit Snowman Head with Scarf
Bring a touch of winter whimsy to your home with this charming knitted snowman head tissue box cover, complete with a cozy scarf and button eyes. This pattern is perfect for adding handmade warmth to any room while keeping tissues within easy reach. Whether you're a seasoned knitter or just starting your amigurumi journey, this beginner-friendly project is a delightful way to create a functional piece of winter decor that will bring smiles all season long.
Why You'll Love This Pattern
This tissue box cover is more than just a practical accessory—it's a statement piece. The soft white worsted weight yarn creates a plush, inviting texture that mimics freshly fallen snow, while the embroidered face adds personality and charm. The pattern is worked flat and seamed, making it accessible for knitters who prefer not to work in the round. Plus, the scarf is a quick, separate piece that adds the perfect finishing touch.
Materials Needed
Before you begin, gather the following materials to ensure a smooth knitting experience:
- Yarn: Worsted weight yarn in white (approx. 200g), black (small amount for eyes and mouth), orange (small amount for nose), and red or green (approx. 50g for scarf)
- Needles: US 7 (4.5 mm) knitting needles
- Notions: Tapestry needle, scissors, stitch markers
- Other: A standard cube tissue box (approx. 5x5x5 inches)
Gauge
18 stitches and 24 rows = 4 inches in stockinette stitch. While gauge is important for fit, this pattern is forgiving—the cover stretches slightly to accommodate standard tissue boxes. If your gauge is off, adjust needle size accordingly.
Abbreviations
- CO: Cast on
- K: Knit
- P: Purl
- K2tog: Knit two stitches together (right-leaning decrease)
- SSK: Slip slip knit (left-leaning decrease)
- St(s): Stitch(es)
- Rep: Repeat
Step-by-Step Instructions
Main Body (Worked Flat, Then Seamed)
Cast On: CO 60 stitches with white yarn.
Foundation Rows: Work Rows 1-4 in stockinette stitch (Knit on right side, Purl on wrong side). This creates a neat, rolled edge that will form the bottom hem.
Body: Continue in stockinette stitch until the piece measures 5 inches from the cast-on edge, ending with a wrong-side row. This section will wrap around the sides of the tissue box.
Shape the Top (Crown of Head)
Now we'll shape the rounded crown of the snowman's head. Each decrease row reduces the stitch count by 4, creating a gentle curve. Remember to purl all even-numbered rows.
Row 1 (right side): K2tog, K26, K2tog, K2tog, K26, K2tog – 56 sts.
Note: The two K2tog in the center create a subtle seam line that will be hidden at the top.
Row 2 and all even rows: Purl all stitches.
Row 3: K2tog, K24, K2tog, K2tog, K24, K2tog – 52 sts.
Row 5: K2tog, K22, K2tog, K2tog, K22, K2tog – 48 sts.
Row 7: K2tog, K20, K2tog, K2tog, K20, K2tog – 44 sts.
Row 9: K2tog, K18, K2tog, K2tog, K18, K2tog – 40 sts.
Row 11: K2tog, K16, K2tog, K2tog, K16, K2tog – 36 sts.
Row 13: K2tog, K14, K2tog, K2tog, K14, K2tog – 32 sts.
Row 15: K2tog, K12, K2tog, K2tog, K12, K2tog – 28 sts.
Row 17: K2tog, K10, K2tog, K2tog, K10, K2tog – 24 sts.
Row 19: K2tog, K8, K2tog, K2tog, K8, K2tog – 20 sts.
Row 21: K2tog, K6, K2tog, K2tog, K6, K2tog – 16 sts.
Row 23: K2tog, K4, K2tog, K2tog, K4, K2tog – 12 sts.
Row 25: K2tog, K2, K2tog, K2tog, K2, K2tog – 8 sts.
Row 27: K2tog across – 4 sts.
Finish: Cut yarn, leaving a 12-inch tail. Thread through remaining 4 stitches, pull tight to close the top, and secure with a knot.
Bottom Opening (Hem)
With the right side facing you, pick up and knit 60 stitches along the cast-on edge. Work in stockinette stitch for 2 inches. Bind off loosely—this creates a flared hem that tucks neatly under the tissue box, keeping the cover securely in place.
Face Details (Embroidered After Seaming)
For best results, embroider the face after seaming the body but before placing it on the tissue box. This allows you to work on a flat surface and ensure proper placement.
Eyes: Using black yarn and a tapestry needle, embroider two French knots or satin stitches for eyes. Place them approximately 2 inches apart, centered on the front of the head, about 1.5 inches from the top. For a friendlier look, position them slightly lower and wider apart.
Mouth: Using black yarn, embroider a small smile below the eyes using a backstitch. Create a gentle curve by making 5-7 small stitches. Keep the smile subtle—about 1 inch wide.
Nose: Using orange yarn, embroider a small triangle or a few straight stitches for a carrot nose. Center it between the eyes and mouth, pointing slightly downward. For a 3D effect, you can work a few satin stitches in a triangular shape.
Scarf
Cast On: CO 8 stitches with red or green yarn.
Row 1: Knit all stitches.
Row 2: Purl all stitches.
Repeat these 2 rows until the scarf measures 12 inches long. Bind off.
Optional: For a striped scarf, alternate colors every 4 rows. Simply switch yarn colors at the beginning of a right-side row and weave in ends as you go.
Assembly
- Seam the body: With right sides together, sew the side seams of the main body using mattress stitch or whip stitch. Leave the bottom open—this is where the tissue box will slide in.
- Turn right side out: Gently turn the cover so the right side faces outward. Use a blunt needle to push out the corners of the crown for a smooth, rounded shape.
- Insert tissue box: Place the tissue box inside the cover, pulling the bottom hem over the bottom edges of the box. The hem should fit snugly to keep the cover in place.
- Adjust face details: If the face looks off-center or too high/low, adjust the embroidery now before adding the scarf.
- Tie the scarf: Wrap the scarf around the neck area (just below the face) and tie a knot or bow at the side. Trim the ends to your desired length, or leave them fringed for a playful look.
Finishing Touches
Weave in all loose ends using a tapestry needle. Take your time to ensure all yarn tails are securely hidden—this will make your cover look professional and last longer. Give the cover a gentle steam block (optional) to even out the stitches and enhance the plush texture.
Tips for Success
- Count your stitches: After each decrease row, count your stitches to ensure you haven't missed a decrease. This prevents lopsided shaping.
- Use stitch markers: Place markers between the center two K2tog decreases to help you keep track of your place.
- Test the fit: Before seaming, wrap the body around your tissue box to check the fit. If it's too tight, add 4-6 stitches to your cast-on; if too loose, subtract 4-6 stitches.
- Embroider carefully: For the eyes, use a French knot for a raised, button-like appearance. If you prefer flat eyes, use satin stitch instead.
Customization Ideas
Once you've mastered the basic pattern, feel free to get creative! Add a top hat by knitting a small rectangle and brim, or embroider rosy cheeks with pink yarn. You could also knit a tiny bird or snowflake to attach to the scarf. The possibilities are endless—make this Frosty Nook cover uniquely yours.
Care Instructions
To keep your snowman looking fresh, hand wash in cold water with a mild detergent. Gently squeeze out excess water (do not wring), then reshape and lay flat to dry. Avoid machine washing or drying, as this can felt the yarn and distort the shape.
Your Frosty Nook Tissue Box Cover is now ready to brighten any room! Whether you gift it to a fellow crafter or keep it for your own cozy winter decor, this charming snowman is sure to become a beloved seasonal favorite. Happy knitting!



