Coral Cove Sea Turtle Amigurumi Free Pattern – A Knitted Ocean Drifter
Coral Cove Sea Turtle Amigurumi Free Pattern – A Knitted Ocean Drifter
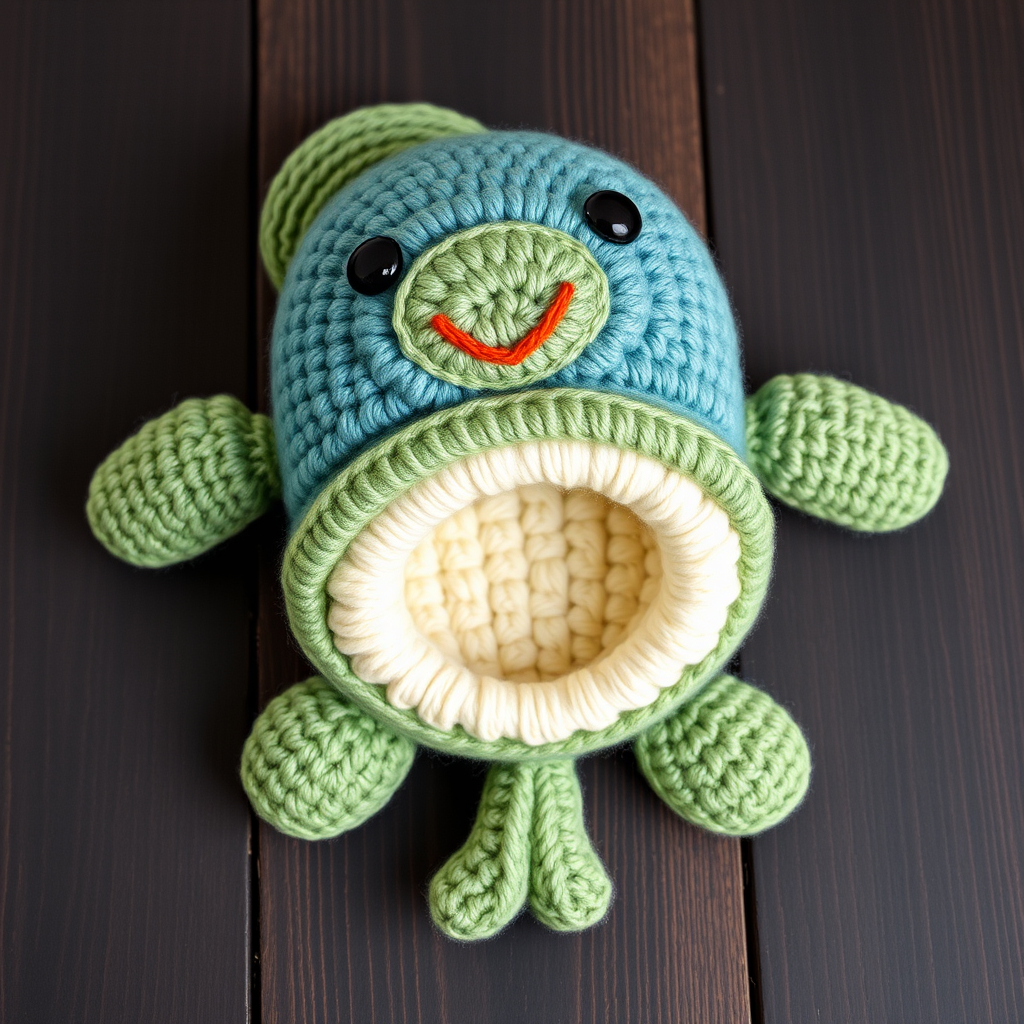
Dive into a serene ocean-inspired project with this knitted sea turtle amigurumi. Featuring a beautifully textured shell, gentle flippers, and a sweet embroidered smile, this little ocean drifter is the perfect companion for cozy crafting sessions. Whether you're looking for a handmade gift for a nature lover or a charming addition to your ocean decor, this beginner-friendly pattern will guide you through every stitch. Let's bring this gentle sea creature to life!
Materials Needed
Before we begin our crafting journey, gather these essential supplies:
- Yarn: Worsted weight cotton or acrylic yarn in four colors:
- Sage green (body and flippers)
- Teal (shell)
- Cream (belly)
- Warm coral (accents and smile)
- Knitting Needles: US 5 (3.75 mm) double-pointed needles (set of 4) or circular needle for magic loop
- Crochet Hook: Size G/6 (4.0 mm) for flippers, head, and tail
- Stuffing: Polyester fiberfill for a soft, huggable finish
- Eyes: 8 mm safety eyes or black yarn for embroidered eyes
- Notions: Stitch markers, tapestry needle for sewing and weaving ends
Gauge: 5 stitches and 7 rows = 1 inch in stockinette stitch (not critical for amigurumi, but keep consistent tension for best results)
Abbreviations
- K: knit
- P: purl
- K2tog: knit two together (decrease)
- M1: make one (increase)
- St(s): stitch(es)
- Rnd: round
- Sc: single crochet
- Inc: increase (2 sc in same stitch)
- Dec: decrease (sc two together)
Step-by-Step Instructions
Body (Knitted, Worked in the Round)
Start with your sage green yarn. Using your double-pointed needles or circular needle, follow these rounds:
- Rnd 1: Cast on 6 sts, join in the round, place marker. (6 sts)
- Rnd 2: M1 in each st around. (12 sts)
- Rnd 3: *K1, M1* repeat around. (18 sts)
- Rnd 4: *K2, M1* repeat around. (24 sts)
- Rnd 5: *K3, M1* repeat around. (30 sts)
- Rnd 6: *K4, M1* repeat around. (36 sts)
- Rnd 7: *K5, M1* repeat around. (42 sts)
- Rnd 8-14: Knit all sts (7 rounds even).
- Rnd 15: *K5, K2tog* repeat around. (36 sts)
- Rnd 16: *K4, K2tog* repeat around. (30 sts)
- Rnd 17: *K3, K2tog* repeat around. (24 sts)
Important: Stuff the body firmly with fiberfill at this point. You want it nice and plump for a cuddly turtle!
- Rnd 18: *K2, K2tog* repeat around. (18 sts)
- Rnd 19: *K1, K2tog* repeat around. (12 sts)
- Rnd 20: K2tog around. (6 sts)
Cut yarn, thread through remaining sts, pull tight, and weave in end securely.
Shell (Knitted, Worked in the Round)
Switch to your teal yarn for the beautiful textured shell:
- Rnd 1: Cast on 6 sts, join in the round. (6 sts)
- Rnd 2: M1 in each st. (12 sts)
- Rnd 3: *K1, M1* repeat. (18 sts)
- Rnd 4: *K2, M1* repeat. (24 sts)
- Rnd 5: *K3, M1* repeat. (30 sts)
- Rnd 6: *K4, M1* repeat. (36 sts)
- Rnd 7: *K5, M1* repeat. (42 sts)
- Rnd 8-16: Knit all sts (9 rounds even).
- Rnd 17: *K5, K2tog* repeat. (36 sts)
- Rnd 18: *K4, K2tog* repeat. (30 sts)
- Rnd 19: *K3, K2tog* repeat. (24 sts)
Tip: Stuff the shell lightly, keeping it somewhat flat so it fits nicely over the body like a dome.
- Rnd 20: *K2, K2tog* repeat. (18 sts)
- Rnd 21: *K1, K2tog* repeat. (12 sts)
- Rnd 22: K2tog around. (6 sts)
Cut yarn, thread through remaining sts, pull tight, and weave in end. Leave a long tail for sewing the shell to the body.
Belly (Knitted Flat)
Using your cream yarn, create the flat oval belly:
- Cast on 10 sts.
- Row 1: Knit all sts.
- Row 2: K1, M1, knit to last st, M1, K1. (12 sts)
- Repeat Row 2 until you have 20 sts.
- Knit even for 10 rows.
- Next row: K1, K2tog, knit to last 3 sts, K2tog, K1. (18 sts)
- Repeat decrease row until 10 sts remain.
- Bind off all sts. Weave in ends.
Head (Crocheted)
Switch to your crochet hook and sage green yarn:
- Rnd 1: Magic ring, 6 sc. (6 sts)
- Rnd 2: Inc in each st. (12 sts)
- Rnd 3: *Sc 1, inc* repeat. (18 sts)
- Rnd 4-6: Sc in each st around. (18 sts)
- Rnd 7: *Sc 2, inc* repeat. (24 sts)
- Rnd 8-10: Sc in each st around. (24 sts)
Eye placement: Insert safety eyes between Rnds 6 and 7, about 4 sts apart. If using embroidered eyes, mark the spots and stitch them later.
- Rnd 11: *Sc 2, dec* repeat. (18 sts)
- Rnd 12: *Sc 1, dec* repeat. (12 sts)
Stuff the head firmly with fiberfill.
- Rnd 13: Dec around. (6 sts)
Cut yarn, thread through remaining sts, pull tight, and weave in end.
Flippers (Crocheted, Make 4)
Using sage green yarn, create four flippers for swimming:
- Rnd 1: Magic ring, 6 sc. (6 sts)
- Rnd 2: Inc in each st. (12 sts)
- Rnd 3-5: Sc in each st around. (12 sts)
- Rnd 6: *Sc 1, dec* repeat. (8 sts)
- Rnd 7-8: Sc in each st around. (8 sts)
Lightly stuff each flipper.
- Rnd 9: Dec around. (4 sts)
Cut yarn, thread through remaining sts, pull tight, and weave in end. Leave a long tail for sewing.
Tail (Crocheted)
Still using sage green yarn:
- Rnd 1: Magic ring, 4 sc. (4 sts)
- Rnd 2: Inc in each st. (8 sts)
- Rnd 3-4: Sc in each st around. (8 sts)
- Rnd 5: *Sc 1, dec* repeat. (6 sts)
- Rnd 6: Sc in each st around. (6 sts)
Cut yarn, thread through remaining sts, pull tight, and weave in end. Leave a long tail for sewing.
Assembly
Now comes the fun part – bringing your turtle together! Follow these steps carefully:
- Attach the belly: Sew the cream belly onto the flat bottom of the body, aligning the edges neatly. Use small, invisible stitches.
- Position the shell: Place the teal shell on top of the body, slightly overlapping the belly edge. Sew around the edges, leaving a small opening. Add extra stuffing if needed for a fuller look, then close the opening securely.
- Attach the head: Sew the head to the front of the body, just above the belly line. Make sure it's centered and secure.
- Add the flippers: Attach two flippers on each side of the body, positioning them slightly forward to create a gentle swimming pose. Ensure they're evenly spaced.
- Sew the tail: Attach the tail to the back of the body, opposite the head.
- Embroider the smile: Using your warm coral yarn, embroider a small, sweet smile on the head below the eyes.
- Weave in all ends: Double-check that all yarn tails are securely woven in and trimmed.
Finishing Touches
Gently shape your turtle by adjusting the stuffing to create smooth, rounded contours. Ensure all parts are securely attached – give the flippers and head a gentle tug to test. Your Coral Cove Sea Turtle is now ready to drift into cozy hands and bring a touch of ocean serenity to any space!
This pattern is perfect for beginners and experienced crafters alike. The combination of knitting and crochet techniques creates a wonderfully textured, professional-looking finished piece. Enjoy your crafting journey, and don't forget to share your beautiful sea turtle creation!



