Coral Cove Mommy and Me Seahorse Amigurumi Free Pattern – A Coastal Cuddle Duo
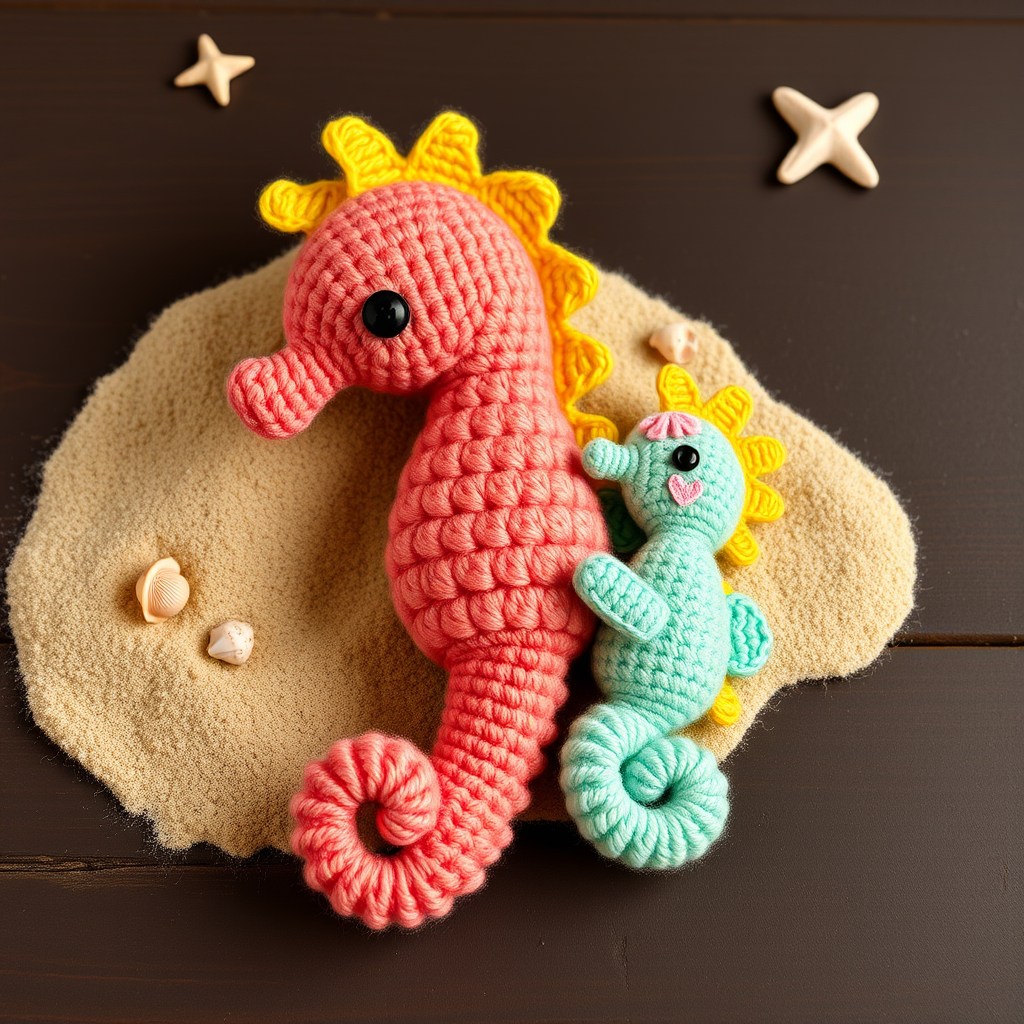
Coral Cove Mommy and Me Seahorse Amigurumi Free Pattern – A Coastal Cuddle Duo
Dive into a whimsical underwater world with this enchanting crochet set featuring a mama seahorse and her tiny baby, adorned with swirling shells and soft seaweed fronds. Perfect for ocean-loving crafters seeking a heartwarming handmade gift, this beginner-friendly pattern is a delightful way to bring a piece of the coast into your home. Whether you're a seasoned crocheter or just starting your amigurumi journey, this pattern is designed to be approachable, detailed, and incredibly rewarding.
This adorable duo makes a thoughtful present for baby showers, birthdays, or simply as a charming decorative piece for a coastal-themed nursery. The combination of coral pink, seafoam green, and golden yellow creates a vibrant yet soothing palette that captures the essence of a serene underwater cove. Let's get started on creating your very own ocean companions!
Materials Needed
Before we begin, gather all your materials to ensure a smooth and enjoyable crocheting experience. Here's what you'll need:
- Yarn: Worsted weight cotton yarn in coral pink, seafoam green, and cream; small amounts of golden yellow for accents. Cotton yarn is ideal for amigurumi as it holds its shape well and has a soft, natural texture.
- Hook: 3.5mm (E) crochet hook. This size works perfectly with worsted weight yarn to create a tight, firm fabric that prevents stuffing from showing through.
- Gauge: 4 sc x 4 rows = 1 inch. While gauge is not critical for this project, maintaining consistent tension ensures neat shaping and a professional finish.
- Other Supplies: Polyester fiberfill for stuffing, a stitch marker to track rounds, a yarn needle for assembly, and either 6mm and 4mm safety eyes or black yarn for embroidering eyes.
- Optional: A small piece of pink yarn for cheek blush and a few tiny beads or embroidery thread for added details like seashells or starfish.
Step-by-Step Instructions
This pattern is worked in continuous spiral rounds unless otherwise noted. Always use a stitch marker to track the beginning of each round. All pieces are crocheted separately and assembled at the end. Let's begin with the mama seahorse, then move on to her baby, and finally assemble them together.
Mama Seahorse (Approx. 10 Inches Tall)
Head and Body (Worked as One Piece)
This is the main piece of the mama seahorse, worked from the snout down to the tail. Take your time with the increases and decreases to ensure a smooth, rounded shape.
- Round 1: With coral pink, make a magic ring, 6 sc into ring. (6)
- Round 2: Inc in each sc around. (12)
- Round 3: (Sc in next sc, inc) around. (18)
- Round 4: (Sc in next 2 sc, inc) around. (24)
- Round 5: (Sc in next 3 sc, inc) around. (30)
- Rounds 6-10: Sc in each sc around. (30) – This forms the snout. Keep your tension even to create a smooth, tubular shape.
- Round 11: (Sc in next 4 sc, inc) around. (36)
- Rounds 12-16: Sc in each sc around. (36) – This is the head. The head should feel slightly wider than the snout.
- Round 17: (Sc in next 5 sc, inc) around. (42)
- Rounds 18-22: Sc in each sc around. (42) – This is the neck/chest area. You'll notice the piece starting to curve naturally.
- Round 23: (Sc in next 6 sc, inc) around. (48)
- Rounds 24-30: Sc in each sc around. (48) – This is the belly. The belly should be nice and round, so keep your stitches loose enough to allow for stuffing later.
- Round 31: (Sc in next 6 sc, dec) around. (42)
- Round 32: (Sc in next 5 sc, dec) around. (36)
- Round 33: (Sc in next 4 sc, dec) around. (30)
- Round 34: (Sc in next 3 sc, dec) around. (24)
- Round 35: (Sc in next 2 sc, dec) around. (18)
- Stuff firmly with polyester fiberfill, shaping the belly and head as you go. Make sure the stuffing is distributed evenly to avoid lumps.
- Round 36: (Sc in next sc, dec) around. (12)
- Round 37: Dec around. (6)
- Fasten off, leaving a long tail. Weave the tail through the front loops of the remaining stitches, pull tight to close the hole, and secure with a knot.
Tail (Curled)
The tail is a simple tube that you'll curl into a spiral shape and attach to the body. This gives the seahorse its characteristic whimsical look.
- Round 1: With coral pink, make a magic ring, 6 sc into ring. (6)
- Round 2: (Sc in next 2 sc, inc) around. (8)
- Rounds 3-20: Sc in each sc around. (8) – Work in a spiral, then coil the tail into a spiral shape and sew to the bottom of the body. To get a nice curl, gently twist the tail as you sew it to the body.
- Fasten off, leaving a long tail for sewing.
Dorsal Fin (Back Fin)
This fin is worked in rows, not rounds, and adds a lovely texture to the back of the seahorse.
- Row 1: With seafoam green, ch 6, sc in 2nd ch from hook and across. (5)
- Row 2: Ch 1, turn, sc in each sc across. (5)
- Row 3: Ch 1, turn, sc2tog, sc in next sc, sc2tog. (3)
- Row 4: Ch 1, turn, sc2tog, sc in last sc. (2)
- Fasten off, leaving a tail. Sew to the back of the body, just behind the head. Position it so it stands upright slightly.
Pectoral Fin (Side Fin)
These small fins are worked in the round and attached to the sides of the head, near the snout.
- Round 1: With seafoam green, make a magic ring, 5 sc into ring. (5)
- Round 2: Inc in each sc around. (10)
- Rounds 3-4: Sc in each sc around. (10)
- Fasten off, leaving a tail. Sew to the side of the head, near the snout. Make sure to attach it securely so it doesn't flop around.
Crown (Coronet)
The crown adds a regal touch to your mama seahorse. It's a small, simple piece that sits on top of the head.
- Round 1: With golden yellow, make a magic ring, 6 sc into ring. (6)
- Round 2: (Sc in next sc, inc) around. (9)
- Round 3: (Sc in next 2 sc, inc) around. (12)
- Round 4: Sc in each sc around. (12)
- Fasten off, leaving a tail. Sew to the top of the head, slightly towards the back.
Eyes and Cheeks
Adding the face is the most fun part! It brings your seahorse to life.
- Eyes: With black yarn, embroider two French knots or use safety eyes (6mm) placed between rounds 12-13, about 4 stitches apart. If using safety eyes, insert them before stuffing the head to ensure they're secure.
- Cheek Blush: With a small piece of pink yarn, embroider a few straight stitches on each cheek. This adds a sweet, rosy glow to your seahorse's face.
Baby Seahorse (Approx. 5 Inches Tall)
Now let's create the adorable baby seahorse. It follows a similar structure to the mama but is smaller and uses seafoam green as the main color.
Head and Body
- Round 1: With seafoam green, make a magic ring, 6 sc into ring. (6)
- Round 2: Inc in each sc around. (12)
- Round 3: (Sc in next sc, inc) around. (18)
- Round 4: (Sc in next 2 sc, inc) around. (24)
- Rounds 5-8: Sc in each sc around. (24) – Snout and head. Keep the tension consistent for a smooth shape.
- Round 9: (Sc in next 3 sc, inc) around. (30)
- Rounds 10-14: Sc in each sc around. (30) – Belly. This section should be slightly wider than the head.
- Round 15: (Sc in next 3 sc, dec) around. (24)
- Round 16: (Sc in next 2 sc, dec) around. (18)
- Stuff firmly with polyester fiberfill. Make sure the belly is plump and the head is well-shaped.
- Round 17: (Sc in next sc, dec) around. (12)
- Round 18: Dec around. (6)
- Fasten off, weave in end securely.
Tail
- Round 1: With seafoam green, make a magic ring, 6 sc into ring. (6)
- Rounds 2-12: Sc in each sc around. (6)
- Fasten off, coil and sew to bottom of body. The baby's tail is shorter and simpler than the mama's, but still curls nicely.
Dorsal Fin
- Row 1: With coral pink, ch 4, sc in 2nd ch from hook and across. (3)
- Row 2: Ch 1, turn, sc2tog, sc in last sc. (2)
- Fasten off, sew to back. This small fin adds a lovely pop of color to the baby's back.
Crown
- Round 1: With golden yellow, make a magic ring, 6 sc into ring. (6)
- Round 2: (Sc in next sc, inc) around. (9)
- Fasten off, sew to top of head. The baby's crown is smaller and simpler than the mama's, but just as charming.
Eyes
- Eyes: Use 4mm safety eyes or embroider with black yarn. Place them between rounds 5-6, about 3 stitches apart. If using safety eyes, insert them before stuffing.
Assembly
Now that all the pieces are complete, it's time to bring your seahorse duo together. This is where the magic happens!
- Sew the Mama's Tail: Position the tail at the bottom of the mama's body, curling it forward. Sew it securely using the long tail left from the tail piece. Make sure the curl faces forward for that classic seahorse look.
- Sew the Baby's Tail: Similarly, attach the baby's tail to the bottom of its body, curling it forward. Sew securely.
- Attach Fins and Crowns: Sew the dorsal fins to the back of each seahorse, just behind the head. Attach the pectoral fin to the side of the mama's head. Sew the crowns to the tops of their heads. Ensure all pieces are firmly attached.
- Add Optional Details: For extra charm, you can crochet a small seashell or starfish and attach it to the mama's belly. Use cream yarn to create a tiny shell shape, or golden yellow for a starfish. This adds a lovely personal touch.
- Weave in All Ends: Use your yarn needle to carefully weave in any remaining loose ends. Make sure they are hidden within the stitches so they don't show.
Finishing
Your Coral Cove seahorse duo is almost complete! Here are a few final touches to make them perfect.
- Shape the Seahorses: Gently bend the tails into a natural curve. You can also adjust the fins and crowns to sit nicely.
- Pose Them Together: For a heartwarming display, curve the mama's tail around the baby, as if she's protecting him. This creates a beautiful, cohesive piece.
- Enjoy Your Creation: Your adorable ocean duo is ready to be gifted or displayed. They make a wonderful addition to any nursery, shelf, or coastal-themed decor.
Congratulations on completing your Coral Cove Mommy and Me Seahorse amigurumi set! This project is a labor of love that results in a truly special keepsake. The combination of soft cotton yarn, careful shaping, and charming details makes these seahorses a joy to create and a treasure to own. Happy crocheting, and may your crafting adventures always be filled with creativity and warmth!



