Chirp the Chick Free Pattern – A Knitted Springtime Companion
Chirp the Chick Free Pattern – A Knitted Springtime Companion
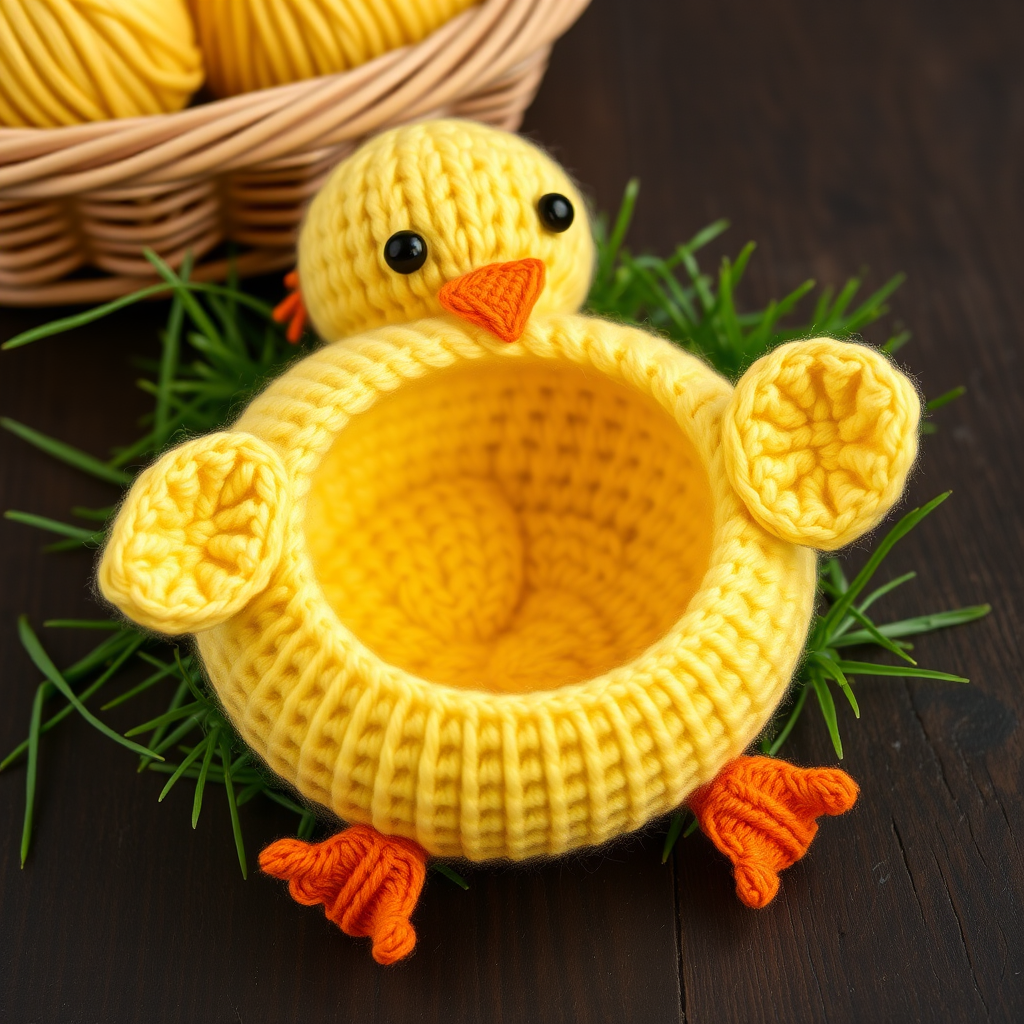
Bring a burst of sunshine into your home with Chirp, a delightfully plump knitted chick with a soft, textured shell and a cheerful orange beak. This beginner-friendly pattern creates a cuddly companion that's perfect for Easter baskets, nursery decor, or a handmade gift that will be treasured. Whether you're new to amigurumi-style knitting or a seasoned crafter looking for a quick weekend project, Chirp is designed to bring joy with every stitch.
Knitted flat in simple stockinette stitch and seamed together, this pattern uses basic increases and decreases to shape the chick's rounded body. The result is a squishy, huggable toy with visible knit texture that feels wonderfully handcrafted. Let's get started!
Materials Needed
Before you begin, gather the following supplies. All items are readily available at craft stores or online.
Yarn
- Worsted weight yarn in three colors:
- Sunny Yellow – for the body and wings (approx. 100 yards)
- Soft White – optional, for a belly patch or accents
- Bright Orange – for the beak and feet (small amount)
- Recommended brand: Lion Brand Vanna's Choice (or any similar worsted weight yarn)
Needles & Tools
- US Size 4 (3.5 mm) knitting needles – or size needed to obtain gauge
- Tapestry needle – for seaming and weaving in ends
- Stitch markers – to help track rows if needed
- Fiberfill stuffing – for a plump, cuddly body
- Black yarn or safety eyes – for the eyes (if using safety eyes, attach before stuffing)
Gauge
5 stitches and 7 rows = 1 inch in stockinette stitch. Gauge is not critical for this project, but maintaining consistent tension throughout will ensure your chick comes out evenly shaped.
Step-by-Step Instructions
This pattern is worked flat in pieces and seamed together. All pieces are knitted in stockinette stitch (knit on the right side, purl on the wrong side) unless otherwise noted. Take your time, count your stitches after each increase row, and you'll have a beautiful chick in no time.
HEAD & BODY (make 1)
This is the main piece that forms the chick's rounded, egg-shaped body. You'll start at the top of the head, increase to create the widest part of the body, then decrease to close the bottom.
- Cast on 6 stitches with yellow yarn. Leave a tail of about 6 inches for seaming later.
- Row 1 (RS): Knit all stitches.
- Row 2: Purl all stitches.
- Row 3 (Increase row): Knit into the front and back of each stitch (kfb) across – you should now have 12 stitches.
- Row 4: Purl all stitches.
- Row 5 (Increase row): *K1, kfb* repeat across – you should now have 18 stitches.
- Row 6: Purl all stitches.
- Row 7 (Increase row): *K2, kfb* repeat across – you should now have 24 stitches.
- Row 8: Purl all stitches.
- Row 9 (Increase row): *K3, kfb* repeat across – you should now have 30 stitches.
- Row 10: Purl all stitches.
- Rows 11-20: Work even in stockinette stitch (knit on RS, purl on WS) for 10 rows. This creates the tall, rounded body of the chick.
- Row 21 (Decrease row): *K3, k2tog* repeat across – you should now have 24 stitches.
- Row 22: Purl all stitches.
- Row 23 (Decrease row): *K2, k2tog* repeat across – you should now have 18 stitches.
- Row 24: Purl all stitches.
- Row 25 (Decrease row): *K1, k2tog* repeat across – you should now have 12 stitches.
- Row 26: Purl all stitches.
- Row 27 (Decrease row): *K2tog* repeat across – you should now have 6 stitches.
- Finish: Cut the yarn, leaving a long tail (about 12 inches). Thread the tail through a tapestry needle, then pass it through the remaining 6 stitches on your needle. Pull tight to close the top of the head and secure with a knot.
Seaming the Body: With the right side facing out, use the tail yarn to sew the side seam from the cast-on edge (bottom) to the gathered top (head). Leave the bottom opening unsewn for now – you'll stuff the chick through this opening. Turn the body right side out and stuff firmly with fiberfill, shaping it into a plump egg form. Set aside.
WINGS (make 2)
These small, flat wings are quick to knit and add the perfect finishing touch to Chirp's sides.
- Cast on 4 stitches with yellow yarn, leaving a 6-inch tail.
- Row 1 (RS): Knit all stitches.
- Row 2: Purl all stitches.
- Row 3 (Increase row): Kfb, k2, kfb – you should now have 6 stitches.
- Row 4: Purl all stitches.
- Row 5: Knit all stitches.
- Row 6: Purl all stitches.
- Row 7 (Decrease row): K2tog, k2, k2tog – you should now have 4 stitches.
- Row 8: Purl all stitches.
- Bind off all stitches. Leave a tail for sewing.
Attaching the Wings: Position each wing on the side of the body, about 1/3 of the way down from the top of the head. Using the tail yarn and a tapestry needle, sew the wing securely to the body with small, neat stitches. Repeat for the second wing on the opposite side.
BEAK (make 1)
Chirp's adorable orange beak is a tiny triangle that adds instant character.
- Cast on 3 stitches with orange yarn, leaving a 6-inch tail.
- Row 1 (RS): Knit all stitches.
- Row 2: Purl all stitches.
- Row 3 (Increase row): Kfb, k1, kfb – you should now have 5 stitches.
- Row 4: Purl all stitches.
- Bind off all stitches. Leave a tail for sewing.
Attaching the Beak: Fold the beak in half (the bind-off edge will form the point). Position it on the front of the head, centered between where the eyes will go. Sew it securely in place using the tail yarn, tucking the cast-on edge underneath.
FEET (make 2)
These simple little feet give Chirp a stable base and a playful look.
- Cast on 5 stitches with orange yarn, leaving a 6-inch tail.
- Row 1 (RS): Knit all stitches.
- Row 2: Purl all stitches.
- Bind off all stitches. Leave a tail for sewing.
Attaching the Feet: Fold each foot in half (the bind-off edge forms the bottom). Position them on the bottom front of the body, slightly apart from each other. Sew each foot securely in place using the tail yarn, making sure they're evenly spaced.
ASSEMBLY
Now it's time to bring all the pieces together and give Chirp its final touches.
- Close the bottom: Using a tapestry needle and yellow yarn, sew the bottom opening closed with a whip stitch or mattress stitch. Weave in the end securely.
- Add the eyes: Embroider two small eyes using black yarn, or attach safety eyes if you prefer. Place them about 1 inch apart, centered above the beak. If using safety eyes, attach them before stuffing the body (during the seaming step).
- Weave in all loose ends: Use your tapestry needle to hide any remaining yarn tails inside the body or along the seams.
FINISHING
Your Chirp the Chick is complete! Gently shape the chick by fluffing the fiberfill and smoothing the knitted fabric. Add a small ribbon or bow around the neck for extra charm if desired – a pastel ribbon in mint or pink looks especially sweet.
Chirp makes a wonderful gift for newborns, toddlers, or anyone who loves handmade treasures. Display it in an Easter basket, on a nursery shelf, or gift it to a friend who needs a little sunshine. Because it's knitted flat and seamed, this pattern is also perfect for using up small amounts of worsted weight yarn from your stash.
Happy knitting! We'd love to see your Chirp creations – share them with us and spread the springtime cheer.



