Cherry Chevron Gear Shift Garter: Free Crochet C2C Pattern
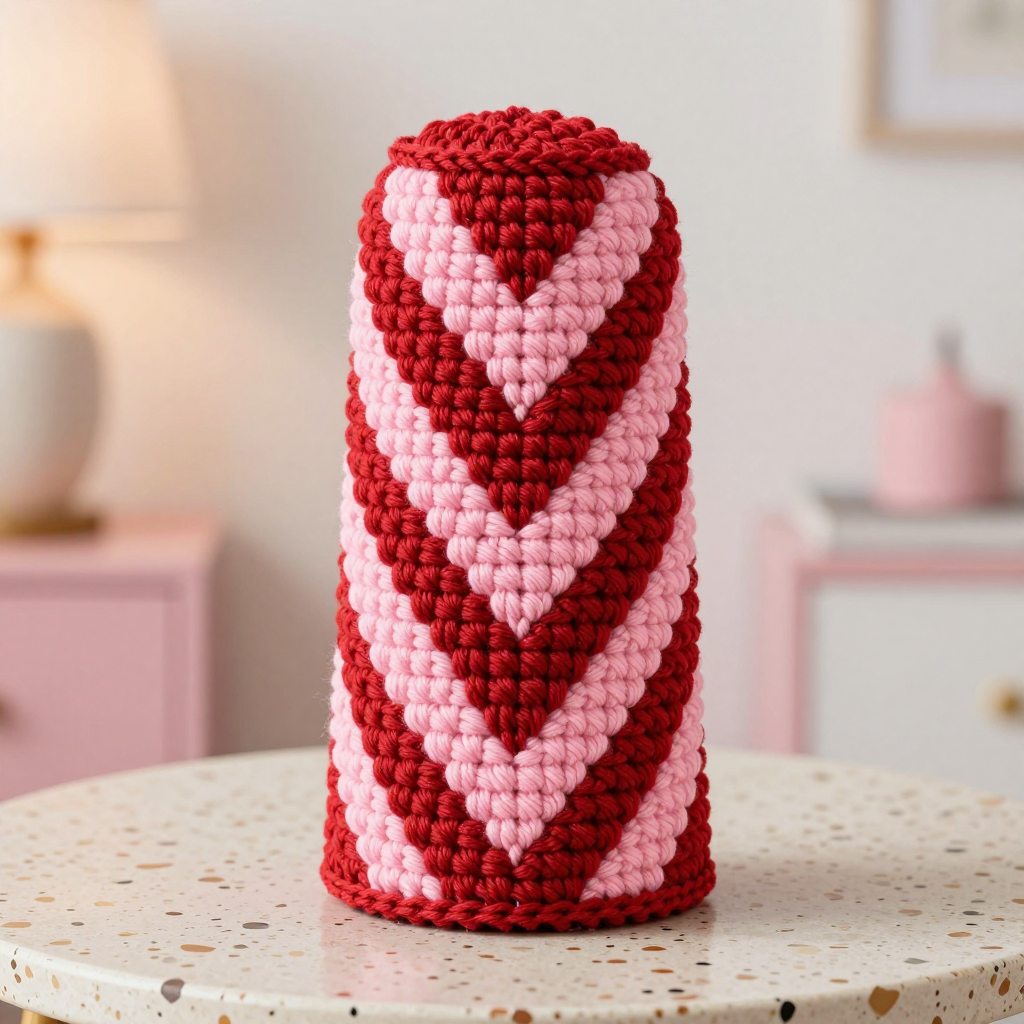
Cherry Chevron Gear Shift Garter: Free Crochet C2C Pattern
Introduction
If you have never held a crochet hook before, this is the perfect very first project to make something you will actually use every single day. The Cherry Chevron Gear Shift Garter is a small, stretchy tube that slips snugly over an automatic gear shift knob like a little sock, keeping it warm in winter and cool in summer. It is worked as a flat rectangle in corner-to-corner (C2C) crochet, then seamed into a tube, so you never have to crochet in a circle or juggle complicated shaping. The finished piece is about 4 inches around and 6 inches tall, made from soft, slightly fuzzy bulky wool in cherry red and candy pink arranged in diagonal pairs that look like little leaves in a crisp Art Deco chevron. The surface has a nubby, grid-like texture from the C2C blocks, and the whole thing feels cozy, tailored, and surprisingly professional for a beginner make.
Materials Needed
- Yarn: Bulky weight (category 5) wool, approximately 55 yd / 50 m total. You will need about 30 yd / 27 m of cherry red (Color A) and 25 yd / 23 m of candy pink (Color B).
- Crochet hook: Size J/10 (6.0 mm), or whatever size you need to match the gauge below.
- Stitch markers: At least 4, to mark the first and last block of each row and to hold your place at color changes.
- Tapestry needle: A blunt-tipped yarn needle with a large eye, for seaming and weaving in ends.
- Scissors: Sharp craft scissors for cutting yarn.
- Measuring tape or ruler: For checking gauge and finished size.
- Finished size: Flat strip before seaming is 8 in / 20 cm wide by 6 in / 15 cm tall. Seamed tube is approximately 4 in / 10 cm in circumference (unstretched) by 6 in / 15 cm tall, and it stretches to fit a knob up to 2.5 in / 6.5 cm in diameter.
Abbreviations and Beginner Glossary
- ch – chain. Wrap the yarn over your hook and pull it through the loop already on your hook. This makes one chain stitch.
- dc – double crochet. Wrap yarn over hook, insert hook into the stitch, pull up a loop (3 loops on hook), yarn over and pull through 2 loops, yarn over and pull through the last 2 loops.
- sl st – slip stitch. Insert hook into the stitch, yarn over, and pull the yarn straight through both the stitch and the loop on your hook at the same time. It makes a nearly invisible joining stitch.
- sc – single crochet. Insert hook into the stitch, pull up a loop (2 loops on hook), yarn over and pull through both loops.
- st / sts – stitch / stitches.
- sp – space. The little gap between stitches, usually under a chain.
- block – one C2C unit made of [ch 3, 3 dc]. Each block is about 1 in / 2.5 cm square.
- C2C – corner-to-corner. A technique where you build a square or rectangle diagonally, one block at a time, starting from one corner.
- turn – flip your work over so you can crochet back the other way.
- fasten off – cut the yarn, pull the tail all the way through the last loop, and tighten to secure.
- work even – continue in the same pattern without adding or removing blocks.
- RS / WS – right side (the pretty front) / wrong side (the back).
Gauge
Gauge: 1 C2C block = 1 in / 2.5 cm square (one block = ch 3, 3 dc). 4 blocks = 4 in / 10 cm.
Gauge matters because it controls the finished size. If your blocks are bigger than 1 inch, the tube will be too loose and slide off the knob. If they are smaller, it will be too tight to stretch on. To make a gauge swatch, crochet the first 4 rows of the pattern (which gives you 4 blocks in a triangle) and measure one block from corner to corner. If your block is larger than 1 inch, try a smaller hook (size I/9, 5.5 mm). If it is smaller, try a larger hook (size K/10.5, 6.5 mm).
Beginner Tips Before You Start
- Use stitch markers on the first and last block of every row. C2C rows are easy to lose track of, and markers show you exactly where the row begins and ends.
- Do not pull your yarn too tight. C2C blocks need to stay square and slightly loose so the tube can stretch over the knob. Keep your chains relaxed.
- Carry the unused color loosely up the side. When you change colors, let the resting yarn hang along the edge with a little slack. If you pull it tight, the edge will pucker.
- Count your blocks out loud at the end of each row. The count in parentheses tells you exactly how many blocks you should have.
- Change color at the very start of a row, before you make the first chain. This keeps the stripes crisp and the leaf pairs aligned.
- Keep your tension even rather than fast. Slow, steady stitches make a neater grid than rushing.
Step-by-Step Instructions
NOTES: This is corner-to-corner (C2C) crochet worked as a flat rectangle, then seamed into a tube. Each block is [ch 3, 3 dc]. Color changes happen at the start of a block; carry the unused color loosely up the side. The chevron effect comes from alternating diagonal stripes of A and B in pairs, creating leaf-pair motifs. The pattern runs 24 rows total: 8 increase rows, 8 even rows, and 8 decrease rows.
Set-Up
With Color A, ch 4.
Row 1: Dc in the 4th ch from hook (this makes your first block). Turn. (1 block)
Increase Section (Rows 2–8)
Row 2: Ch 6, dc in the 4th ch from hook, ch 3, sl st in the ch-3 sp of the previous row, ch 3, 3 dc in the same sp. Turn. (2 blocks)
Row 3: Ch 6, dc in the 4th ch from hook, [ch 3, sl st in the next ch-3 sp, ch 3, 3 dc in the same sp] twice. Turn. (3 blocks)
Row 4: Change to Color B. Ch 6, dc in the 4th ch from hook, work blocks across as established. Turn. (4 blocks)
Row 5: With Color B, continue as established. Turn. (5 blocks)
Row 6: Change to Color A. Continue as established. Turn. (6 blocks)
Row 7: With Color A, continue as established. Turn. (7 blocks)
Row 8: Change to Color B. Continue as established. Turn. (8 blocks)
Main Body (Rows 9–16, Even Width of 8 Blocks)
Row 9: With Color B, ch 3, sl st in the first ch-3 sp, ch 3, 3 dc in the same sp, work blocks across to the last block, do not work into the final block. Turn. (8 blocks)
Row 10: Change to Color A. Work even as Row 9. Turn. (8 blocks)
Row 11: With Color A, work even. Turn. (8 blocks)
Row 12: Change to Color B. Work even. Turn. (8 blocks)
Row 13: With Color B, work even. Turn. (8 blocks)
Row 14: Change to Color A. Work even. Turn. (8 blocks)
Row 15: With Color A, work even. Turn. (8 blocks)
Row 16: Change to Color B. Work even. Turn. (8 blocks)
Decrease Section (Rows 17–24)
Row 17: With Color B, ch 3, sl st in the first ch-3 sp, ch 3, 3 dc in the same sp, work blocks across, omitting the final block. Turn. (7 blocks)
Row 18: Change to Color A. Decrease 1 block as in Row 17. Turn. (6 blocks)
Row 19: With Color A, decrease 1 block. Turn. (5 blocks)
Row 20: Change to Color B. Decrease 1 block. Turn. (4 blocks)
Row 21: With Color B, decrease 1 block. Turn. (3 blocks)
Row 22: Change to Color A. Decrease 1 block. Turn. (2 blocks)
Row 23: With Color A, decrease 1 block. Turn. (1 block)
Row 24: Ch 3, sl st in the ch-3 sp, ch 3, 3 dc in the same sp. Fasten off, leaving a 12 in / 30 cm tail. (1 block)
Assembly and Finishing
1. Weave in the color-change ends. Thread each short tail onto your tapestry needle and run it back and forth through the wrong side of the fabric for about an inch, then trim close to the fabric. Do not knot the tails; weaving hides them.
2. Fold and seam. Fold the strip in half with right sides together so the two 6 in / 15 cm edges meet, forming a tube. Thread the long 12 in / 30 cm tail onto your tapestry needle. Whipstitch the side seam closed by passing the needle through one matching block on each side, then back through the next matching block, row for row, all the way down. Pull each stitch snug but not tight. Fasten off and weave in the tail.
3. Turn right side out. Push the tube right side out through the opening. The chevron leaf pairs should now align vertically down the front.
4. Optional edging. With Color A, join yarn at the top opening. Work 1 round of sc evenly around the top opening (about 16–20 sc), join with a sl st to the first sc, and fasten off. Repeat for 1 round of sc around the bottom opening. Weave in all ends.
5. Block gently. Spritz the finished tube lightly with water, shape it into a neat cylinder, and let it dry flat. Bulky wool smooths out beautifully with a light block, and the C2C blocks will square up.
6. Fit it on the knob. Slip the tube over the gear shift knob, stretching gently to fit. The bulky wool and the nubby C2C blocks hold it snug.
Pro Tips and Variations
- Change the color story. Swap cherry red and candy pink for any two bulky colors you love. Try charcoal and cream for a modern look, or forest green and mustard for a vintage feel. Keep the two-row pairing so the leaf-pair chevron still reads clearly.
- Adjust the size. To fit a larger knob, add one or two more even rows in the Main Body (each extra row adds about 1 in / 2.5 cm of height). To make the tube wider, increase to 9 or 10 blocks before working even, then decrease back down.
- Substitute the yarn. Any bulky (category 5) yarn works, but wool gives the best stretch and grip. If you use acrylic, make a gauge swatch first, because acrylic behaves differently and may not stretch as much.
- Add a matching keychain. Work only the Increase Section (Rows 1–8) and the Decrease Section (Rows 17–24) for a tiny 4-block diamond, seam it the same way, and slip it over a keyring for a matching accessory.