Celestial Bloom Starfish Free Pattern – A Crocheted Ocean Star
Celestial Bloom Starfish Free Pattern – A Crocheted Ocean Star
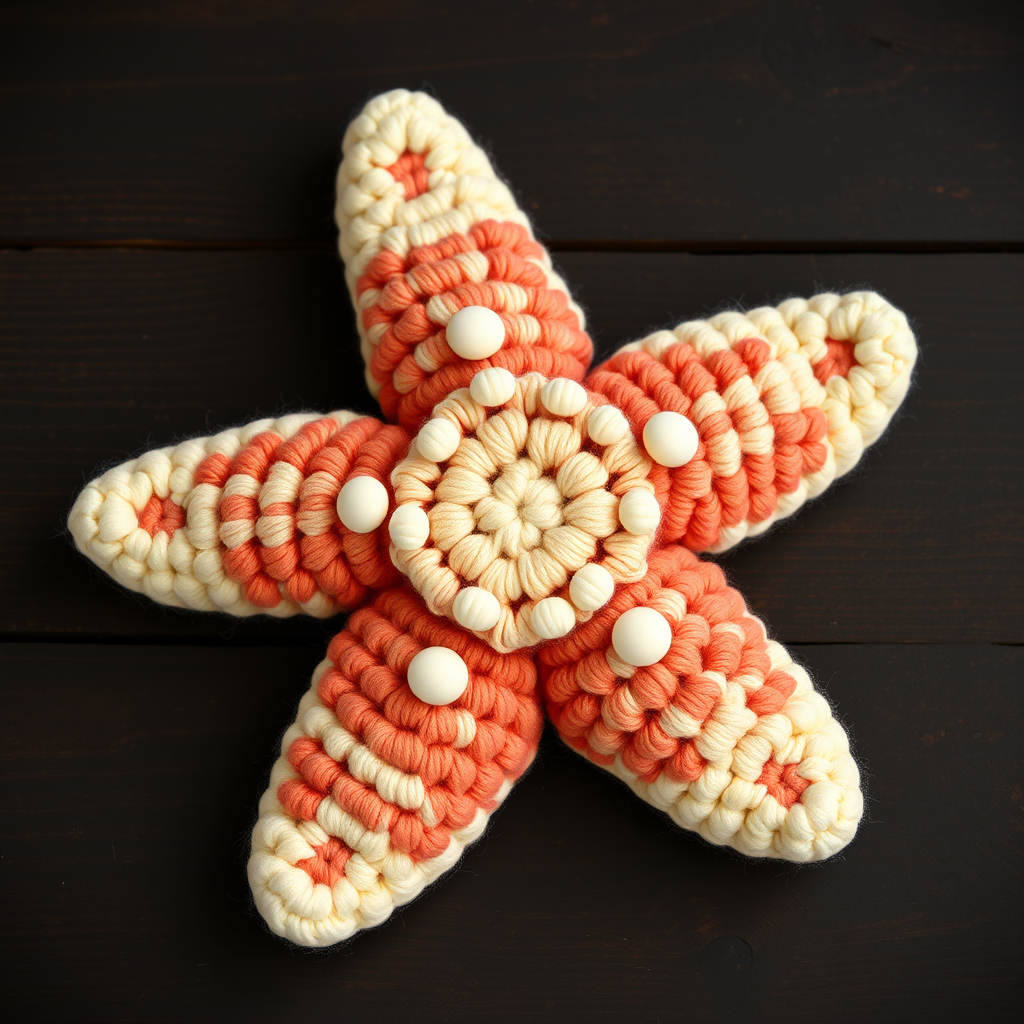
Bring the magic of the sea to your hands with this charming crocheted starfish, featuring a soft gradient of coral and cream. Perfect for a whimsical nursery or a coastal-themed decor piece, this beginner-friendly amigurumi project works up quickly and lies flat with a soft, plush appearance. The five plump arms radiate from a central disc, and the optional French knots add a delightful tactile texture that mimics the tiny bumps found on real starfish. No people or faces are present—just pure, handmade ocean charm.
Materials Needed
- Yarn: Worsted weight cotton yarn in three colors: coral, peach, and cream (approximately 50g of each for a standard-sized starfish)
- Hook: 3.5mm crochet hook (or size needed to obtain gauge)
- Gauge: 4 sc x 4 rows = 1 inch (important for achieving the correct density and size)
- Other: Yarn needle for weaving in ends, stitch markers (optional but helpful), scissors
Step-by-Step Instructions
Crochet Terminology & Abbreviations
Before you begin, familiarize yourself with these standard crochet abbreviations used throughout the pattern:
- sc – single crochet
- st(s) – stitch(es)
- ch – chain
- 2 sc in next st – increase (work two single crochets into the same stitch)
- sc2tog – single crochet two together (decrease)
- magic ring – adjustable loop technique for starting in the round
Starting the Central Disc
Step 1: Begin with a magic ring using your coral yarn. This technique creates a tight, seamless center that won't leave a hole.
Round 1: Work 6 single crochets (sc) into the magic ring. Pull the tail to close the ring tightly. Join with a slip stitch to the first sc. You should have 6 stitches. (6)
Round 2: Work 2 sc in each stitch around. Join with a slip stitch. (12)
Round 3: *Sc in the next stitch, 2 sc in the next stitch* – repeat from * to * around. Join. (18)
Round 4: *Sc in the next 2 stitches, 2 sc in the next stitch* – repeat around. Join. (24)
Round 5: *Sc in the next 3 stitches, 2 sc in the next stitch* – repeat around. Join. (30)
Round 6: *Sc in the next 4 stitches, 2 sc in the next stitch* – repeat around. Join. (36)
Round 7: *Sc in the next 5 stitches, 2 sc in the next stitch* – repeat around. Join. (42)
Round 8: *Sc in the next 6 stitches, 2 sc in the next stitch* – repeat around. Join. (48)
Round 9: *Sc in the next 7 stitches, 2 sc in the next stitch* – repeat around. Join. (54)
Round 10: *Sc in the next 8 stitches, 2 sc in the next stitch* – repeat around. Join. (60)
Tip: At this point, your circle should measure approximately 3.75 inches in diameter. If it's significantly larger or smaller, check your gauge and adjust your hook size accordingly.
Shaping the Five Arms
Now we'll create the starfish's distinctive five-arm shape. This is done by working chains that skip stitches, creating gaps that will become the spaces between arms.
Round 11 (Arm Formation):
- Work 12 sc in the next 12 stitches.
- Chain 10, then skip the next 10 stitches.
- Work 10 sc in the next 10 stitches (this completes the first arm's base).
- Chain 10, skip 10 stitches, work 10 sc in the next 10 stitches (second arm).
- Chain 10, skip 10 stitches, work 10 sc in the next 10 stitches (third arm).
- Chain 10, skip 10 stitches, work 10 sc in the next 10 stitches (fourth arm).
- Chain 10, skip 10 stitches, work 10 sc in the next 10 stitches (fifth arm).
- You should have used all 60 stitches from the previous round. Join with a slip stitch to the first sc of this round.
Note: You now have 5 chain-loops (each 10 chains long) that will form the arms, with 10 sc between each chain on the body.
Working Around Each Arm
Now you'll work around each arm to give it body and shape. Work each arm separately, starting from the base where it meets the central disc.
Arm 1:
- Starting at the base of the first chain-loop (where it joins the body), work 10 sc along the chain.
- At the tip of the chain (the end), work 3 sc in the last chain stitch to create a rounded point.
- Work 10 sc down the other side of the chain, back toward the body.
- Slip stitch to the body to secure.
Arm 2: Repeat the same process for the second chain-loop.
Arm 3: Repeat for the third chain-loop.
Arm 4: Repeat for the fourth chain-loop.
Arm 5: Repeat for the fifth chain-loop.
Tip: As you work each arm, you'll notice the chain naturally curves. Gently shape it as you go to ensure it lies flat.
Shaping the Arm Tips (Tapering)
To give your starfish those characteristic tapered, rounded tips, you'll now work a decrease round on each arm.
For each arm:
- Starting at the base of the arm (where it meets the body), work sc evenly around the arm.
- When you reach the tip (the rounded point), work 2 sc together (sc2tog) to begin tapering.
- Continue working sc around the arm, working another sc2tog at the very tip if needed to create a smooth, rounded point.
- Work your way back down the other side of the arm.
- Slip stitch to secure at the base.
Repeat this tapering process for all five arms. The goal is to create a gentle, rounded taper rather than a sharp point.
Adding Texture with French Knots (Optional)
For an authentic starfish look, add small cream French knots across the body and arms. These mimic the tiny bumps found on real starfish.
To create a French knot:
- Thread your yarn needle with cream yarn.
- Insert the needle from the back of the starfish to the front.
- Wrap the yarn around the needle 2-3 times.
- Insert the needle back through the fabric close to where you came up.
- Pull gently to create a small, tight knot on the surface.
Scatter 8-12 French knots across the central disc and a few along each arm for a natural, organic look.
Finishing Touches
Step 1: Fasten off your yarn by cutting it, leaving a 6-inch tail. Pull the tail through the last loop on your hook.
Step 2: Thread the tail onto your yarn needle and weave it through the stitches on the back of the starfish to secure it.
Step 3: Weave in all other loose ends using your yarn needle, being careful to hide them within the stitches.
Step 4: Gently block your starfish by pinning it flat and lightly steaming it (or spritzing with water and letting it dry flat). This will help it lie perfectly flat and even.
Color Gradient Option
To achieve the beautiful gradient effect shown in the photo, you can switch colors as you work:
- Rounds 1-4: Coral
- Rounds 5-7: Peach
- Rounds 8-10: Cream
- Arms: Continue with cream, or alternate between peach and cream for a more varied look
When changing colors, work the last yarn-over of the final stitch in the old color with the new color to create a seamless transition.
Care Instructions
This cotton starfish is durable and easy to care for. Hand wash in cold water with mild detergent, then lay flat to dry. Do not wring or twist. If needed, you can gently iron on a low setting with a pressing cloth.
Your Celestial Bloom Starfish is now complete! Display it on a shelf, use it as a nursery decoration, or give it as a handmade gift. The possibilities are as endless as the ocean itself. Happy crocheting!



