Bunny Lissy Amigurumi Free Pattern – Heirloom Knit Easter Bunny with Floral Crown
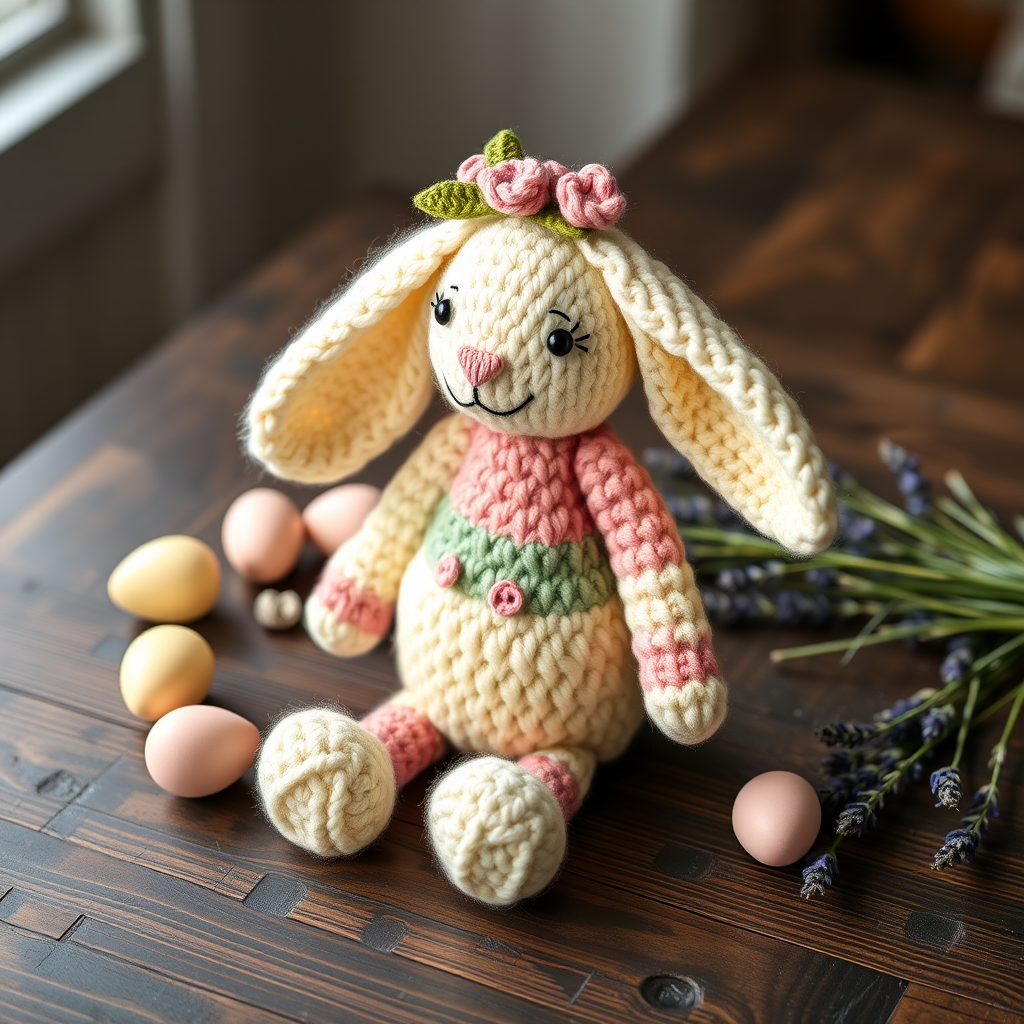
Introducing Bunny Lissy: A Timeless Heirloom Knitted Easter Bunny
There's something truly magical about creating a handmade heirloom that can be passed down through generations. The Bunny Lissy Amigurumi pattern captures that magic perfectly—a soft, cuddly knitted bunny with a delicate floral crown and a hand-stitched expression that radiates pure innocence. Whether you're crafting for an Easter basket, a nursery shelf, or a cherished baby gift, this pattern uses natural fibers and classic knitting techniques to create a companion that feels both nostalgic and fresh.
This pattern is designed with beginners in mind, using simple increases and decreases to shape each piece. The result is a plump, rounded bunny with long, gently curved ears and a sweet, hand-stitched face. The crocheted floral crown adds a whimsical touch that elevates this project from a simple toy to a true keepsake. Let's dive into everything you'll need to bring Bunny Lissy to life.
Materials Needed
Before you begin, gather the following supplies. Having everything ready will make the process smooth and enjoyable.
Yarn
- Worsted weight cotton or wool blend (e.g., Lion Brand 24/7 Cotton) in the following colors:
- Cream – for the bunny's body, head, ears, arms, and legs
- Blush pink – for the small flowers on the crown and the cheek blush
- Sage green – for the leaves on the crown
- Butter yellow – for the base of the floral crown
Knitting Needles & Crochet Hook
- US 4 (3.5 mm) knitting needles – for the body and head
- US 2 (2.75 mm) knitting needles – for the ears, arms, legs, and finer details
- US C/2 (2.75 mm) crochet hook – for the floral crown and flowers
Additional Supplies
- Tapestry needle – for seaming and embroidery
- Stuffing – polyester fiberfill or natural wool roving for a soft, firm fill
- Black embroidery floss – for the eyes
- Stitch markers – optional, but helpful for keeping track of rows
- Scissors
Gauge
22 stitches and 30 rows = 4 inches in stockinette stitch (not critical for amigurumi, but consistent tension helps achieve a neat, even finish).
Step-by-Step Instructions
Follow these detailed instructions carefully. Each piece is knitted flat and then seamed, which makes the pattern approachable for beginners. Take your time, and don't rush the stuffing—it's the key to a plump, huggable bunny.
HEAD (Knit Flat, Then Seamed)
- Cast on 10 stitches with cream yarn using your US 4 needles.
- Row 1: Knit all stitches (10 sts).
- Row 2: Purl all stitches.
- Row 3: K1, M1 (make one), K8, M1, K1 (12 sts).
- Row 4: Purl all stitches.
- Row 5: K1, M1, K10, M1, K1 (14 sts).
- Row 6: Purl all stitches.
- Row 7: K1, M1, K12, M1, K1 (16 sts).
- Row 8: Purl all stitches.
- Row 9: K1, M1, K14, M1, K1 (18 sts).
- Row 10: Purl all stitches.
- Rows 11–18: Work in stockinette stitch (knit odd rows, purl even rows) for 8 rows. You should have 18 stitches.
- Row 19: K1, K2tog (knit two together), K12, K2tog, K1 (16 sts).
- Row 20: Purl all stitches.
- Row 21: K1, K2tog, K10, K2tog, K1 (14 sts).
- Row 22: Purl all stitches.
- Row 23: K1, K2tog, K8, K2tog, K1 (12 sts).
- Row 24: Purl all stitches.
- Row 25: K1, K2tog, K6, K2tog, K1 (10 sts).
- Row 26: Purl all stitches.
- Finishing: Cut the yarn, leaving a long tail (about 12 inches). Thread the tail through a tapestry needle, then pass it through the remaining 10 stitches on the needle. Pull tight to gather and close the top of the head. Seam the back of the head using mattress stitch or whip stitch, leaving a small opening for stuffing. Stuff firmly, shaping the head into a smooth round ball. Close the opening with a few neat stitches.
BODY (Knit Flat, Then Seamed)
- Cast on 8 stitches with cream yarn using your US 4 needles.
- Row 1: Knit all stitches.
- Row 2: Purl all stitches.
- Row 3: K1, M1, K6, M1, K1 (10 sts).
- Row 4: Purl all stitches.
- Row 5: K1, M1, K8, M1, K1 (12 sts).
- Row 6: Purl all stitches.
- Row 7: K1, M1, K10, M1, K1 (14 sts).
- Row 8: Purl all stitches.
- Rows 9–20: Work in stockinette stitch for 12 rows. You should have 14 stitches.
- Row 21: K1, K2tog, K8, K2tog, K1 (12 sts).
- Row 22: Purl all stitches.
- Row 23: K1, K2tog, K6, K2tog, K1 (10 sts).
- Row 24: Purl all stitches.
- Row 25: K1, K2tog, K4, K2tog, K1 (8 sts).
- Finishing: Cut the yarn, leaving a long tail. Thread through the remaining 8 stitches, pull tight, and secure. Seam the sides of the body, leaving the bottom open. Stuff firmly, shaping the body into a plump oval. Close the bottom opening with neat stitches.
EARS (Make 2, Knit Flat)
- Cast on 6 stitches with cream yarn using your US 2 needles.
- Row 1: Knit all stitches.
- Row 2: Purl all stitches.
- Row 3: K1, M1, K4, M1, K1 (8 sts).
- Row 4: Purl all stitches.
- Rows 5–16: Work in stockinette stitch for 12 rows. You should have 8 stitches.
- Row 17: K1, K2tog, K2, K2tog, K1 (6 sts).
- Row 18: Purl all stitches.
- Row 19: K1, K2tog, K1, K2tog, K1 (4 sts).
- Finishing: Cut the yarn, thread through the remaining 4 stitches, and pull tight. Fold each ear in half lengthwise (with the right side out) and seam the bottom edge to create a slight curve. Do not stuff the ears—they should remain flat and floppy.
ARMS (Make 2, Knit Flat)
- Cast on 5 stitches with cream yarn using your US 2 needles.
- Row 1: Knit all stitches.
- Row 2: Purl all stitches.
- Row 3: K1, M1, K3, M1, K1 (7 sts).
- Rows 4–12: Work in stockinette stitch for 9 rows. You should have 7 stitches.
- Row 13: K1, K2tog, K1, K2tog, K1 (5 sts).
- Finishing: Cut the yarn, thread through the remaining 5 stitches, and pull tight. Seam the sides, leaving the top open. Stuff lightly—just enough to give the arm shape, but not so much that it becomes stiff.
LEGS (Make 2, Knit Flat)
- Cast on 6 stitches with cream yarn using your US 2 needles.
- Row 1: Knit all stitches.
- Row 2: Purl all stitches.
- Row 3: K1, M1, K4, M1, K1 (8 sts).
- Rows 4–14: Work in stockinette stitch for 11 rows. You should have 8 stitches.
- Row 15: K1, K2tog, K2, K2tog, K1 (6 sts).
- Finishing: Cut the yarn, thread through the remaining 6 stitches, and pull tight. Seam the sides, leaving the top open. Stuff lightly, just like the arms.
FLORAL CROWN (Crochet, in the Round)
This delicate crown sits atop Bunny Lissy's head, adding a touch of springtime charm. You'll crochet the base, then attach small flowers and leaves.
Crown Base (Butter Yellow)
- Make a magic ring with butter yellow yarn.
- Round 1: 6 single crochet (sc) in the ring (6 sts).
- Round 2: 2 sc in each stitch around (12 sts).
- Round 3: *Sc in next stitch, 2 sc in next stitch* repeat around (18 sts).
- Round 4: *Sc in next 2 stitches, 2 sc in next stitch* repeat around (24 sts).
- Round 5: Sc in each stitch around (24 sts).
- Fasten off, leaving a long tail for sewing.
Small Flowers (Make 5, Blush Pink)
- Make a magic ring with blush pink yarn.
- *Chain 2, 3 double crochet (dc) in the ring, chain 2, slip stitch (sl st) in the ring* – repeat this sequence 5 times to form 5 petals.
- Fasten off, leaving a tail for sewing.
Leaves (Make 3, Sage Green)
- Chain 6 with sage green yarn.
- Single crochet in the 2nd chain from the hook, half double crochet (hdc) in the next, double crochet in the next, hdc in the next, sc in the last chain.
- Fasten off, leaving a tail for sewing.
Attaching Flowers and Leaves
Sew the 5 small flowers evenly spaced around the crown base. Between the flowers, sew the 3 leaves, positioning them so they peek out from under the flowers. Weave in all ends securely.
ASSEMBLY
Now it's time to bring Bunny Lissy together. Take your time with this step—it's where the bunny truly comes to life.
- Attach the head to the body: Position the head on top of the body, ensuring the seam of the head is at the back. Sew them together securely with a tapestry needle and cream yarn, making several passes to ensure a firm attachment.
- Attach the ears: Place the ears on the top of the head, about 1 inch apart, angling them slightly outward. Sew each ear in place with small, neat stitches, making sure they're securely anchored.
- Attach the arms: Position the arms on the sides of the body, about 1 inch below the neck. Sew them in place, using the open top edge of each arm to attach it flush against the body.
- Attach the legs: Place the legs on the bottom front of the body, about 0.5 inch apart. Sew them securely, ensuring the bunny can sit upright.
- Place the floral crown: Position the crown on the head, just above the ears, and sew it in place with the long tail left from the crown base. Make sure it sits evenly and is well-anchored.
Embroidering the Face
The face is what gives Bunny Lissy her sweet, innocent expression. Take your time and use a steady hand.
- Eyes: Using black embroidery floss, stitch two small French knots for the eyes, placing them about 0.5 inch apart. Position them slightly above the center of the face for a cute, baby-like look.
- Nose: With blush pink yarn, stitch a small vertical line for the nose, centered between and slightly below the eyes.
- Mouth: Below the nose, stitch a tiny smile using a single strand of blush pink yarn. A small "v" shape works perfectly.
- Blush: Add a small pink blush on each cheek using a single strand of blush pink yarn. Make a few tiny straight stitches in a circular pattern, or use a small satin stitch.
Final Touches
Weave in all ends securely, making sure no loose threads are visible. Give Bunny Lissy a gentle squeeze to ensure all stuffing is evenly distributed. If any area feels lumpy, adjust the stuffing through the nearest seam opening and re-close it neatly.
Your heirloom Bunny Lissy is now complete! Display her on a nursery shelf, tuck her into an Easter basket, or gift her to someone special. With her delicate floral crown and



