The Harvest Haze Colorblock Pullover Free Pattern
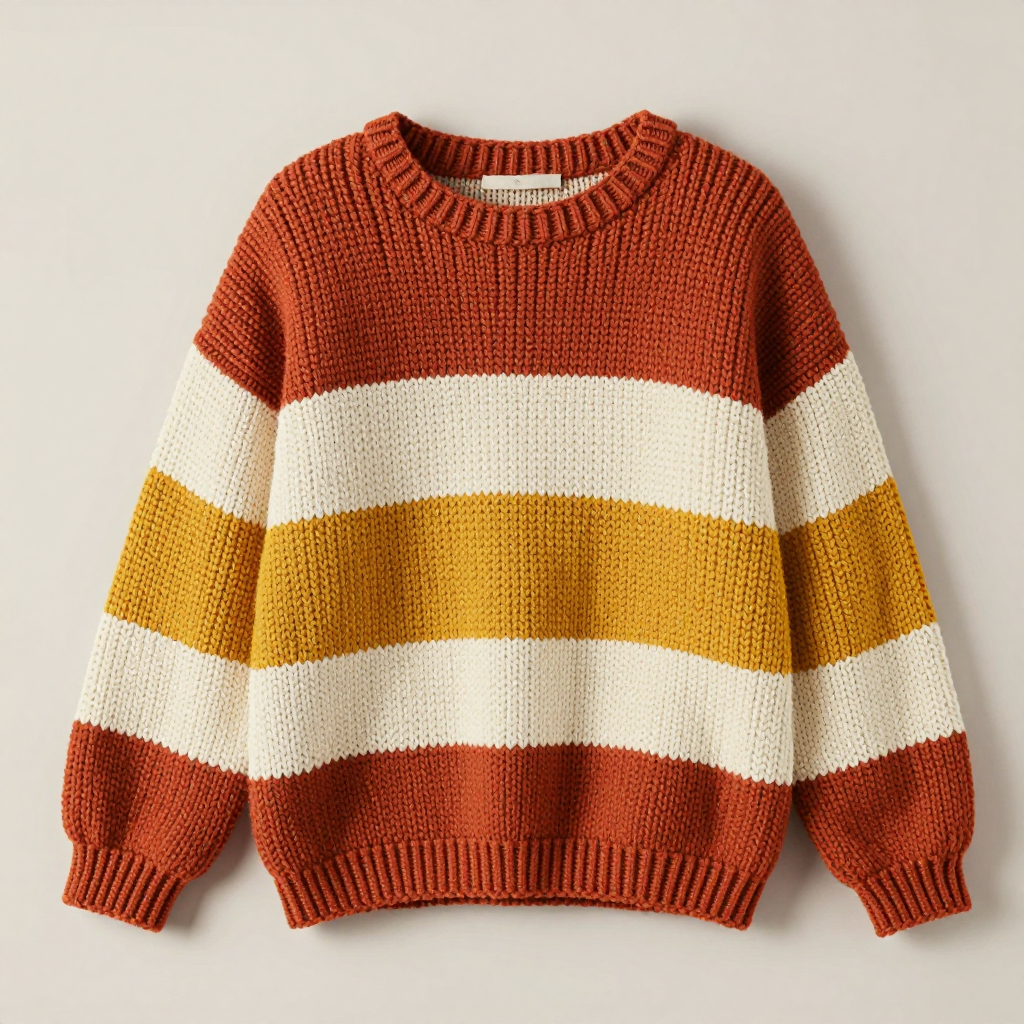
The Harvest Haze Colorblock Pullover
If you have ever looked at a handmade sweater and thought, "I could never make that," this is the pattern that will prove you wrong. The Harvest Haze Colorblock Pullover is a relaxed, oversized drop-shoulder sweater built entirely from one simple stitch — the half double crochet — worked in bold horizontal stripes of rust, mustard, and cream. It is perfect for a confident beginner who has practiced the basic stitches and is ready for a real, wearable project. The finished piece is boxy and roomy, with wide sleeves and a soft, slightly ribbed texture that feels like your favorite autumn blanket in sweater form. You will work two flat panels, seam them together, and add sleeves in the round — that is the whole adventure.
Materials Needed
- Yarn: Worsted weight (Category 4) acrylic or wool blend yarn, approximately 900 (1000, 1150, 1300) yards total, split into three colors:
- Color A (rust): 300 (340, 390, 440) yds
- Color B (mustard): 300 (330, 380, 430) yds
- Color C (cream): 300 (330, 380, 430) yds
- Crochet hook: 9 mm (US size M/13), or whatever size you need to match the gauge below.
- Stitch markers: At least 6. These are small clips or loops of yarn you place in your work to mark a specific stitch so you do not lose your place.
- Tapestry needle: A large, blunt-tipped needle with an eye big enough for worsted yarn. You will use it to sew the panels together and to weave in loose yarn ends.
- Scissors: Any sharp pair for cutting yarn.
- Measuring tape: For checking gauge and measuring the armhole openings.
- Finished size / dimensions: This pattern is written for four sizes — Small (Medium, Large, Extra Large). The body panels measure approximately 24 (27, 30, 33) inches wide and 24 inches long before seaming, giving a relaxed, oversized fit with roughly 4–6 inches of positive ease (extra room) at the bust. Sleeves measure approximately 18 inches from armhole to cuff.
Abbreviations and Beginner Glossary
Read this list once before you begin. Every abbreviation used in this pattern is explained here in plain English, assuming you have never crocheted before.
- ch — chain. Make a slip knot on your hook, wrap the yarn over the hook, and pull it through the loop on your hook. That is one chain. Chains form your foundation row.
- st / sts — stitch / stitches. One completed unit of crochet work.
- hdc — half double crochet. Wrap the yarn over your hook, insert the hook into the stitch, pull up a loop (you now have 3 loops on the hook), wrap the yarn over again, and pull it through all 3 loops at once. That is one half double crochet.
- BLO — back loop only. Every stitch has two loops at its top edge: the front loop (closer to you) and the back loop (farther from you). Working in the back loop only means you insert your hook under just the back loop, not both. This creates the subtle ribbed texture of this sweater.
- hdc2tog — half double crochet two stitches together. This is a decrease: it turns two stitches into one. Wrap the yarn over, insert the hook into the first stitch, pull up a loop (3 loops on hook), wrap the yarn over, insert the hook into the next stitch, pull up a loop (5 loops on hook), wrap the yarn over, and pull through all 5 loops at once.
- sc — single crochet. Insert the hook into the stitch, pull up a loop (2 loops on hook), wrap the yarn over, and pull through both loops. That is one single crochet.
- sl st — slip stitch. Insert the hook into the stitch, wrap the yarn over, and pull it through both the stitch and the loop on your hook in one motion. It creates almost no height and is used to join rounds.
- turn — flip your work over so you can work back across the row you just finished.
- fasten off — cut the yarn a few inches from your work, then pull the tail all the way through the last loop on your hook to lock it.
- join — attach a new color or reattach yarn by making a slip knot on your hook and pulling it through the designated stitch or loop.
- round — a row worked in a continuous circle rather than back and forth. The sleeves and neckline trim are worked in rounds.
- right side — the side of the fabric that faces outward on the finished sweater.
- whip stitch — a simple seaming stitch: pass the needle through both layers from front to back, then back to front, over and over, like a spiral around the edge.
- block — to wet or steam your finished pieces and pin them to the correct measurements so they dry in shape.
Gauge
Gauge: 10 hdc x 8 rows = 4 inches (10 cm) in half double crochet.
Gauge means how many stitches and rows fit into a set measurement. It matters because a sweater must fit a body: if your stitches are bigger than the pattern assumes, your sweater will come out too large; if they are smaller, it will be too tight. Always make a gauge swatch first. Here is how: with your 9 mm hook and one of your yarn colors, chain 16. Work 1 hdc in the 3rd chain from the hook and in each chain across (14 sts). Work 10 more rows of hdc, chaining 2 at the start of each row. Lay the swatch flat, measure a 4-inch section across the middle, and count the stitches. If you have more than 10 stitches in 4 inches, your tension is tight — try a larger hook. If you have fewer, your tension is loose — try a smaller hook. Do not skip this step; it takes 15 minutes and saves you a whole sweater.
Beginner Tips Before You Start
- Use stitch markers to track your color changes. Place a marker in the first stitch of each row. When you reach the marker, you know you have finished a full row — and you will always know which row number you are on for the color blocks.
- Do not pull the yarn too tight. Beginners often crochet tightly out of nerves. Keep your loops relaxed and even. If your fabric feels stiff as cardboard, loosen up or go up a hook size.
- Count your stitches at the end of every row. The stitch count in parentheses tells you exactly how many stitches you should have. If you are off by one, fix it now rather than discovering it ten rows later.
- Change colors on the last stitch of the row. When you make the final hdc of a color block, pull the new color through the last loop instead of the old color. This makes a clean, invisible color change.
- Keep your turning chains loose. The ch 2 at the start of each row does not count as a stitch, but if you make it too tight, the edge of your sweater will pucker. Make it relaxed and skip it when counting.
- Work in good light and take breaks. Half double crochet in the back loop only is repetitive. Rest your hands every 20 minutes so your tension stays even and your wrists stay happy.
Step-by-Step Instructions
PATTERN NOTES: The pullover is worked in two identical panels (front and back) from the bottom up, then seamed at the shoulders and sides. Sleeves are worked directly into the armhole openings. All stitches are half double crochet (hdc) worked in the back loop only (BLO) to create a subtle ribbed texture. Ch 2 at the beginning of each row does not count as a stitch. Color changes are made at the end of a row by pulling the new color through the last loop of the final hdc.
Back Panel
With Color A, ch 62 (70, 78, 86).
Row 1: Hdc in 3rd ch from hook and in each ch across. Turn. (60, 68, 76, 84 hdc)
Rows 2–8: Ch 2, hdc in each st across, working in BLO. Turn. Fasten off Color A. (60, 68, 76, 84 sts)
Join Color B.
Rows 9–16: Ch 2, hdc in each st across in BLO. Turn. Fasten off Color B. (60, 68, 76, 84 sts)
Join Color C.
Rows 17–24: Ch 2, hdc in each st across in BLO. Turn. Fasten off Color C. (60, 68, 76, 84 sts)
Join Color A.
Rows 25–32: Ch 2, hdc in each st across in BLO. Turn. Fasten off Color A. (60, 68, 76, 84 sts)
Join Color B.
Rows 33–40: Ch 2, hdc in each st across in BLO. Turn. Fasten off Color B. (60, 68, 76, 84 sts)
Join Color C.
Rows 41–48: Ch 2, hdc in each st across in BLO. Turn. Do not fasten off. (60, 68, 76, 84 sts)
Shape shoulders (optional for sizes M–XL):
Row 49: Ch 2, hdc in next 18 (22, 26, 30) sts, hdc2tog, hdc in remaining 18 (22, 26, 30) sts. Turn. (58, 66, 74, 82 sts)
Row 50: Ch 2, hdc in each st across. Turn. Fasten off. Weave in ends. (58, 66, 74, 82 sts)
Front Panel
Work same as Back Panel through Row 48. Do not fasten off. (60, 68, 76, 84 sts)
Shape neckline:
Row 49: Ch 2, hdc in next 20 (24, 28, 32) sts, hdc2tog, turn. Leave remaining sts unworked. (21, 25, 29, 33 sts)
Row 50: Ch 2, hdc2tog, hdc in each st across. Turn. (20, 24, 28, 32 sts)
Row 51: Ch 2, hdc in each st across. Turn. Fasten off. (20, 24, 28, 32 sts)
Rejoin yarn at opposite side of neckline with right side facing, skip center 16 (16, 16, 16) sts, join Color C.
Row 49: Ch 2, hdc2tog, hdc in each st across. Turn. (21, 25, 29, 33 sts)
Row 50: Ch 2, hdc in each st across to last 2 sts, hdc2tog. Turn. (20, 24, 28, 32 sts)
Row 51: Ch 2, hdc in each st across. Turn. Fasten off. (20, 24, 28, 32 sts)
Assembly (Seaming)
Block both panels lightly to measurements (see the Assembly and Finishing section below). With right sides together, seam shoulders using a whip stitch or single crochet seam. Seam sides from bottom edge up to armhole, leaving top 7 (7.5, 8, 8.5) inches open for armholes.
Sleeves (worked in the round)
With right side facing, join Color A at underarm seam.
Round 1: Ch 2, work 32 (34, 36, 38) hdc evenly around armhole opening. Join with sl st to first hdc. (32, 34, 36, 38 sts)
Rounds 2–6: Ch 2, hdc in each st around in BLO. Join. Fasten off Color A. (32, 34, 36, 38 sts)
Join Color B.
Rounds 7–12: Ch 2, hdc in each st around in BLO. Join. Fasten off Color B. (32, 34, 36, 38 sts)
Join Color C.
Rounds 13–18: Ch 2, hdc in each st around in BLO. Join. Fasten off Color C. (32, 34, 36, 38 sts)
Join Color A.
Rounds 19–24: Ch 2, hdc in each st around in BLO. Join. Fasten off Color A. (32, 34, 36, 38 sts)
Join Color B.
Rounds 25–30: Ch 2, hdc in each st around in BLO. Join. Fasten off Color B. (32, 34, 36, 38 sts)
Join Color C.
Rounds 31–36: Ch 2, hdc in each st around in BLO. Join. Fasten off Color C. Weave in all ends. (32, 34, 36, 38 sts)
Neckline Trim
With right side facing, join Color C at shoulder seam.
Round 1: Ch 1, work 1 sc in each st around neckline opening. Join with sl st to first sc. Fasten off. Weave in ends.
Assembly and Finishing
Blocking: Before seaming, lay each panel flat on a towel or blocking mat. Lightly mist with water (or steam gently with an iron held an inch above the fabric — never press the iron directly onto acrylic yarn, as it will melt). Pat the panels to the measurements listed above and let them dry completely. This relaxes the stitches and makes seaming much easier.
Shoulder seams: Place the front and back panels right sides together (the prettier side of each panel facing inward). Thread your tapestry needle with a long tail of matching yarn. Starting at the outer shoulder edge, whip stitch across the shoulder edge, passing the needle through both layers each time. Keep your stitches small and even — about 1/4 inch apart. Repeat on the other shoulder.
Side seams: Still with right sides together, whip stitch from the bottom edge up the side, stopping 7 (7.5, 8, 8.5) inches from the top to leave the armhole open. Try the sweater on before you finish to check the armhole size. Repeat on the other side.
Sleeves: With the sweater right side out, join Color A at the underarm seam and work the sleeve rounds as written above, attaching the yarn directly to the armhole edge. The first round is worked into the edge stitches of the armhole opening — just pick up stitches evenly around the circle.
Weaving in ends: Thread each loose yarn tail onto your tapestry needle and weave it back and forth through the wrong side of the fabric for about 2 inches, changing direction once so it cannot pull loose. Trim the tail close to the fabric. Never knot your ends — knots work their way out over time.
Final check: Turn the sweater right side out, give it one more light mist, and let it dry flat. Your Harvest Haze Pullover is ready to wear.
Pro Tips and Variations
- Change the color story: Swap the rust, mustard, and cream for any three colors you love — dusty rose, sage, and oatmeal make a beautiful spring version. Keep the same yardage per color and the pattern will work unchanged.
- Adjust the length: To make the sweater longer or shorter, simply add or remove rows in multiples of 8 (one full color block) before the shoulder shaping. Each 8-row block adds or removes about 4 inches of length.
- Try a different yarn: This pattern works beautifully in any worsted weight yarn. A wool blend gives warmth and drape; a cotton blend gives a crisper, more structured look. Always re-check your gauge with the new yarn before starting.
- Add a ribbed cuff: For a snugger sleeve, work the final 4 rounds of each sleeve in single crochet instead of half double crochet. This creates a firmer, elastic cuff that hugs the wrist.