The Ember & Ash Driftwood Throw: A Free Knitting Pattern for a Textured, Two-Tone Blanket
Wrap Yourself in Texture: Introducing the Ember & Ash Driftwood Throw
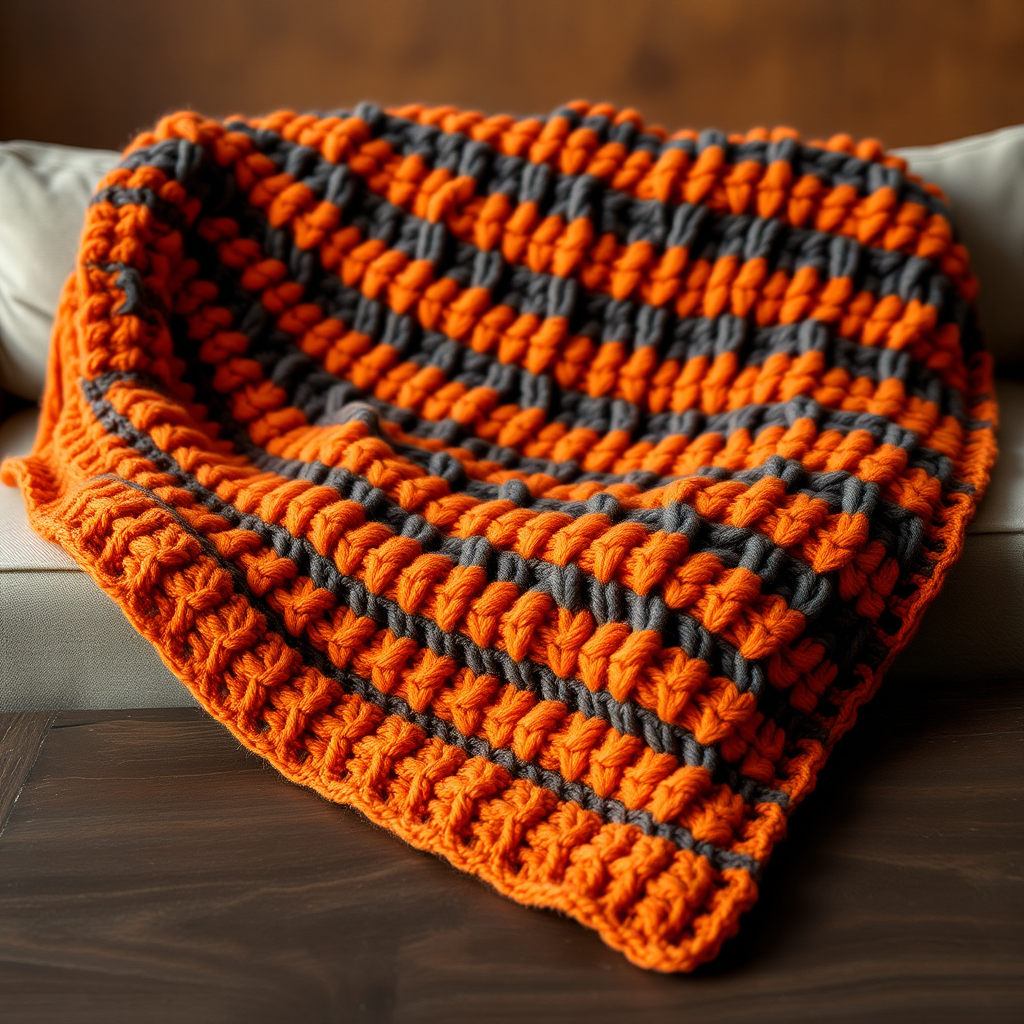
There’s something magical about a blanket that tells a story. The Ember & Ash Driftwood Throw is more than just a cozy layer for your sofa—it’s a tactile journey. Inspired by the organic grain of driftwood and the smooth, pebbly texture of beach stones, this modern two-tone throw combines deep burnt orange (Ember) with warm charcoal grey (Ash) to create a stunning, textured statement piece for your home.
This free knitting pattern is designed for the adventurous intermediate knitter. Using a unique combination of slipped stitches and bobbles, you’ll create a mesmerizing, woven-like surface that catches the light and invites touch. The slipped stitches form long, horizontal “driftwood” lines, while the bobbles add a three-dimensional, pebbly feel. The result? A blanket that looks like it was shaped by the wind and waves—perfect for curling up with a good book or draping over a neutral-toned sofa.
Let’s dive into the details so you can recreate this exact piece at home, step by step.
Materials Needed
Before you begin, gather these supplies. Using the exact yarn weight and needle size is crucial for achieving the correct gauge and the beautiful, structured texture.
- Yarn: Worsted weight (#4) yarn in two contrasting colors:
- Color A (Ember): Deep burnt orange – 1200 yards
- Color B (Ash): Warm charcoal grey – 800 yards
- Suggested: Lion Brand Wool-Ease (or any worsted weight yarn that meets gauge)
- Needles: US Size 9 (5.5 mm) circular knitting needles, 32-inch cable or longer (to accommodate the 200 stitches comfortably).
- Notions: Tapestry needle for weaving in ends, stitch markers (optional, for counting repeats), blocking mats and pins.
Gauge & Finished Size
- Gauge: 16 stitches and 22 rows = 4 inches in Stockinette stitch, after blocking. Important: Always knit a gauge swatch and block it before starting. If your gauge is off, your blanket will not be the correct size.
- Finished Size: Approximately 50 inches wide x 60 inches long.
Abbreviations
Familiarize yourself with these abbreviations before you start. The pattern uses a special bobble technique—don’t worry, it’s easier than it looks!
- CO: Cast on
- K: Knit
- P: Purl
- Sl: Slip stitch purlwise with yarn in back (wyib)
- MB: Make Bobble (see detailed instructions below)
- Rep: Repeat
- St(s): Stitch(es)
- WS: Wrong side
- RS: Right side
How to Make a Bobble (MB)
This is the key to the pebbly texture. Follow these steps carefully:
- Into the same stitch, knit 1, purl 1, knit 1, purl 1, knit 1. You now have 5 stitches on your right needle from that one original stitch.
- Turn your work (so the wrong side is facing you). Purl these 5 stitches.
- Turn your work again (right side facing). Knit these 5 stitches.
- Now, pass the 2nd, 3rd, 4th, and 5th stitches over the 1st stitch (one at a time, like a bind-off). You are left with 1 stitch on your right needle. That’s your bobble!
Pattern Notes
- The blanket is worked flat from side to side (horizontally).
- The slipped stitches create the long, horizontal “driftwood” grain. Always slip stitches purlwise with yarn in back (wyib) unless otherwise stated.
- The pattern repeats every 20 rows, alternating colors every 20 rows. This creates the bold, horizontal bands of texture.
- Always keep the first and last stitch as a knit or purl as indicated to maintain a clean, straight edge.
Step-by-Step Instructions
Cast On & Set-Up
- CO: With Color A (Ember), cast on 200 stitches loosely. A long-tail cast-on works well.
- Set-up Row (WS): Purl all stitches. This creates a clean base for the pattern.
Pattern Repeat (Rows 1-20)
Repeat these 20 rows for the entire blanket. The first 10 rows are worked with Color A, the next 10 with Color B. After Row 20, you will switch back to Color A and start again from Row 1.
Color A Section (Rows 1-10)
Row 1 (RS - Color A): K1, *Sl 1, K3; rep from * to last 3 sts, Sl 1, K2.
Row 2 (WS - Color A): P1, *Sl 1, P3; rep from * to last 3 sts, Sl 1, P2.
Row 3 (RS - Color A): K1, *K1, Sl 1, K2; rep from * to last 3 sts, K1, Sl 1, K1.
Row 4 (WS - Color A): P1, *P1, Sl 1, P2; rep from * to last 3 sts, P1, Sl 1, P1.
Row 5 (RS - Color A): K1, *K2, Sl 1, K1; rep from * to last 3 sts, K2, Sl 1.
Row 6 (WS - Color A): P1, *P2, Sl 1, P1; rep from * to last 3 sts, P2, Sl 1.
Row 7 (RS - Color A): K1, *K3, Sl 1; rep from * to last 3 sts, K3.
Row 8 (WS - Color A): P1, *P3, Sl 1; rep from * to last 3 sts, P3.
Row 9 (RS - Color A): K1, *K1, MB, K2; rep from * to last 3 sts, K1, MB, K1.
Row 10 (WS - Color A): Purl all stitches.
Color B Section (Rows 11-20)
Row 11 (RS - Color B): K1, *K3, Sl 1; rep from * to last 3 sts, K3.
Row 12 (WS - Color B): P1, *P3, Sl 1; rep from * to last 3 sts, P3.
Row 13 (RS - Color B): K1, *K2, Sl 1, K1; rep from * to last 3 sts, K2, Sl 1.
Row 14 (WS - Color B): P1, *P2, Sl 1, P1; rep from * to last 3 sts, P2, Sl 1.
Row 15 (RS - Color B): K1, *K1, Sl 1, K2; rep from * to last 3 sts, K1, Sl 1, K1.
Row 16 (WS - Color B): P1, *P1, Sl 1, P2; rep from * to last 3 sts, P1, Sl 1, P1.
Row 17 (RS - Color B): K1, *Sl 1, K3; rep from * to last 3 sts, Sl 1, K2.
Row 18 (WS - Color B): P1, *Sl 1, P3; rep from * to last 3 sts, Sl 1, P2.
Row 19 (RS - Color B): K1, *K1, MB, K2; rep from * to last 3 sts, K1, MB, K1.
Row 20 (WS - Color B): Purl all stitches.
Continuing the Pattern
Repeat Rows 1-20 for the entire blanket, alternating colors every 20 rows. Continue until the piece measures approximately 60 inches from the cast-on edge. It’s best to end after a Row 20 (a purl row) of either color, so you are ready to bind off on a right-side row.
Finishing
- Final Row (WS): With the current color, purl all stitches.
- Bind Off (RS): Knitwise, bind off loosely. Tip: Use a needle one size larger for the bind-off if it feels too tight. A loose bind-off ensures the edge doesn’t pucker.
- Weave in Ends: Using a tapestry needle, weave in all yarn ends securely on the wrong side of the blanket.
- Blocking: This step is essential for achieving the beautiful, even texture and the correct finished size. Soak the blanket in cool water with a gentle wool wash for 20 minutes. Gently squeeze out excess water (do not wring). Lay flat on blocking mats, gently stretch to the finished measurements (50” x 60”), and pin the edges. Allow to dry completely.
Once blocked, your Ember & Ash Driftwood Throw will be a stunning, tactile work of art. The slipped stitches will open up, the bobbles will pop, and the two-tone design will create a modern, organic look that’s perfect for any cozy corner. Enjoy your new favorite blanket!