Sherbet Hexagon Stripe Pullover Free Pattern: A Neon Pop Crochet Sweater
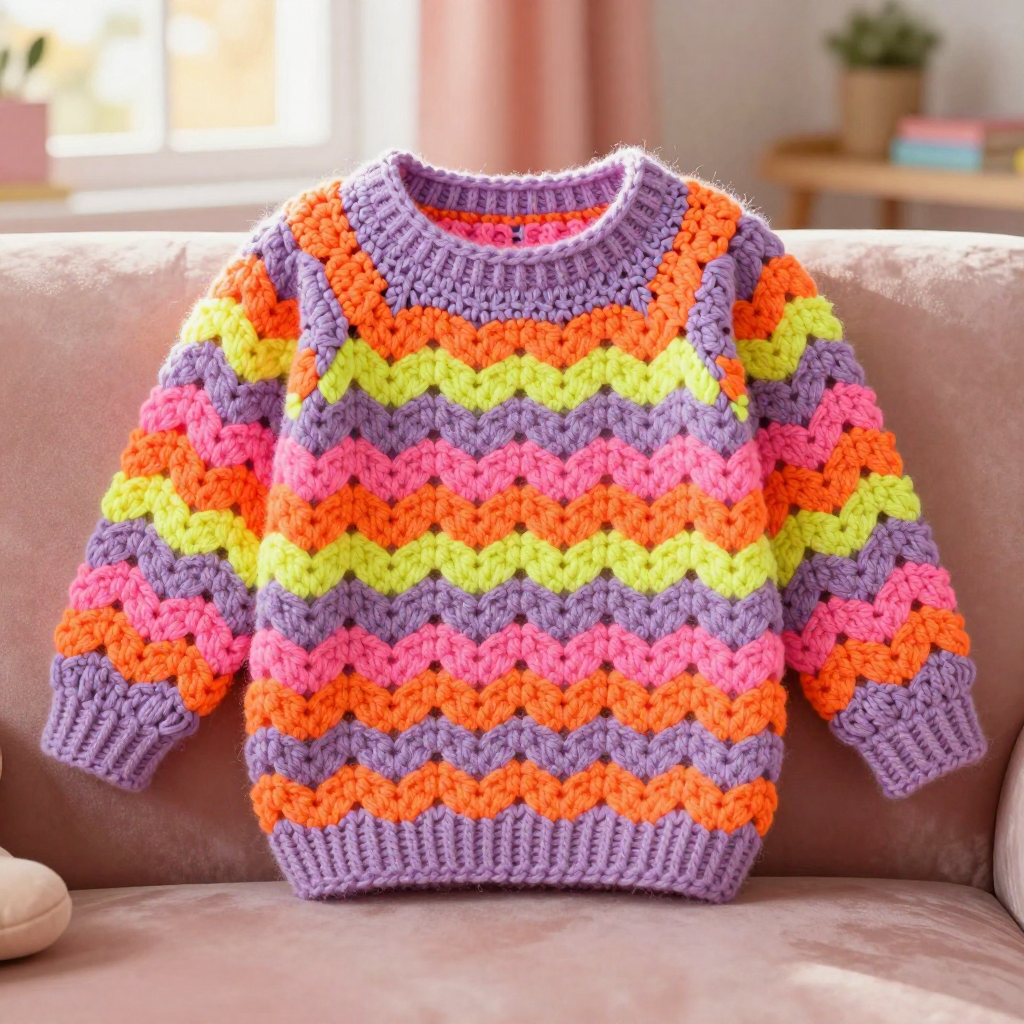
Sherbet Hexagon Stripe Pullover: A Neon Pop Crochet Sweater
Introduction
If you have ever looked at a crocheted sweater and thought, "I could never make that," this is the project that will change your mind. The Sherbet Hexagon Stripe Pullover is a dreamy kids' pullover worked as one simple straight tube, built from horizontal strips of half-hexagon motifs that alternate pale lilac mohair silk with bold neon sherbet stripes. It is perfect for a confident beginner who has mastered the basic stitches and is ready for a first garment, because there is no complicated shaping, no armhole math, and no sewing of dozens of separate pieces. The finished sweater is soft, fuzzy, and airy, with a graphic, modern look that feels like a little pop of sunshine. When it is done, you will have a lightweight, cozy pullover with a wide neck, short striped sleeves, and a clean single crochet edging at the neck, hem, and cuffs.
Materials Needed
- Yarn: Mohair silk blend lace-weight yarn (approximately 420 m / 460 yds per 50 g skein), held double throughout (two strands worked together as if they were one).
- Color A (Pale Lilac): 3 (3, 4) skeins.
- Color B (Neon Sherbet Orange): 1 skein.
- Color C (Neon Sherbet Pink): 1 skein.
- Color D (Neon Sherbet Yellow): 1 skein.
- Total yarn used in the sample: approximately 110 (130, 155) g total.
- Main hook: 4.0 mm (US G-6) crochet hook, or the size needed to obtain gauge.
- Edging hook: 3.5 mm (US E-4) crochet hook.
- Stitch markers: at least 8, to mark motif points, the neck opening, and the start of rounds.
- Tapestry needle: a blunt needle with a large eye for weaving in ends and seaming.
- Scissors: sharp small scissors for cutting yarn.
- Measuring tape and a ruler for checking gauge and motif size.
Finished sizes: 2 (4, 6) years. Finished chest circumference: 60 (66, 72) cm / 23½ (26, 28¼) in. Finished body length from shoulder: 36 (40, 44) cm / 14¼ (15¾, 17¼) in. Finished sleeve length from underarm: 22 (25, 28) cm / 8¾ (9¾, 11) in. The pullover is designed with 4–6 cm / 1½–2¼ in of positive ease, which means it is meant to fit a little loosely and comfortably.
Abbreviations and Beginner Glossary
- ch – chain: yarn over the hook, pull the loop through the loop on your hook. This makes a small link.
- sl st – slip stitch: insert your hook into the stitch, yarn over, and pull the loop straight through both the stitch and the loop on your hook. It makes a flat, tight join.
- sc – single crochet: insert hook into stitch, yarn over, pull up a loop (2 loops on hook), yarn over, pull through both loops. One loop remains.
- hdc – half double crochet: yarn over, insert hook into stitch, yarn over, pull up a loop (3 loops on hook), yarn over, pull through all 3 loops.
- dc – double crochet: yarn over, insert hook into stitch, yarn over, pull up a loop (3 loops on hook), yarn over, pull through 2 loops, yarn over, pull through the last 2 loops.
- tr – treble crochet: yarn over twice, insert hook into stitch, yarn over, pull up a loop, then yarn over and pull through 2 loops three times.
- ch-2 sp – chain-2 space: the little gap made by working 2 chains and skipping stitches underneath. You work your next stitches into that gap, not into a stitch.
- ch-3 sp – chain-3 space: the same idea, but made with 3 chains.
- st(s) – stitch(es).
- yo – yarn over: wrap the yarn from back to front over your hook.
- beg – beginning.
- rep – repeat.
- magic ring – an adjustable loop of yarn you crochet into, then pull tight so there is no hole in the center.
- turn – flip your work over so you can work back along the row you just made.
- fasten off – cut the yarn, pull the tail all the way through the last loop, and tighten.
- join with sl st – close a round by making a slip stitch into the first stitch of that round.
- held double – using two strands of yarn at the same time as though they were one thicker strand.
- A/B/C/D – the yarn colors as listed in the Materials section.
Gauge
Gauge: One half-hexagon motif measures 8 cm (3¼ in) wide across the flat base and 7 cm (2¾ in) tall from base to center point, worked with 2 strands held together on a 4.0 mm hook. 4 rows (strips) of motifs = 28 cm (11 in) in body height.
Why gauge matters: Gauge is simply how big your stitches and motifs turn out. If your motifs are larger than the pattern states, the sweater will come out too big; if they are smaller, it will be too small. Because this sweater is built from motifs, the motif size is your gauge.
How to make a gauge swatch: Work one complete half-hexagon motif exactly as written below, using 2 strands of yarn and your 4.0 mm hook. Lay it flat without stretching and measure across the flat base edge and from the base to the center point. If your motif is bigger than 8 cm / 3¼ in, try a smaller hook; if it is smaller, try a larger hook. Change hook size and make another motif until the measurement matches.
Beginner Tips Before You Start
- Hold both strands together from the start. Pull one strand from the outside of the skein and one from the inside, or wind each color into two small balls. Treat the two strands as one yarn at all times.
- Use stitch markers to track motif points. Place a marker in each ch-2 space along the top edge of a finished strip. When you join the next strip, you will match each new motif point to a marked space, which keeps your strips straight.
- Do not pull your yarn too tight. Mohair silk is fuzzy and grippy. Keep your loops relaxed so the motifs stay soft and airy and so your hook slides easily.
- Join as you go, one motif at a time. Do not wait until all motifs are finished. Joining each motif to the strip below as you complete it keeps the work manageable and the edges even.
- Count your motifs before joining a ring. Each strip must have 8 (9, 10) motifs. Count twice, then join the first and last motif to close the ring.
- Keep your tension even on the final row. Row 5 of the motif creates the flat base edge. Work it loosely and evenly so the base edge lies flat and does not curl.
Step-by-Step Instructions
Half-Hexagon Motif (make many)
With 2 strands of the required color held together and the 4.0 mm hook, make a magic ring.
Row 1: Ch 3 (counts as first dc), work 5 dc into the ring, turn. (6 dc)
Row 2: Ch 3 (counts as first dc), dc in the same st, 2 dc in each of the next 4 sts, dc in the last st, turn. (12 dc)
Row 3: Ch 3 (counts as first dc), dc in the same st, [ch 2, skip 1 st, 2 dc in the next st] 5 times, ch 2, skip 1 st, dc in the last st, turn. (14 dc, 6 ch-2 sps)
Row 4: Ch 3 (counts as first dc), dc in the same st, *2 dc in the next ch-2 sp, ch 2, 2 dc in the same ch-2 sp; rep from * across, dc in the last st, turn. (26 dc, 6 ch-2 sps)
Row 5 (final): Ch 1, sc in each dc and 2 sc in each ch-2 sp across, working 3 sc in the two corner ch-2 sps to create a flat base edge. Fasten off, leaving a 20 cm / 8 in tail for joining. Motif measures approximately 8 cm / 3¼ in wide across the base and 7 cm / 2¾ in tall.
Color Sequence for Body Strips (worked bottom to top)
Strip 1: Color A
Strip 2: Color B
Strip 3: Color A
Strip 4: Color C
Strip 5: Color A
Strip 6: Color D
Strip 7: Color A
Strip 8: Color B (for sizes 4 and 6 only)
Strip 9: Color A (for size 6 only)
Body
The body is a straight tube. Each strip contains 8 (9, 10) motifs joined side by side along their straight base edges, forming a ring.
Strip 1 (Color A): Work 8 (9, 10) half-hexagon motifs in Color A. Join the motifs side by side along their base edges using sl st through both layers, forming a ring. Join the first and last motif to close the ring. Do not fasten off; turn the ring so the pointed edges face upward. (8 (9, 10) motifs)
Strip 2 (Color B): Work motifs in Color B, joining each motif to the pointed upper edge of Strip 1 as you go. Work Row 4 of the motif, then instead of completing Row 5 independently, sl st the base edge of the new motif to the pointed edge of the previous strip, matching each point to a ch-2 sp. Join 8 (9, 10) motifs into a ring. (8 (9, 10) motifs)
Strips 3–7 (and 8–9 where applicable): Continue in the color sequence above, joining each new strip to the upper edge of the previous strip in the same manner. After the final strip, fasten off and weave in ends. Body tube measures approximately 28 (32, 36) cm / 11 (12½, 14¼) in from base to top edge, and 60 (66, 72) cm / 23½ (26, 28¼) in around.
Shoulder Seam and Neck Opening
Lay the tube flat with the top edge horizontal. The top edge has 8 (9, 10) motif points. Mark the center 3 (3, 4) motif points for the neck opening with stitch markers. Seam the remaining motif points on each side together using sl st through both layers to form the shoulders. Neck opening measures approximately 18 (18, 22) cm / 7 (7, 8¾) in wide.
Sleeves (worked in the round from the armhole)
With 2 strands of Color A held together and the 4.0 mm hook, join yarn at the underarm of one armhole.
Round 1: Ch 1, work 24 (28, 32) sc evenly around the armhole, join with sl st to first sc. (24 (28, 32) sc)
Rounds 2–3: Ch 1, sc in each st around, join with sl st. Change to Color B after Round 3. (24 (28, 32) sc)
Round 4: Ch 1, sc in each st around, join with sl st. (24 (28, 32) sc)
Rounds 5–6: Rep Round 4 in Color A. (24 (28, 32) sc)
Round 7: Rep Round 4 in Color C. (24 (28, 32) sc)
Rounds 8–9: Rep Round 4 in Color A. (24 (28, 32) sc)
Round 10: Rep Round 4 in Color D. (24 (28, 32) sc)
Rounds 11–12: Rep Round 4 in Color A. (24 (28, 32) sc)
For sizes 4 and 6 only — Rounds 13–14: Rep Round 4 in Color B. (28 (32) sc)
For sizes 4 and 6 only — Rounds 15–16: Rep Round 4 in Color A. (28 (32) sc)
Sleeve measures approximately 22 (25, 28) cm / 8¾ (9¾, 11) in from underarm. Fasten off. Rep for the second sleeve.
Neck Edging
With 2 strands of Color A held together and the 3.5 mm hook, join yarn at the back of the neck opening. Ch 1, work 1 round of sc evenly around the neck opening, working 1 sc in each st and 2 sc in each corner. Join with sl st to first sc. Fasten off and weave in ends.
Hem Edging
With 2 strands of Color A held together and the 3.5 mm hook, join yarn at the bottom edge. Ch 1, work 1 round of sc evenly around the bottom edge, working 1 sc in each st along the base of the motifs. Join with sl st to first sc. Fasten off and weave in ends.
Sleeve Cuff Edging
With 2 strands of Color A held together and the 3.5 mm hook, join yarn at the sleeve cuff. Ch 1, work 1 round of sc evenly around the cuff. Join with sl st to first sc. Fasten off and weave in ends. Rep for the second sleeve.
Assembly and Finishing
Seaming the shoulders: Lay the body tube flat so the top edge runs horizontally and the pointed motif edges face up. With the tapestry needle and a long tail of Color A, whipstitch or sl st through both layers at each motif point on either side of the marked neck opening. Work from the outer edge inward toward the neck marker on each side so the shoulder line stays straight. Check that the neck opening measures about 18 (18, 22) cm / 7 (7, 8¾) in before fastening off.
Weaving in ends: Thread each yarn tail onto the tapestry needle and run it through the back of several stitches in one direction, then back through a few stitches in the other direction to lock it. Trim the tail close to the fabric. Do this for every motif join, sleeve, and edging.
Blocking: Lightly mist the finished sweater with cool water and lay it flat on a towel, shaping the motifs gently with your hands so the hexagon points sit evenly and the edgings lie flat. Let it dry completely away from direct heat. Do not press or iron the mohair silk fabric, because heat will flatten the fuzzy texture and can damage the fibers.
Pro Tips and Variations
- Change the color story: Swap the neon sherbet stripes for a single contrast color, or use a gradient set of minis for a softer ombré effect. Keep Color A as the anchor between stripes so the graphic look stays crisp.
- Adjust the size: To make the sweater wider or narrower, add or remove one motif per strip (each motif adds about 8 cm / 3¼ in to the circumference). To make it longer or shorter, add or remove a full strip (each strip adds about 7 cm / 2¾ in of body height).
- Substitute yarn: Any lace-weight yarn held double will work, but choose one with a soft halo for the same airy feel. Always make a new gauge motif, because a different fiber will change the motif size.
- Make the sleeves longer: Continue repeating the single crochet rounds in Color A after Round 12 (or after Round 16 for sizes 4 and 6) until the sleeve reaches the length you want, then work the cuff edging as written.