Mustard Bouquet Gift Pouch Crochet Free Pattern
Mustard Bouquet Gift Pouch: A Beginner-Friendly Crochet Pattern
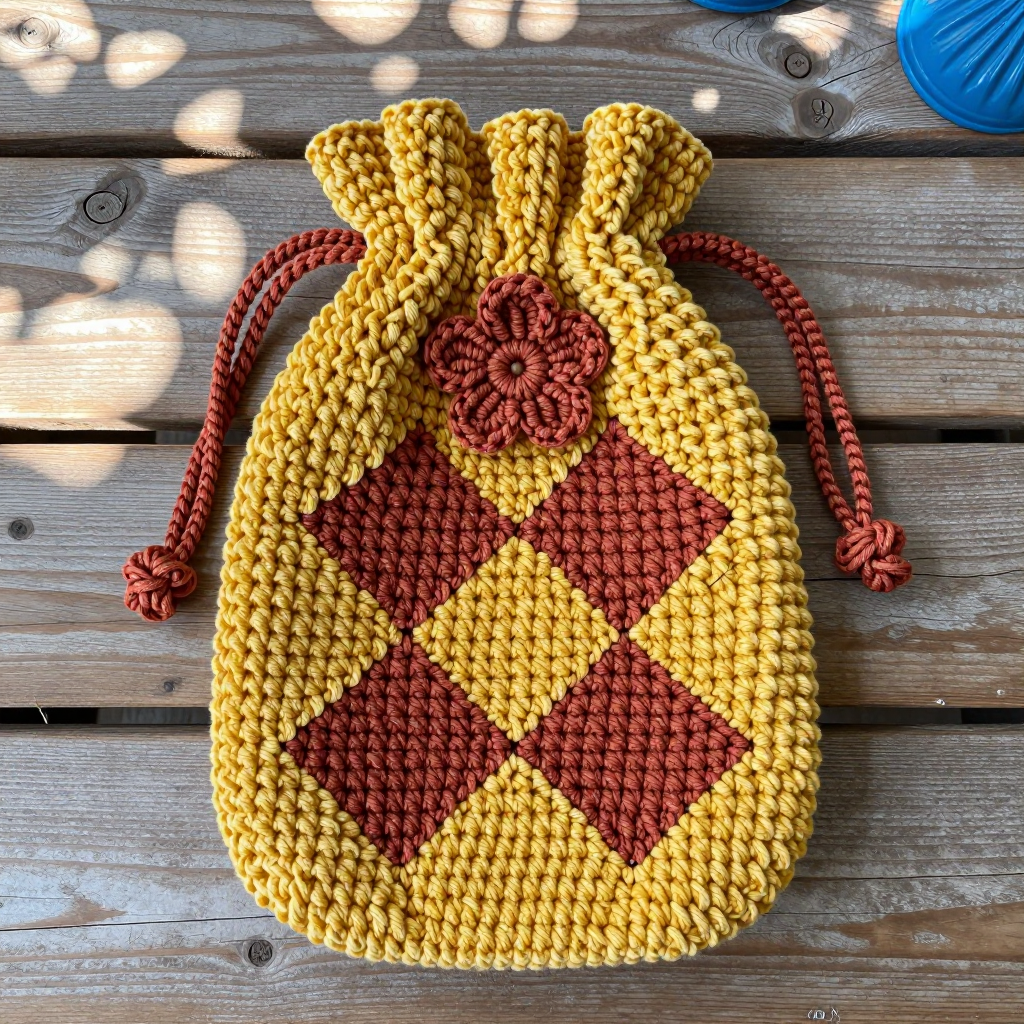
If you have never held a crochet hook before, this is the perfect first project to fall in love with. The Mustard Bouquet Gift Pouch is a soft, plush little drawstring bag worked in a gorgeous mid-century modern style, with a warm mustard body, terracotta argyle diamonds, and a sweet crocheted flower on the front. Because it is worked in the round as a simple tube, you never have to sew a long seam, which makes it wonderfully forgiving for brand-new hands. The finished pouch is about 4.5 inches wide and 6 inches tall, small enough to cradle a tiny bouquet, a piece of jewelry, or a handful of chocolates. Made in velvet yarn, it feels like a cloud in your hands and looks far more complicated than it really is. Let's make something beautiful together.
Materials Needed
- Yarn: Bernat Velvet (100% polyester, bulky weight #5, 300 g / 315 yds per skein). You need 1 skein in Mustard (about 120 yds used) and 1 skein in Terracotta (about 30 yds used, including the flower and drawstring).
- Crochet hook: Size 5.0 mm (US H-8), or whatever size gives you the correct gauge.
- Stitch marker: 1, to mark the beginning of each round.
- Yarn needle (tapestry needle): A large-eye, blunt-tip needle for weaving in ends and sewing on the flower.
- Scissors: Any sharp pair for cutting yarn.
- 2 small stitch holders or scrap yarn: Optional, for holding the drawstring ends while you work.
- Finished size: Approximately 4.5 inches (11.5 cm) wide x 6 inches (15 cm) tall, not counting the drawstring.
Abbreviations and Beginner Glossary
Every term you will meet in this pattern is explained here in plain English. Read it once before you begin and keep it nearby.
- ch – chain: yarn over the hook, then pull that loop through the loop already on your hook. This makes a small link.
- sl st – slip stitch: insert your hook into the stitch, yarn over, and pull the loop straight through both the stitch and the loop on your hook. It joins things without adding height.
- sc – single crochet: insert hook into stitch, yarn over, pull up a loop (2 loops on hook), yarn over, pull through both loops. (1 loop remains.)
- dc – double crochet: yarn over, insert hook into stitch, yarn over, pull up a loop (3 loops on hook), yarn over, pull through 2 loops, yarn over, pull through remaining 2 loops.
- FPdc – front-post double crochet: work a double crochet, but instead of going into the top of the stitch, insert your hook from front to back around the vertical "post" (the body) of the stitch. This pushes the stitch forward.
- BPdc – back-post double crochet: same as FPdc, but insert your hook from back to front around the post. This pushes the stitch backward.
- st / sts – stitch / stitches.
- magic ring – an adjustable loop you make with your yarn, then crochet into, so the center pulls tight with no hole.
- yarn over – wrap the working yarn over your hook from back to front.
- fasten off – cut the yarn, pull the tail all the way through the last loop, and tug gently to lock it.
- weave in ends – thread a yarn tail onto a needle and run it back and forth through the fabric so it disappears.
- join with a sl st – after working a round, slip stitch into the first stitch of that round to close the circle.
- skip – do not work into that stitch; move past it to the next one.
Gauge
Gauge: 12 stitches and 12 rows = 4 inches (10 cm) in basketweave stitch pattern (alternating groups of front-post and back-post double crochet) using the 5.0 mm hook.
Why gauge matters: Gauge is simply how big your stitches turn out. If your stitches are larger than mine, your pouch will be bigger than 4.5 x 6 inches and may use more yarn; if smaller, it will be tiny. Matching gauge means your finished pouch matches the measurements and the drawstring fits the eyelet round properly.
How to make a gauge swatch: Chain 20, then work about 14 rows of the basketweave pattern (4 FPdc, 4 BPdc, repeating). Lay the swatch flat without stretching it and measure a 4-inch square in the middle. Count how many stitches and rows fit inside that square. If you have more than 12 stitches, switch to a larger hook; if fewer, switch to a smaller hook. Try again until it matches.
Beginner Tips Before You Start
- Use a stitch marker. Place it in the first stitch of each round. Because you work in a continuous spiral, it is easy to lose track of where a round begins.
- Do not pull your yarn too tight. Velvet yarn is slippery and has little stretch. Keep your tension relaxed and even, or the pouch will feel stiff and the color changes will pucker.
- Count your stitches after every round. The stitch count in parentheses at the end of each line tells you exactly how many you should have. Catching a mistake early is much easier than fixing it later.
- Carry the unused color loosely. When you change to Terracotta for the diamonds, let the Mustard yarn rest loosely along the inside of the pouch. If you pull it tight, the pouch will pucker.
- Work the post stitches by feel. Front-post and back-post stitches can feel awkward at first. Go slowly and remember: front means your hook goes in from the front, back means from the back.
- Keep your base flat. While working the base circle, lay it on the table now and then. If it starts to cup upward, your stitches are too tight; if it ripples, they are too loose.
Step-by-Step Instructions
Notes: The pouch is worked in the round from the bottom up as a straight tube. Do not turn at the end of each round; work continuously in a spiral unless the pattern says to join. The basketweave pattern is made of groups of 4 FPdc and 4 BPdc, and the groups shift every 4 rounds.
Base (worked in Mustard)
Round 1: Make a magic ring. Ch 2 (this does not count as a stitch), work 8 dc into the ring. Join with a sl st to the first dc. (8 sts)
Round 2: Ch 2, 2 dc in each st around. Join with a sl st to the first dc. (16 sts)
Round 3: Ch 2, *2 dc in next st, 1 dc in next st; repeat from * around. Join with a sl st to the first dc. (24 sts)
Round 4: Ch 2, *2 dc in next st, 1 dc in each of next 2 sts; repeat from * around. Join with a sl st to the first dc. (32 sts)
Round 5: Ch 2, *2 dc in next st, 1 dc in each of next 3 sts; repeat from * around. Join with a sl st to the first dc. (40 sts)
Round 6: Ch 2, *2 dc in next st, 1 dc in each of next 4 sts; repeat from * around. Join with a sl st to the first dc. (48 sts)
Round 7: Ch 2, *2 dc in next st, 1 dc in each of next 5 sts; repeat from * around. Join with a sl st to the first dc. (56 sts)
Round 8: Ch 2, *2 dc in next st, 1 dc in each of next 6 sts; repeat from * around. Join with a sl st to the first dc. (64 sts)
Do not fasten off. The base is complete. (64 sts)
Body (Basketweave with Argyle)
Set-up Round: Ch 2, dc in each st around. Join with a sl st to the first dc. (64 sts)
Round 1 (Basketweave): Ch 2. *FPdc in each of next 4 sts, BPdc in each of next 4 sts; repeat from * around. Join with a sl st to the first dc. (64 sts)
Rounds 2–4: Repeat Round 1. (64 sts)
Round 5 (Shift): Ch 2. *BPdc in each of next 4 sts, FPdc in each of next 4 sts; repeat from * around. Join with a sl st to the first dc. (64 sts)
Rounds 6–8: Repeat Round 5. (64 sts)
Round 9 (Shift): Repeat Round 1. (64 sts)
Rounds 10–12: Repeat Round 1. (64 sts)
Round 13 (Shift): Repeat Round 5. (64 sts)
Rounds 14–16: Repeat Round 5. (64 sts)
Round 17 (Shift): Repeat Round 1. (64 sts)
Rounds 18–20: Repeat Round 1. (64 sts)
Argyle Diamond Patches (worked in Terracotta over the basketweave)
Note: The diamonds are worked on the front of the pouch only, centered on the front panel. Each diamond spans 5 stitches and 5 rounds. Work the color changes as instructed, carrying Mustard loosely behind.
Round 21 (Shift): Ch 2. *BPdc in each of next 4 sts, FPdc in each of next 4 sts; repeat from * around. Work all stitches in Mustard. Join with a sl st to the first dc. (64 sts)
Round 22: Ch 2. Work in the established basketweave pattern, but on the front panel (sts 1–32), change to Terracotta for the center stitch of each 8-stitch block: sts 4, 12, 20, and 28. Work these stitches in Terracotta and all others in Mustard. Join with a sl st to the first dc. (64 sts)
Round 23: Ch 2. Work in the established basketweave pattern, but on the front panel, change to Terracotta for sts 3–5, 11–13, 19–21, and 27–29. Work all other stitches in Mustard. Join with a sl st to the first dc. (64 sts)
Round 24: Ch 2. Work in the established basketweave pattern, but on the front panel, change to Terracotta for sts 2–6, 10–14, 18–22, and 26–30. Work all other stitches in Mustard. Join with a sl st to the first dc. (64 sts)
Round 25: Ch 2. Work in the established basketweave pattern, but on the front panel, change to Terracotta for sts 3–5, 11–13, 19–21, and 27–29. Work all other stitches in Mustard. Join with a sl st to the first dc. (64 sts)
Round 26: Ch 2. Work in the established basketweave pattern, but on the front panel, change to Terracotta for sts 4, 12, 20, and 28. Work all other stitches in Mustard. Join with a sl st to the first dc. (64 sts)
Rounds 27–28: Ch 2. Work in the established basketweave pattern in Mustard only. Join with a sl st to the first dc. (64 sts)
Round 29 (Shift): Repeat Round 1 (Mustard only). (64 sts)
Rounds 30–32: Repeat Round 1. (64 sts)
Round 33 (Shift): Repeat Round 5 (Mustard only). (64 sts)
Rounds 34–36: Repeat Round 5. (64 sts)
Round 37 (Shift): Repeat Round 1 (Mustard only). (64 sts)
Rounds 38–40: Repeat Round 1. (64 sts)
Eyelet Round and Top Edging
Round 41 (Eyelet Round for Drawstring): Ch 2. *Dc in next st, ch 1, skip next st; repeat from * around. Join with a sl st to the first dc. (32 dc and 32 ch-1 spaces)
Round 42 (Top Edging): Ch 1, sc in each st and in each ch-1 space around. Join with a sl st to the first sc. (64 sc)
Fasten off. Weave in ends.
Drawstring (make 1 in Terracotta)
Chain 120. Fasten off. Thread the chain through the eyelet round (Round 41), starting and ending at the center front. Tie a knot at each end.
Crocheted Flower (make 1 in Terracotta)
Round 1: Make a magic ring. Ch 1, work 6 sc into the ring. Join with a sl st to the first sc. (6 sc)
Round 2: Ch 1, *2 sc in next st; repeat from * around. Join with a sl st to the first sc. (12 sc)
Round 3: Ch 1, *sc in next st, 2 sc in next st; repeat from * around. Join with a sl st to the first sc. (18 sc)
Round 4 (Petals): *Ch 3, skip next st, sl st in next st; repeat from * around. (9 petals)
Fasten off, leaving a long tail. Sew the flower to the front of the pouch, just above the drawstring, using the tail.
Assembly and Finishing
Weaving in ends: Thread each yarn tail onto your tapestry needle. Run the needle back and forth through the inside of the pouch for about an inch, changing direction once or twice so the tail cannot work loose. Trim the yarn close to the fabric.
Sewing on the flower: Use the long tail from the flower. Bring the needle from the inside of the pouch out through the center of the flower, then take a small stitch through each petal base and back into the pouch. Go around the flower twice for security, then weave the tail inside and trim.
Threading the drawstring: Starting at the center front, weave the 120-chain drawstring in and out through the eyelet round (the ch-1 spaces of Round 41). Go all the way around and come back out at the center front. Tie a small knot at each end of the chain so it cannot slip back through.
Blocking: Lightly mist the pouch with water and gently shape it with your hands. Do not press it flat with an iron, because that will crush the basketweave texture and flatten the velvet. Let it air dry completely. Once dry, insert a small gift or a tiny crocheted bouquet and cinch the drawstring closed.
Pro Tips and Variations
- Change the colors: Swap Mustard for sage green and Terracotta for cream for a softer, vintage look, or use deep plum with gold diamonds for something more dramatic. Any bulky #5 yarn will work.
- Adjust the size: To make a larger pouch, add one more increase round to the base (Round 9: *2 dc in next st, 1 dc in each of next 7 sts; repeat around = 72 sts) and then work the body with 72 stitches, keeping the basketweave groups of 4. To make a smaller pouch, stop the base at Round 7 (56 sts).
- Try a different yarn: If velvet feels slippery, try a bulky acrylic or cotton blend. Just check your gauge again, because different fibers behave differently.
- Add more flowers: Make two or three small flowers in Terracotta and scatter them across the front panel for a bouquet effect, or use them to hide the drawstring knots.