Moonlit Meadow Lovey Blanket Free Pattern – Knit a Starry Night Comfort
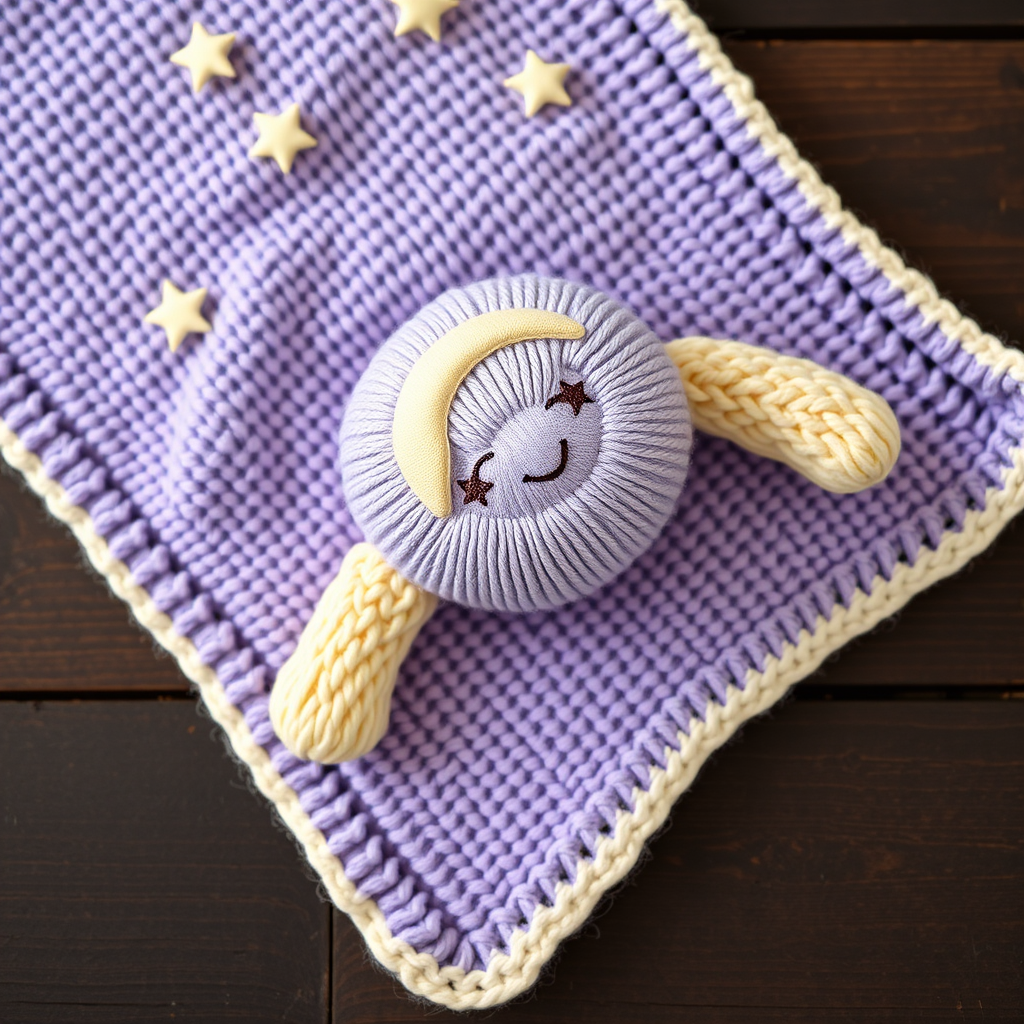
Wrap Your Little One in a Starry Night: The Moonlit Meadow Lovey Blanket
There is something truly magical about a handmade gift, especially one that captures the wonder of a starry night. The Moonlit Meadow Lovey Blanket is more than just a baby blanket; it's a comforting companion designed to soothe and delight. This enchanting pattern combines a soft, textured blanket with a sweet, huggable character head and arms, creating the perfect nap-time friend. Whether you are a seasoned knitter or a confident beginner looking for a rewarding project, this lovey is an heirloom-quality piece that will be treasured for years. Let's knit a little piece of the night sky!
Gathering Your Materials
Before we dive into the stitches, let's ensure you have everything you need. This project uses simple, accessible materials to create a stunning result.
- Yarn: DK weight yarn in three colors:
- Yarn A (Main Blanket): Soft lavender (approx. 200g)
- Yarn B (Embroidery): Pale yellow (approx. 50g)
- Yarn C (Head & Arms): Cream (approx. 50g)
- Needles: US 6 (4.0 mm) knitting needles. You can use straight or circular needles, whichever you prefer.
- Notions: Tapestry needle for weaving in ends and assembly, stitch markers, and a small amount of fiberfill for stuffing.
- Extras: Dark embroidery thread or yarn for the face, and a darning needle for embroidery details.
Gauge: 22 stitches and 30 rows = 4 inches in stockinette stitch. While gauge isn't critical for a lovey, it's always good practice to check!
Step-by-Step Instructions: Knitting the Moonlit Meadow
This pattern is worked in one piece for the main blanket, making it wonderfully straightforward. We'll then create the head and arms separately and sew them on. Let's begin!
Part 1: The Main Blanket
We'll start with the lavender blanket, which features a beautifully textured star pattern.
- Cast On: Using Yarn A, cast on 80 stitches.
- Border: Knit 6 rows of garter stitch (knit every row). This creates a sturdy, non-curling border.
- Set Up Row (Right Side): K6, place a stitch marker, work Row 1 of the Star Pattern across the next 68 stitches, place another marker, K6. The 6 knit stitches on each side will form the side borders.
The Star Pattern (Worked over 68 stitches, a multiple of 8 + 4):
This pattern is a simple 12-row repeat that creates a gorgeous, subtle texture. Follow these rows carefully, remembering to knit the 6 border stitches on each side in garter stitch throughout.
- Row 1 (RS): *K4, P4* repeat from * to * until you have 4 stitches left, K4.
- Row 2 (WS): *P4, K4* repeat from * to * until you have 4 stitches left, P4.
- Row 3: Repeat Row 1.
- Row 4: Repeat Row 2.
- Row 5: Repeat Row 1.
- Row 6: Repeat Row 2.
- Row 7: Repeat Row 1.
- Row 8: Repeat Row 2.
- Row 9: Repeat Row 1.
- Row 10: Repeat Row 2.
- Row 11: Repeat Row 1.
- Row 12: Repeat Row 2.
Repeat these 12 rows until the blanket measures approximately 12 inches from the cast-on edge, ending with a wrong-side row.
- Final Border: Knit 6 rows of garter stitch for the bottom border.
- Bind Off: Bind off all stitches loosely. Weave in the yarn ends on the wrong side of the blanket.
Part 2: The Lovey's Head
Now, let's create the sweet, round head for your lovey.
- Cast On: Using Yarn C, cast on 20 stitches.
- Body of Head: Work in stockinette stitch (knit on the right side, purl on the wrong side) for 3 inches, ending with a wrong-side row.
- Shaping - Row 1 (RS): K2tog across the row. You will have 10 stitches.
- Shaping - Row 2 (WS): Purl across.
- Shaping - Row 3 (RS): K2tog across the row. You will have 5 stitches.
- Finishing: Cut the yarn, leaving a long tail. Thread the tail through a tapestry needle and pass it through the remaining 5 stitches. Pull tight to gather the top of the head.
- Assembly: Sew the side seam of the head to form a ball shape, leaving a small opening. Stuff lightly with fiberfill, then close the opening. The gathered end will be the top of the head.
Part 3: The Arms
These little arms make the lovey huggable and adorable.
- Cast On: Using Yarn C, cast on 8 stitches.
- Body of Arm: Work in stockinette stitch for 4 inches.
- Shaping (RS): K2tog across the row. You will have 4 stitches.
- Finishing: Cut the yarn, leaving a long tail. Thread the tail through the remaining 4 stitches and pull tight. Sew the side seam to form a tube. Stuff lightly. Repeat for the second arm.
Part 4: Assembly and Embroidery
This is where your lovey comes to life!
- Attach the Head: Position the head in the center of the top edge of the blanket, with the gathered end facing down (towards the blanket). Sew it securely to the blanket using the yarn tail and a tapestry needle.
- Attach the Arms: Sew the arms to the sides of the head, angling them slightly downward for a natural, relaxed look.
- Embroider the Moon: Using Yarn B (pale yellow), embroider a crescent moon shape in the center of the blanket. You can use a simple chain stitch or a satin stitch to fill in the shape.
- Embroider the Stars: Using Yarn B, embroider small stars scattered around the moon. You can use a star stitch or create small French knots for a twinkling effect.
- Add the Starry Sky: Using Yarn A (lavender), embroider tiny dots (French knots or small straight stitches) around the moon and stars to create a beautiful, starry sky effect.
- Embroider the Face: Using dark embroidery thread, stitch a gentle, peaceful face on the head. Two small, closed eyes (a simple curved line for each) and a tiny smile will give your lovey a serene expression.
Finishing Touches
Your Moonlit Meadow Lovey is almost complete!
- Weave in Ends: Carefully weave in all remaining yarn ends on the wrong side of the blanket and inside the head and arms.
- Blocking: Gently block the blanket to shape. This will help even out the stitches and give it a professional finish. Simply lay it flat, mist with water, and let it dry completely.
And there you have it—a beautiful, handmade Moonlit Meadow Lovey Blanket, ready to be cherished. This project is a wonderful way to create a unique and personal gift that combines comfort, whimsy, and love. Happy knitting!


