Lucky Pineapple Plant Hangers Free Pattern – A Knitted Tropical Charm
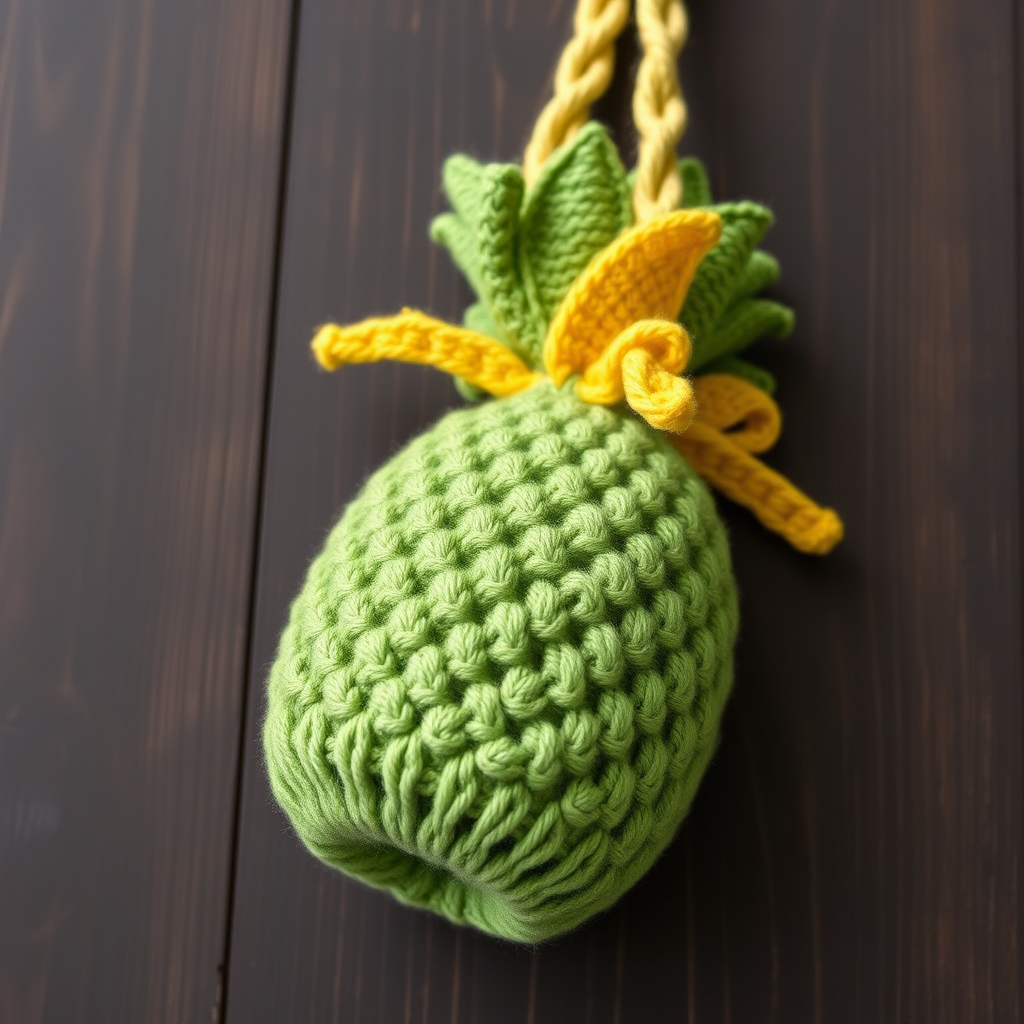
Lucky Pineapple Plant Hangers Free Pattern – A Knitted Tropical Charm
Bring a touch of tropical luck to your home with these adorable knitted pineapple plant hangers! This free pattern combines knitting and crochet to create a charming, textured pineapple body with sunny yellow leaves and a sturdy braided strap. Perfect for holding small pots, air plants, or even just as a whimsical decorative piece, this project is ideal for beginners looking to expand their skills while creating something truly unique. The boho aesthetic and fresh tropical colors—deep green, bright yellow, and warm cream—will add a cozy, handmade vibe to any room. Best of all, this pattern is completely yarn-based with no metal or plastic parts, making it an eco-friendly choice for your home decor.
Whether you're an experienced crafter or just starting your yarn journey, this pattern is designed to be accessible and enjoyable. The pineapple body uses simple knit and purl techniques with strategic increases and decreases to create that iconic diamond-like texture, while the leaves and strap use basic crochet stitches. Make one as a gift, or create a full set of three for a stunning hanging display. Let's dive in and create something lucky!
Materials Needed
Before you begin, gather the following materials to ensure a smooth crafting experience:
Yarn
- Worsted weight cotton yarn (e.g., Lion Brand 24/7 Cotton) in three colors:
- Pineapple Green (A) – for the pineapple body
- Golden Yellow (B) – for the leaves
- Natural (C) – for the hanger strap
Tools
- US Size 7 (4.5 mm) knitting needles – for the pineapple body
- US Size G/6 (4.0 mm) crochet hook – for the leaves and strap
- Yarn needle – for sewing and weaving in ends
- Scissors
- Stitch markers (optional, but helpful for keeping track of rounds)
Gauge
- Knitting: 20 stitches and 28 rows = 4 inches in stockinette stitch
- Crochet: 16 sc and 18 rows = 4 inches
Note: Gauge is important for achieving the correct size, but since this is a decorative hanger, slight variations are acceptable. The finished pineapple will be approximately 6-7 inches tall, perfect for holding a small 2-3 inch pot.
Step-by-Step Instructions
This pattern creates a single pineapple hanger. Make three for a full set to hang together for maximum tropical impact!
Part 1: Pineapple Body (Knitted – Make 1)
The pineapple body is worked flat in garter stitch (knitting every row) with strategic increases and decreases to create the characteristic pineapple shape and texture. The increases at the beginning create the rounded bottom, while the decreases taper the top to a point.
Getting Started:
- With yarn A (Pineapple Green), cast on 30 stitches using your preferred method (long-tail cast on works well).
- Rows 1-4: Knit all stitches. This creates a garter stitch base that will form the flat bottom of the pineapple.
Increasing Section (Bottom of Pineapple):
- Row 5 (increase row): K1, M1 (make one), knit to last 2 stitches, M1, K1. (32 stitches)
- Rows 6-10: Knit all stitches. (32 stitches)
- Row 11: Repeat increase row: K1, M1, knit to last 2 stitches, M1, K1. (34 stitches)
- Rows 12-16: Knit all stitches. (34 stitches)
- Row 17: Repeat increase row. (36 stitches)
- Rows 18-22: Knit all stitches. (36 stitches)
- Row 23: K1, M1, knit to last 2 stitches, M1, K1. (38 stitches)
- Rows 24-28: Knit all stitches. (38 stitches)
- Row 29: K1, M1, knit to last 2 stitches, M1, K1. (40 stitches)
- Rows 30-34: Knit all stitches. (40 stitches)
- Row 35: K1, M1, knit to last 2 stitches, M1, K1. (42 stitches)
- Rows 36-40: Knit all stitches. (42 stitches)
How to Make One (M1): Insert the left needle from front to back under the horizontal strand between the last knitted stitch and the next stitch on the left needle. Knit this strand through the back loop to create a new stitch. This creates an invisible increase that maintains the smooth texture of the garter stitch.
Decreasing Section (Top of Pineapple):
- Row 41 (decrease row): K1, k2tog (knit two together), knit to last 3 stitches, ssk (slip, slip, knit), K1. (40 stitches)
- Rows 42-44: Knit all stitches. (40 stitches)
- Row 45: Repeat decrease row. (38 stitches)
- Rows 46-48: Knit all stitches. (38 stitches)
- Row 49: Repeat decrease row. (36 stitches)
- Rows 50-52: Knit all stitches. (36 stitches)
- Row 53: Repeat decrease row. (34 stitches)
- Rows 54-56: Knit all stitches. (34 stitches)
- Row 57: Repeat decrease row. (32 stitches)
- Rows 58-60: Knit all stitches. (32 stitches)
- Row 61: Repeat decrease row. (30 stitches)
- Rows 62-64: Knit all stitches. (30 stitches)
- Row 65: Repeat decrease row. (28 stitches)
- Rows 66-68: Knit all stitches. (28 stitches)
- Row 69: Repeat decrease row. (26 stitches)
- Rows 70-72: Knit all stitches. (26 stitches)
- Row 73: Repeat decrease row. (24 stitches)
- Rows 74-76: Knit all stitches. (24 stitches)
- Row 77: Repeat decrease row. (22 stitches)
- Rows 78-80: Knit all stitches. (22 stitches)
- Row 81: Repeat decrease row. (20 stitches)
- Rows 82-84: Knit all stitches. (20 stitches)
- Row 85: Repeat decrease row. (18 stitches)
- Rows 86-88: Knit all stitches. (18 stitches)
- Row 89: Repeat decrease row. (16 stitches)
- Rows 90-92: Knit all stitches. (16 stitches)
- Row 93: Repeat decrease row. (14 stitches)
- Rows 94-96: Knit all stitches. (14 stitches)
- Row 97: Repeat decrease row. (12 stitches)
- Rows 98-100: Knit all stitches. (12 stitches)
- Row 101: Repeat decrease row. (10 stitches)
- Rows 102-104: Knit all stitches. (10 stitches)
- Row 105: Repeat decrease row. (8 stitches)
- Rows 106-108: Knit all stitches. (8 stitches)
- Row 109: Repeat decrease row. (6 stitches)
- Rows 110-112: Knit all stitches. (6 stitches)
Finishing the Point:
- Row 113: K1, k2tog, k1, ssk, K1. (4 stitches)
- Row 114: K2tog twice. (2 stitches)
- Row 115: K2tog. (1 stitch)
- Cut yarn, leaving a 6-inch tail. Pull the tail through the remaining stitch and weave in the end securely.
How to Slip, Slip, Knit (ssk): Slip the first stitch as if to knit, slip the second stitch as if to knit, then insert the left needle into the front of both slipped stitches and knit them together. This creates a left-leaning decrease that pairs beautifully with the right-leaning k2tog.
Shaping Note: The combination of increases and decreases creates a subtle diamond-like texture in the garter stitch, mimicking the natural pattern of a pineapple. The increases at the bottom create a rounded, flat base, while the decreases taper to a neat point at the top where the leaves will be attached.
Part 2: Pineapple Leaves (Crochet – Make 5)
The leaves are crocheted in the round, creating small, slightly curved leaf shapes that will be attached to the top of the pineapple body. Each leaf is worked in Golden Yellow (yarn B) and features a gentle taper for a natural look.
Leaf Pattern:
- With yarn B, make a magic ring. (If you're not familiar with the magic ring technique, you can chain 2 and work into the first chain instead.)
- Round 1: 6 sc in ring. (6 stitches) Pull the ring tight to close.
- Round 2: 2 sc in each stitch around. (12 stitches)
- Rounds 3-5: Sc in each stitch around. (12 stitches)
- Round 6: Sc in next 2 stitches, sc2tog (single crochet two together), repeat around. (9 stitches)
- Rounds 7-10: Sc in each stitch around. (9 stitches)
- Round 11: Sc in next stitch, sc2tog, repeat around. (6 stitches)
- Rounds 12-15: Sc in each stitch around. (6 stitches)
- Fasten off, leaving a long tail (at least 12 inches) for sewing the leaf to the pineapple body.
How to Single Crochet Two Together (sc2tog): Insert hook into next stitch, yarn over and pull up a loop (2 loops on hook). Insert hook into next stitch, yarn over and pull up a loop (3 loops on hook). Yarn over and pull through all 3 loops on the hook. This decreases your stitch count by one.
Shaping the Leaves: After completing all 5 leaves, gently fold each leaf slightly in half lengthwise. This will give them a natural, organic curve. When you sew them to the pineapple, position them so the curves alternate direction for a lively, realistic look.
Part 3: Hanger Strap (Crochet – Make 3)
The hanger strap consists of three long crochet chains that will be braided together for strength and visual interest. The natural cream color (yarn C) provides a beautiful contrast to the green and yellow.
Strap Pattern:
- With yarn C, chain 120. (Make sure your chain is not twisted.)
- Row 1: Sc in second chain from hook and in each chain across. (119 sc)
- Fasten off, leaving a 6-inch tail for weaving in.
- Repeat this process to create three identical straps.
Braiding the Straps:
- Lay the three straps side by side, aligning the ends.
- Tie a knot at one end to secure all three straps together.
- Braid the three straps together tightly, keeping the tension even.
- When you reach the end, tie another knot to secure the braid.
- Trim any excess yarn tails close to the knots.
Pro Tip: For a longer hanger, simply chain more stitches (e.g., 150 or 180). For a shorter hanger, chain fewer. The 120-chain length creates a hanger that drops approximately 18-20 inches, perfect for hanging from a ceiling hook or macrame ring.
Part 4: Assembly
Now it's time to bring all the pieces together to create your beautiful pineapple plant hanger!
- Attach the Leaves: Using the long tails from the leaves, sew each leaf to the top point of the pineapple body. Space the 5 leaves evenly around the point, positioning them so they fan out naturally. Use a whip stitch or running stitch, going through the base of each leaf and into the knitted fabric. Make sure the leaves are securely attached by going through each spot at least twice.
- Attach the Braided Strap: Take the braided strap and position it at the top of the pineapple, distributing the three ends evenly around the leaves. The knot at the bottom of the braid should sit right at the top of the pineapple, among the leaves. Sew each of the three strap ends securely to the pineapple body, using the yarn needle and the tails from the straps. Go through the braid and into the knitted fabric several times to ensure a strong hold.
- Weave in All Ends: Using your yarn needle, weave in any remaining loose ends on the inside of the pineapple body. This will keep the outside clean and professional-looking.
Part 5: Finishing Touches
- Blocking (Optional): To give your pineapple a more defined shape, lightly block it. Wet the pineapple body with cool water, gently squeeze out excess (don't wring), and lay it flat to dry, shaping it as it dries. This will help the garter stitch relax and the pineapple to hold its rounded form.
- Add Your Plant: Place a small pot or air plant inside the pineapple body, using the natural opening at the top. The garter stitch fabric is stretchy enough to accommodate a small 2-3 inch pot. For air plants, you can simply tuck them into the opening.
- Hang and Enjoy: Hang your pineapple from a hook, macrame ring, or curtain rod. The braided strap is sturdy enough to hold a small pot with soil, but for heavier plants, consider adding a small liner or pot inside.
Tips for Success
- Count Your Stitches: Especially during the increase and decrease sections, count your stitches after each row to ensure you haven't accidentally added or dropped any.
- Use Stitch Markers: Place a stitch marker at the beginning of each crochet round to help you keep track of where you are.
- Keep Tension Even: For the knitted body, try to maintain consistent tension throughout. The garter stitch is forgiving, but even tension will give you a smoother, more professional finish.
- Make a Set: This pattern is designed to be made in multiples. Create three pineapples and hang them at different heights for a stunning tropical display.
- Customize Colors: While the traditional pineappleAlso Check Out: We think you'd love this beautiful pattern on our sister site: Cozy Cropped Kimono Sweater