Lilac Sunburst Ripple Crochet Vest Free Pattern
Lilac Sunburst Ripple Crochet Vest: Your First Wearable
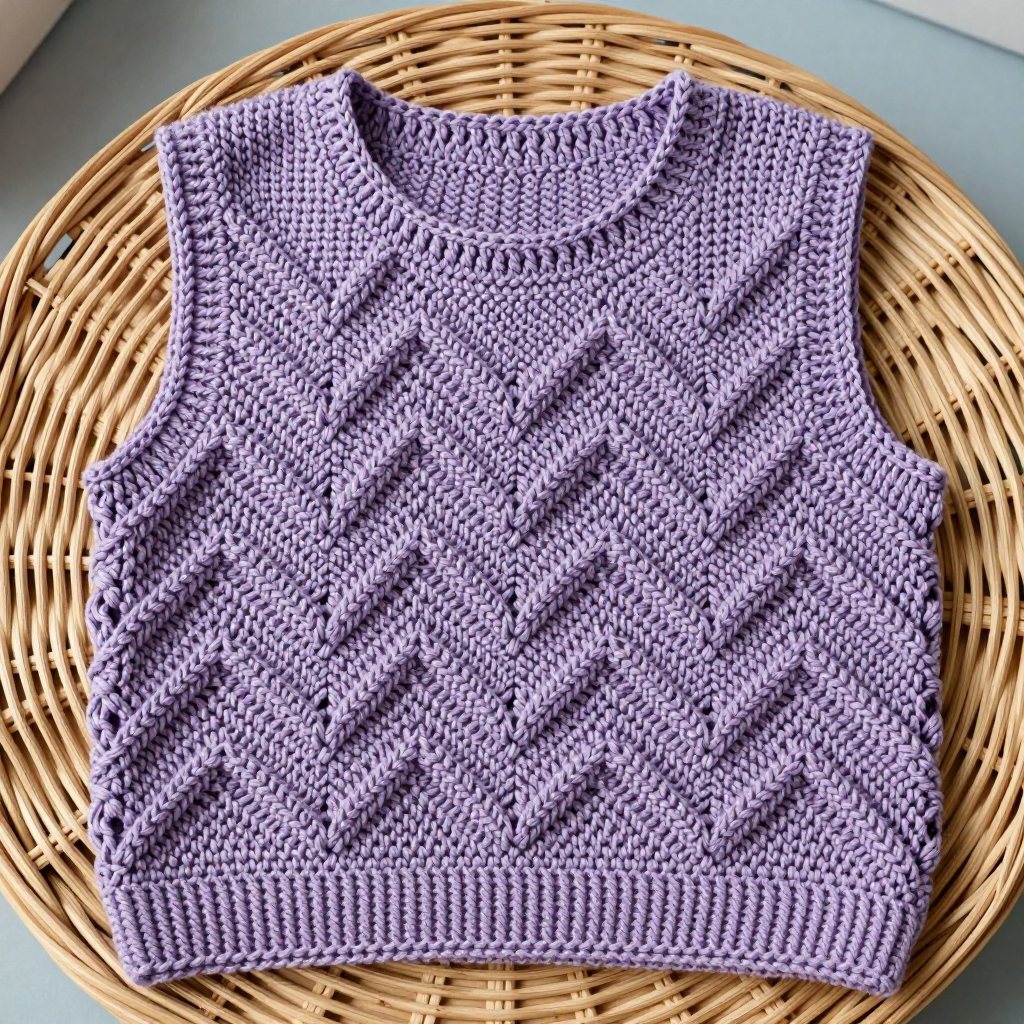
If you have ever wanted to make something you can actually wear, this is the project for you. The Lilac Sunburst Ripple Vest is a boxy, sleeveless layering piece worked in soft worsted-weight tweed wool in a single lilac shade with tiny darker flecks running through it. The whole body is one long flat panel of chevron (zigzag) rows, where paired increases create pointed "sunburst" peaks and double decreases form deep valleys — so the fabric looks far more complicated than the two-row repeat that makes it. It is perfect for advanced beginners who can chain and double crochet and want to level up, and because it is seamed into a simple tube with shallow armholes, there is no shaping, no buttonholes, and no sleeves to worry about. The finished vest is relaxed and straight, with a slightly raised crab-stitch cord around the neck and armholes, and it feels light, warm, and wonderfully textured.
Materials Needed
- Yarn: Worsted-weight tweed wool (approx. 200 yd / 183 m per 100 g skein), lilac monochrome. Total: approx. 700 (800, 900, 1000) yd / 640 (730, 825, 915) m — about 4 (4, 5, 5) skeins.
- Hook: Size 5.0 mm (US H-8), or whatever size gets you gauge.
- Stitch markers: At least 8 (for marking peaks, valleys, and seam points).
- Tapestry needle: Blunt-tipped, large eye, for seaming and weaving in ends.
- Scissors for cutting yarn.
- Measuring tape and rust-proof pins for blocking.
- Finished size: Bust approx. 36 (42, 48, 54) in / 91 (107, 122, 137) cm. Sizes given as XS/S (M/L, XL/2X, 3X). Body length approx. 18 (20, 22, 24) in / 46 (51, 56, 61) cm. Boxy, relaxed fit with about 4–6 in / 10–15 cm of positive ease.
Abbreviations and Beginner Glossary
- ch — chain: yarn over the hook, pull the loop through the loop on your hook. This makes the starting "rope."
- st / sts — stitch / stitches: one completed loop-and-post unit in your fabric.
- sl st — slip stitch: insert hook into stitch, yarn over, pull through both the stitch and the loop on your hook at once. Makes a nearly invisible joining stitch.
- sc — single crochet: insert hook into stitch, yarn over, pull up a loop (2 loops on hook), yarn over, pull through both loops. A short, firm stitch.
- dc — double crochet: yarn over, insert hook into stitch, yarn over, pull up a loop (3 loops on hook), yarn over, pull through 2 loops, yarn over, pull through last 2 loops. A taller stitch.
- dc2tog — double crochet 2 together (a decrease): in the next stitch work a dc but stop when 2 loops remain on the hook; yarn over, insert into the following stitch, pull up a loop, yarn over, pull through 2 loops, yarn over, pull through all 3 remaining loops. Two stitches become one.
- 2 dc in same st — paired increase: work two complete double crochets into one single stitch, making two stitches where there was one.
- RS / WS — right side (the outside face of the fabric) / wrong side (the inside face).
- rep — repeat: do the bracketed sequence again.
- reverse sc (crab stitch) — single crochet worked backwards: insert hook into the stitch to your right, yarn over, pull up a loop, yarn over, pull through both loops. Creates a raised cord edge.
- turn — flip the work over so you can crochet back along the row you just made.
- fasten off — cut yarn, pull the tail all the way through the last loop, and tighten.
Gauge
16 dc x 8 rows = 4 in / 10 cm in ripple pattern; one chevron repeat (16 sts) = 4 in / 10 cm wide.
Gauge is simply how big your stitches come out. If your stitches are larger than the designer's, your vest will be too big; smaller, and it will be too tight. Because this vest is a simple tube, gauge is the only thing controlling fit — so please check it. To swatch: chain 33 (two repeats plus edges), work Row 1 and Row 2 of the pattern below, then repeat Row 2 until you have about 4 in / 10 cm of fabric. Lay it flat without stretching and measure across the middle. If you get more stitches than 16 per 4 in, go up a hook size; if fewer, go down. Change hook size and swatch again until it matches.
Beginner Tips Before You Start
- Count every fourth row. The paired increases and double decreases must balance exactly. After every 4th row, count your stitches — you should always have 145 (161, 177, 193) sts. If you are off, fix it right away rather than 20 rows later.
- Mark your peaks and valleys. Place a stitch marker in the first paired increase and the first double decrease of Row 1. As you work, you will see the peaks and valleys line up vertically — the markers help you spot a mistake instantly.
- Do not pull your yarn tight. Tension is the number-one beginner issue. Let the yarn flow; tight stitches make a stiff, small vest and make the hook hard to insert.
- Keep your turning chain loose. The ch 2 at the start of each row is not a stitch — keep it relaxed so the side edge stays straight and easy to seam.
- Work in good light and count out loud. The 6-dc runs between peaks and valleys are where mistakes hide. Say the numbers as you go.
- Try on before seaming. Once the panel is the right length, wrap it around yourself before you sew anything. It is much easier to add or remove rows now than after seaming.
Step-by-Step Instructions
Understanding the Ripple Math (read this first)
Every chevron repeat uses 16 stitches: 2 dc in the first st (increase), dc in the next 6 sts, dc2tog twice (two decreases), dc in the next 6 sts, 2 dc in the last st (increase). The two increases add 2 stitches and the two decreases remove 2 stitches, so the count stays the same row after row. The sunburst peaks sit at each paired increase; the valleys sit at the double decrease.
Body (worked flat, side to side)
Set-up chain: Ch 145 (161, 177, 193). This gives 9 (10, 11, 12) full chevron repeats plus 1 edge stitch at each end.
Row 1 (RS): Dc in the 3rd ch from hook (this counts as your first dc), dc in the next ch, [dc in the next 6 ch, dc2tog over the next 2 ch twice, dc in the next 6 ch, 2 dc in the next ch] rep to the last 2 ch, dc in the last 2 ch. Turn. (145 / 161 / 177 / 193 sts)
Row 2 (WS): Ch 2 (does not count as a st), 2 dc in the first st, [dc in the next 6 sts, dc2tog twice, dc in the next 6 sts, 2 dc in the next st] rep across, ending with 2 dc in the last st. Turn. (145 / 161 / 177 / 193 sts)
Rows 3–144 (160, 176, 192): Repeat Row 2. (145 / 161 / 177 / 193 sts) — this brings the piece to approx. 18 (20, 22, 24) in / 46 (51, 56, 61) cm from the foundation chain, ending on a WS row. (At 8 rows per 4 in, 144 rows = 72 in / 183 cm of fabric length, which folds in half to a 36 in / 91 cm bust; the larger sizes follow the same math.)
Fasten off, leaving a 24 in / 60 cm tail for seaming.
Side Seams
Fold the panel in half widthwise with RS together (the outside faces touching). Starting at the bottom edge, seam 9 (10, 11, 12) in / 23 (25, 28, 30) cm up each side using sl st or mattress stitch. Leave the remaining upper edge open for the armholes — approx. 7 (8, 9, 10) in / 18 (20, 23, 25) cm open on each side.
Shoulder Seams
Still with RS together, seam the top edge from each outer armhole edge inward, leaving a 9 (10, 11, 12) in / 23 (25, 28, 30) cm center opening for the neck. Seam approx. 4 (4.5, 5, 5.5) in / 10 (11, 13, 14) cm at each shoulder.
Neckline Edging
Round 1: With RS facing, join yarn at the back neck. Work 1 round of sc evenly around the entire neck opening, spacing stitches so the edge lies flat (about 1 sc per stitch along the top edge and 1 sc per row along any vertical edges). Join with sl st to the first sc.
Round 2: Work 1 round of reverse sc (crab stitch) all the way around. Fasten off.
Armhole Edging
Round 1: With RS facing, join yarn at the underarm. Work 1 round of sc evenly around the armhole, again spacing to keep it flat. Join with sl st.
Round 2: Work 1 round of reverse sc around. Fasten off. Repeat for the second armhole.
Assembly and Finishing
Seaming: For mattress stitch, lay both edges flat side by side with RS facing you, thread a tapestry needle with the long tail, and pass the needle under the horizontal bar between the first two stitches on one edge, then the matching bar on the other edge, pulling snug every few stitches. The seam disappears into the fabric. For a sl st seam, hold RS together and work sl st through both layers along the edge — quicker and slightly more visible.
Weaving in ends: Thread each tail onto the tapestry needle and run it through the wrong side of the fabric for about 3 in / 8 cm, changing direction once so it cannot work loose. Trim close to the fabric.
Blocking: Mist the vest lightly with water (or soak and gently roll in a towel), then pin it to the finished measurements on a towel or blocking mat, pinning each chevron peak flat so the zigzag reads crisply. Do not press heavily with an iron — the tweed texture and flecks should stay visible. Let it dry completely before unpinning.
Pro Tips and Variations
- Color changes: Work the body in lilac and switch to a contrast shade for the reverse-sc edging, or work wide stripes by changing color every 16 rows (one full chevron repeat) for a bolder streetwear look.
- Size adjustments: To change the width, add or remove 16-stitch chevron repeats (each adds/removes 4 in / 10 cm of bust). To change the length, add or remove rows in multiples of 8 (each 8 rows adds/removes 4 in / 10 cm of fabric length, which becomes 2 in / 5 cm of body length once folded).
- Yarn substitution: Any worsted-weight yarn works — a smooth wool shows the chevron ridges most crisply, while a tweed or heathered yarn gives the flecked, nubby look shown here. Just swatch again, since fiber content changes gauge.
- Deeper armholes or a longer vest: For a more oversized feel, leave 1–2 in / 3–5 cm more open at the armholes, or add 8–16 rows to the panel before seaming for a tunic-length version.