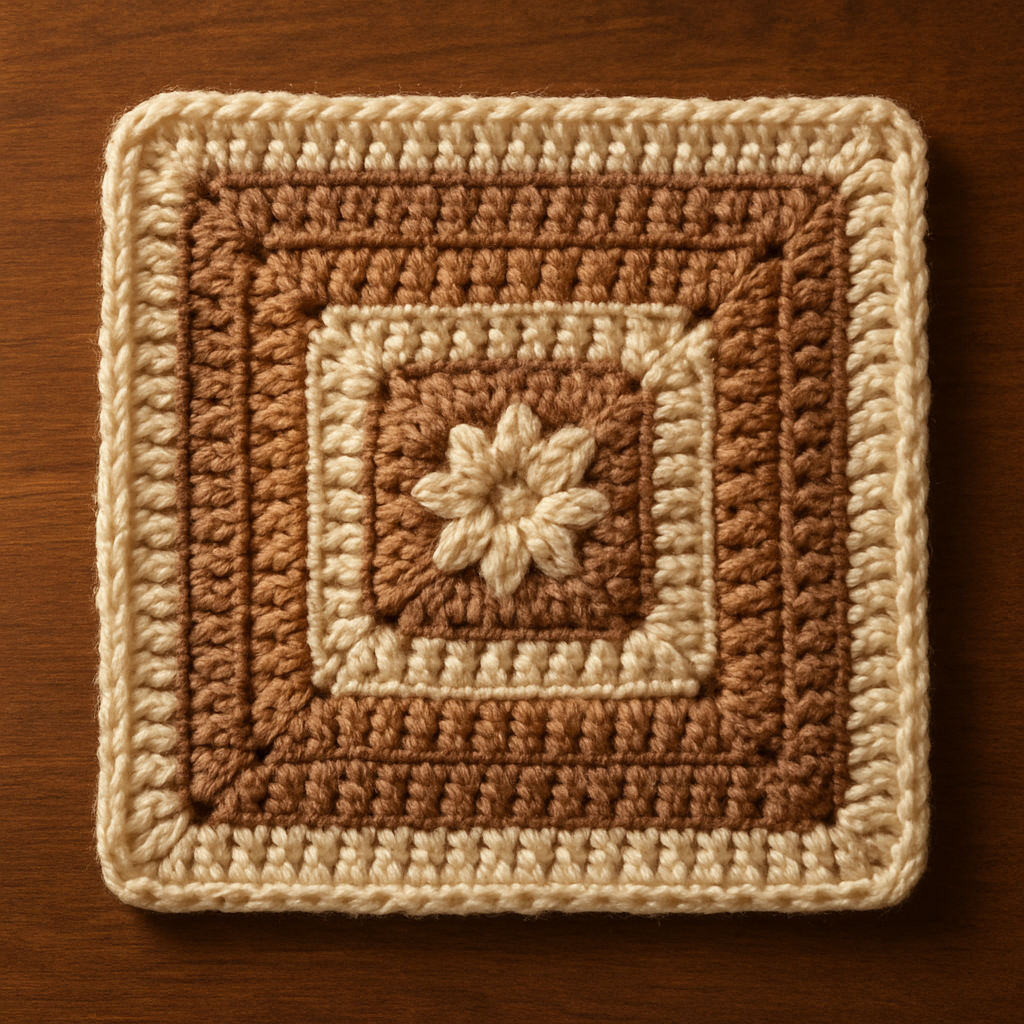
Celestial Seraphim Granny Square Free Pattern – Crochet an Angelic Halo Motif

Celestial Seraphim Granny Square Free Pattern – Crochet an Angelic Halo Motif
Elevate your crochet repertoire with this ethereal granny square featuring a raised heart center and delicate halo border. Perfect for blankets, pillows, or wall art, this pattern blends classic technique with a celestial twist. The Celestial Seraphim Granny Square is a stunning addition to any crocheter's collection, offering a unique combination of traditional granny square construction with an angelic, heavenly aesthetic that will make your handmade creations truly divine.
Whether you're looking to create a thoughtful handmade gift, add a touch of celestial charm to your home decor, or simply expand your crochet skills with a beautiful new pattern, this angelic halo motif is sure to inspire. The raised heart center symbolizes love and devotion, while the delicate halo border adds an ethereal, heavenly glow to the finished piece.
Materials Needed
Before you begin your crochet journey with this celestial pattern, gather the following materials:
Yarn Requirements
- Main Yarn: Worsted weight cotton or acrylic blend (e.g., Lion Brand Cotton-Ease) in three colors:
- Ivory (for the base rounds)
- Soft gold (for the halo border)
- Blush pink (for the heart center)
- Yarn Amount: Approximately 50-60 yards of each color for one 8-inch square
Tools and Notions
- Crochet Hook: 5.0 mm (H-8) crochet hook
- Yarn needle: For weaving in ends
- Scissors: For cutting yarn
- Stitch markers: Optional, but helpful for keeping track of rounds
- Blocking supplies: Steam iron or spray bottle and blocking mat
Gauge Information
Gauge: 4 rounds = 4 inches (10 cm) in double crochet. This gauge ensures your square will measure approximately 8 inches (20 cm) when blocked. Adjust your hook size if needed to achieve the correct gauge.
Step-by-Step Instructions
Follow these detailed instructions to create your Celestial Seraphim Granny Square. The pattern is worked in continuous rounds, with each round building upon the previous one to create the beautiful heart and halo design.
Heart Center (Rounds 1-3)
Round 1: With blush pink yarn, make a magic ring.
- Ch 3 (counts as first double crochet)
- Work 2 dc into the magic ring
- Ch 2 (first corner space)
- Work 3 dc into the magic ring
- Ch 2 (second corner space)
- Work 3 dc into the magic ring
- Ch 2 (third corner space)
- Work 3 dc into the magic ring
- Ch 2 (fourth corner space)
- Sl st to top of beginning ch-3 to close round
Round 1 total: 12 double crochet stitches, 4 ch-2 corner spaces
Round 2: Slip stitch into the next 2 dc stitches and into the ch-2 corner space.
- Ch 3 (counts as first dc)
- Work (2 dc, ch 2, 3 dc) in the same corner space – this creates your first corner
- *Ch 1, work (3 dc, ch 2, 3 dc) in the next ch-2 corner space*
- Repeat from * to * around for the remaining 3 corners
- Ch 1, sl st to top of beginning ch-3 to close round
Round 2 total: 24 double crochet stitches, 4 corners, 4 ch-1 spaces
Round 3: Slip stitch into the next 2 dc stitches and into the ch-2 corner space.
- Ch 3 (counts as first dc)
- Work (2 dc, ch 2, 3 dc) in the same corner space
- *Ch 1, work 3 dc in the next ch-1 space
- Ch 1, work (3 dc, ch 2, 3 dc) in the next corner space*
- Repeat from * to * around, ending with:
- Ch 1, work 3 dc in the last ch-1 space
- Ch 1, sl st to top of beginning ch-3 to close round
Round 3 total: 36 double crochet stitches, 4 corners, 8 ch-1 spaces
Heart Shaping (Rounds 4-6)
Round 4: Slip stitch into the next 2 dc stitches and into the ch-2 corner space.
- Ch 3 (counts as first dc)
- Work (2 dc, ch 2, 3 dc) in the same corner space
- *Ch 1, work 3 dc in the next ch-1 space
- Ch 1, work 3 dc in the next ch-1 space
- Ch 1, work (3 dc, ch 2, 3 dc) in the next corner space*
- Repeat from * to * around, ending with:
- Ch 1, work 3 dc in each of the last two ch-1 spaces
- Ch 1, sl st to top of beginning ch-3 to close round
Round 4 total: 48 double crochet stitches, 4 corners, 12 ch-1 spaces
Round 5: Slip stitch into the next 2 dc stitches and into the ch-2 corner space.
- Ch 3 (counts as first dc)
- Work (2 dc, ch 2, 3 dc) in the same corner space
- *Ch 1, work 3 dc in the next ch-1 space
- Ch 1, work 3 dc in the next ch-1 space
- Ch 1, work 3 dc in the next ch-1 space
- Ch 1, work (3 dc, ch 2, 3 dc) in the next corner space*
- Repeat from * to * around, ending with:
- Ch 1, work 3 dc in each of the last three ch-1 spaces
- Ch 1, sl st to top of beginning ch-3 to close round
Round 5 total: 60 double crochet stitches, 4 corners, 16 ch-1 spaces
Round 6: Slip stitch into the next 2 dc stitches and into the ch-2 corner space.
- Ch 3 (counts as first dc)
- Work (2 dc, ch 2, 3 dc) in the same corner space
- *Ch 1, work 3 dc in the next ch-1 space
- Ch 1, work 3 dc in the next ch-1 space
- Ch 1, work 3 dc in the next ch-1 space
- Ch 1, work 3 dc in the next ch-1 space
- Ch 1, work (3 dc, ch 2, 3 dc) in the next corner space*
- Repeat from * to * around, ending with:
- Ch 1, work 3 dc in each of the last four ch-1 spaces
- Ch 1, sl st to top of beginning ch-3 to close round
Round 6 total: 72 double crochet stitches, 4 corners, 20 ch-1 spaces
Color Change Note: At the end of Round 6, fasten off the blush pink yarn and weave in the ends. You will now switch to ivory yarn for the next section, or you can continue with your preferred color scheme.
Halo Border (Rounds 7-8)
Round 7: With ivory yarn, slip stitch into the next 2 dc stitches and into the ch-2 corner space.
- Ch 1, work (sc, ch 2, sc) in the corner space
- *Ch 2, skip the next ch-1 space
- Work sc in the next 3 dc stitches
- Ch 2, skip the next ch-1 space
- Work sc in the next 3 dc stitches
- Ch 2, skip the next ch-1 space
- Work sc in the next 3 dc stitches
- Ch 2, skip the next ch-1 space
- Work sc in the next 3 dc stitches
- Ch 2, skip the next ch-1 space
- Work (sc, ch 2, sc) in the next corner space*
- Repeat from * to * around for the remaining 3 sides
- End with ch 2, sl st to the first sc to close round
Round 7 total: 4 corners, 20 ch-2 spaces
Round 8: Slip stitch into the ch-2 corner space.
- Ch 1, work (sc, ch 2, sc) in the corner space
- *Ch 2, work sc in the next ch-2 space
- Ch 2, work sc in the next ch-2 space
- Ch 2, work sc in the next ch-2 space
- Ch 2, work sc in the next ch-2 space
- Ch 2, work sc in the next ch-2 space
- Ch 2, work (sc, ch 2, sc) in the next corner space*
- Repeat from * to * around for the remaining 3 sides
- End with ch 2, sl st to the first sc to close round
Round 8 total: 4 corners, 20 ch-2 spaces
Finishing: Fasten off and weave in all loose ends with your yarn needle. The square should measure approximately 8 inches (20 cm) across before blocking.
Blocking Instructions
Blocking is essential for this pattern to achieve the perfect shape and open up the stitches beautifully:
- Wet blocking method: Soak your square in lukewarm water with a drop of mild soap for 15-20 minutes
- Gently squeeze out excess water (do not wring)
- Lay the square flat on a blocking mat or towel
- Pin the corners to measure exactly 8 inches (20 cm) square
- Pin the edges to create straight lines between corners
- Allow to dry completely, typically 24-48 hours
Alternative steam blocking: If you prefer steam blocking, pin the square to size and use a steam iron held 1-2 inches above the surface. Never place the iron directly on the yarn. Allow to cool completely before unpinning.
Tips for Perfect Results
- Maintain consistent tension: Keep your stitches even throughout to ensure the square lies flat
- Count your stitches: After each round, count your stitches to ensure accuracy before proceeding
- Use stitch markers: Place markers at the corners to help you identify them quickly
- Weave ends as you go: Weave in ends at the end of each color section to save time later
- Block for best results: Never skip blocking – it transforms the square and ensures professional-looking results
Creative Uses for Your Celestial Seraphim Square
Once you've mastered this beautiful pattern, consider these creative applications:
- Angel-themed baby blanket: Create multiple squares and join them for a heavenly gift
- Decorative wall art: Frame a single square for a unique celestial wall hanging
- Throw pillow: Make two squares and join them with a matching backing for a divine accent pillow
- Table runner: Join several squares for an ethereal table centerpiece
- Sacred space decor: Use in meditation corners or prayer spaces for a serene atmosphere
This Celestial Seraphim Granny Square pattern is perfect for crocheters of all skill levels, from confident beginners to experienced makers. The combination of the raised heart center and delicate halo border creates a truly unique motif that will add a touch of heavenly beauty to any project. Happy crocheting, and may your hooks create something truly divine!