Art Deco Corner Fan Crochet Cushion Free Pattern
Introduction
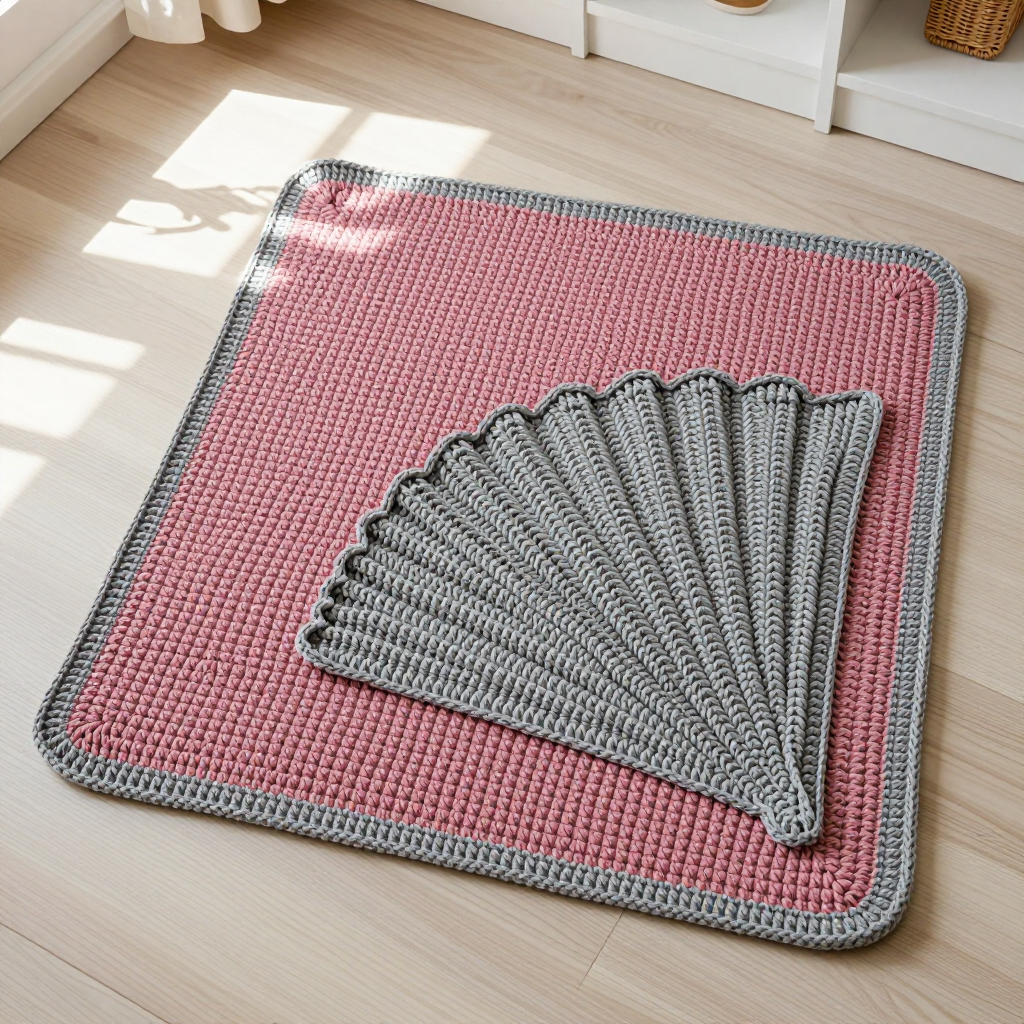
Welcome to your very first crochet cushion! This Art Deco Corner Fan Cushion is the perfect project for a complete beginner who wants to make something beautiful and useful at the same time. You only need to know one basic stitch (single crochet) for most of the project, and the fancy-looking fan motif is created simply by changing colors and working taller stitches in a few rows. The finished cushion is a soft, squishy 16-inch square in dusty rose with a striking grey fan that radiates from one corner like a sunburst. It looks like a designer piece you bought in a fancy shop, but you made it yourself, one stitch at a time. If you can hold a hook and count to 60, you can absolutely make this.
Materials Needed
- Yarn: DK weight (category 3) cotton or cotton-blend yarn. You will need approximately 350 yards of dusty rose (Color A) and 150 yards of medium grey (Color B).
- Main hook: 4.5 mm (US 7) crochet hook — used for the cushion face and back panels.
- Border hook: 3.75 mm (US F/5) crochet hook — used for the border and final joining.
- Stitch markers: At least 4, to mark your corners and color-change points.
- Tapestry needle: A large blunt needle with an eye big enough for yarn, for weaving in ends.
- Scissors: Sharp craft scissors for cutting yarn.
- Cushion insert: One 16 x 16 in (40.5 x 40.5 cm) pillow insert.
- Finished size: 16 x 16 in (40.5 x 40.5 cm), designed to fit a 16 in cushion insert.
Abbreviations and Beginner Glossary
- ch – chain: Make a loop with the yarn, then pull a new loop through it. Each loop you pull through is one chain. This is how you start a flat piece.
- sc – single crochet: Insert your hook into the next stitch, yarn over (wrap yarn around hook), pull up a loop (you now have 2 loops on hook), yarn over again, pull through both loops. One loop remains. That is one single crochet.
- dc – double crochet: Yarn over first, insert hook into stitch, yarn over, pull up a loop (3 loops on hook), yarn over, pull through 2 loops, yarn over, pull through last 2 loops. Taller than a single crochet.
- tr – treble crochet: Yarn over twice, insert hook, yarn over, pull up a loop (4 loops on hook), then yarn over and pull through 2 loops three times. Taller than a double crochet.
- dtr – double treble crochet: Yarn over three times, insert hook, yarn over, pull up a loop (5 loops on hook), then yarn over and pull through 2 loops four times. The tallest stitch in this pattern.
- sl st – slip stitch: Insert hook into stitch, yarn over, pull the loop straight through the loop on your hook. No height added; used to join rounds.
- st(s) – stitch(es): One completed stitch or several stitches.
- sp – space: The gap between stitches.
- sk – skip: Do not work into that stitch; move past it.
- beg – beginning: The start of a row or round.
- RS – right side: The front, public-facing side of your work.
- turn – flip your work over so you can work back across the row you just made.
- yarn over – wrap the yarn around your hook from back to front.
- fasten off – cut the yarn a few inches from the work, pull the tail all the way through the last loop, and tighten.
- intarsia – a color-change method where you use a separate ball (bobbin) of yarn for each color block so the unused color does not carry across the back.
Gauge
Gauge: 15 single crochet stitches x 16 rows = 4 inches (10 cm) with the 4.5 mm (US 7) hook.
Gauge means how big your stitches come out. If your stitches are too big, your cushion will be too large for the insert; if too small, the insert will bunch up. To check: make a practice square of about 25 chains, work single crochet rows until the piece is about 5 inches tall, then lay it flat and measure a 4-inch section in the middle. Count the stitches across and the rows up. If you have more than 15 stitches in 4 inches, try a larger hook; if fewer, try a smaller hook. Always check gauge before starting — it saves heartache later.
Beginner Tips Before You Start
- Use stitch markers at every color change. Place a marker in the first grey stitch and the first rose stitch of each row so you never lose your place in the fan.
- Keep two separate balls of grey. Because the fan sits in one corner, wind a small separate ball (bobbin) of grey for the fan so the yarn does not tangle across the rose ground.
- Do not pull your yarn too tight. Tension should be relaxed. Tight stitches make the fabric stiff and shrink your cushion below 16 inches.
- Count your stitches at the end of every row. Every row of the cushion face must total 60 stitches. Counting takes ten seconds and prevents hours of fixing.
- Change color on the last stitch of the old color. Work the final stitch of the old color until only two loops remain on the hook, then pull the new color through to finish it. This makes a clean edge.
- Work the fan with the right side facing you on odd rows. Odd-numbered rows are the right side (RS); even rows are the wrong side. Keep track with a simple tally sheet.
Step-by-Step Instructions
Cushion Face — Rose Ground
With Color A (dusty rose) and the 4.5 mm hook, ch 61.
Row 1 (RS): Sc in the 2nd ch from hook and in each ch across, turn. (60 sc)
Row 2: Ch 1, sc in each st across, turn. (60 sc)
Rows 3–8: Repeat Row 2. (60 sc; 8 rows total of A, piece measures approx. 2 in)
Fan Motif — Building the Corner Block (Rows 9–16)
The fan occupies the last 24 stitches of each row (the right-hand corner as you look at the right side). Work the first 36 stitches in A and the last 24 in B, using a separate bobbin of grey.
Row 9 (RS): With A, ch 1, sc in first 36 sts; with B, sc in next 24 sts, turn. (60 sc: 36 A, 24 B)
Row 10: With B, ch 1, sc in first 24 sts; with A, sc in next 36 sts, turn. (60 sc: 24 B, 36 A)
Rows 11–16: Repeat Rows 9 and 10 three more times, ending on a Row 10 repeat. (60 sc each row; 8 fan rows total)
Shaping the Fan (Rows 17–32)
The grey section grows by 2 stitches every other row while the rose section shrinks by 2.
Row 17 (RS): With A, ch 1, sc in first 34 sts; with B, sc in next 26 sts, turn. (60 sc: 34 A, 26 B)
Row 18: With B, ch 1, sc in first 26 sts; with A, sc in next 34 sts, turn. (60 sc: 26 B, 34 A)
Row 19: With A, ch 1, sc in first 32 sts; with B, sc in next 28 sts, turn. (60 sc: 32 A, 28 B)
Row 20: With B, ch 1, sc in first 28 sts; with A, sc in next 32 sts, turn. (60 sc: 28 B, 32 A)
Row 21: With A, ch 1, sc in first 30 sts; with B, sc in next 30 sts, turn. (60 sc: 30 A, 30 B)
Row 22: With B, ch 1, sc in first 30 sts; with A, sc in next 30 sts, turn. (60 sc: 30 B, 30 A)
Row 23: With A, ch 1, sc in first 28 sts; with B, sc in next 32 sts, turn. (60 sc: 28 A, 32 B)
Row 24: With B, ch 1, sc in first 32 sts; with A, sc in next 28 sts, turn. (60 sc: 32 B, 28 A)
Row 25: With A, ch 1, sc in first 26 sts; with B, sc in next 34 sts, turn. (60 sc: 26 A, 34 B)
Row 26: With B, ch 1, sc in first 34 sts; with A, sc in next 26 sts, turn. (60 sc: 34 B, 26 A)
Row 27: With A, ch 1, sc in first 24 sts; with B, sc in next 36 sts, turn. (60 sc: 24 A, 36 B)
Row 28: With B, ch 1, sc in first 36 sts; with A, sc in next 24 sts, turn. (60 sc: 36 B, 24 A)
Row 29: With A, ch 1, sc in first 22 sts; with B, sc in next 38 sts, turn. (60 sc: 22 A, 38 B)
Row 30: With B, ch 1, sc in first 38 sts; with A, sc in next 22 sts, turn. (60 sc: 38 B, 22 A)
Row 31: With A, ch 1, sc in first 20 sts; with B, sc in next 40 sts, turn. (60 sc: 20 A, 40 B)
Row 32: With B, ch 1, sc in first 40 sts; with A, sc in next 20 sts, turn. (60 sc: 40 B, 20 A)
Fan Detail Rows — Raised Ribs (Rows 33–40)
These rows create the radiating art deco ribs. Each bracket repeats across the grey section only.
Row 33 (RS): With A, ch 1, sc in first 18 sts; with B, [dc in next st, sc in next st] 20 times, turn. (60 sts: 18 A, 42 B)
Row 34: With B, ch 1, sc in each st across B section; with A, sc in each st across A section, turn. (60 sc)
Row 35: With A, ch 1, sc in first 16 sts; with B, [tr in next st, sc in next st] 22 times, turn. (60 sts: 16 A, 44 B)
Row 36: With B, ch 1, sc in each st across B section; with A, sc in each st across A section, turn. (60 sc)
Row 37: With A, ch 1, sc in first 14 sts; with B, [dtr in next st, sc in next st] 23 times, turn. (60 sts: 14 A, 46 B)
Row 38: With B, ch 1, sc in each st across B section; with A, sc in each st across A section, turn. (60 sc)
Row 39: With A, ch 1, sc in first 12 sts; with B, [tr in next st, sc in next st] 24 times, turn. (60 sts: 12 A, 48 B)
Row 40: With B, ch 1, sc in each st across B section; with A, sc in each st across A section, turn. (60 sc)
Return to Rose Ground (Rows 41–56)
Row 41 (RS): With A, ch 1, sc in each st across, turn. (60 sc)
Rows 42–56: Repeat Row 41. (60 sc; 16 rows of A after the motif; piece measures approx. 16 in from beginning)
Fasten off A. Do not fasten off B; you will use it for the border.
Border
Change to the 3.75 mm (US F/5) hook and Color B.
Round 1: Ch 1, sc evenly around the entire outer edge of the cushion face, working 1 sc in each st along the top and bottom edges and 1 sc in each row-end along the side edges, with 3 sc in each corner; join with sl st to first sc. (approx. 240 sc)
Round 2: Ch 1, sc in each sc around, working 3 sc in each corner; join with sl st. Fasten off B. (approx. 248 sc)
Envelope Back — Large Panel
With A and the 4.5 mm hook, ch 61.
Row 1 (RS): Sc in 2nd ch from hook and in each ch across, turn. (60 sc)
Rows 2–40: Ch 1, sc in each st across, turn. (60 sc; approx. 16 in tall)
Fasten off A.
Envelope Back — Small Panel
With A and the 4.5 mm hook, ch 61.
Row 1 (RS): Sc in 2nd ch from hook and in each ch across, turn. (60 sc)
Rows 2–24: Ch 1, sc in each st across, turn. (60 sc; approx. 10 in tall)
Fasten off A.
Assembly and Finishing
Step 1 — Block the pieces. Lay the cushion face and both back panels flat on a towel. Pin each piece to its finished measurement (16 x 16 in for the face and large panel, 16 x 10 in for the small panel) using rust-proof pins. Mist lightly with water until damp, then leave to dry completely. This smooths your stitches and evens the edges.
Step 2 — Layer the cushion. Place the cushion face right side up. Place the large back panel right side down on top, aligning the bottom and side edges. Place the small back panel right side down on top, aligning the top and side edges so it overlaps the large panel by about 6 inches, forming the envelope opening.
Step 3 — Pin. Pin all layers together around the entire perimeter, placing a pin at each corner and every 2 inches along the edges.
Step 4 — Join. With B and the 3.75 mm hook, join yarn at the bottom right corner. Work sc evenly through all layers around the entire perimeter, working 3 sc in each corner; join with sl st to first sc. Fasten off.
Step 5 — Weave in ends. Thread each yarn tail onto the tapestry needle and weave it back and forth through the wrong side of the fabric for about 2 inches, then trim close to the fabric.
Step 6 — Insert the cushion. Push a 16 x 16 in cushion insert through the envelope opening and smooth it into the corners.
Pro Tips and Variations
- Change the colors. Try sage green with cream, or navy with mustard for a bolder art deco look. Keep one color light and one dark so the fan stands out.
- Adjust the size. To make an 18-inch cushion, add 8 chains to the starting chain (69) and work 8 more rows in each plain section; keep the fan rows the same.
- Substitute yarn. Worsted weight (category 4) yarn works too — just use a 5 mm (US H/8) hook and check your gauge again, as the cushion will grow quickly.
- Add a button closure. Instead of a plain envelope, crochet two small chains and sew a decorative button to the back panel for extra charm.


