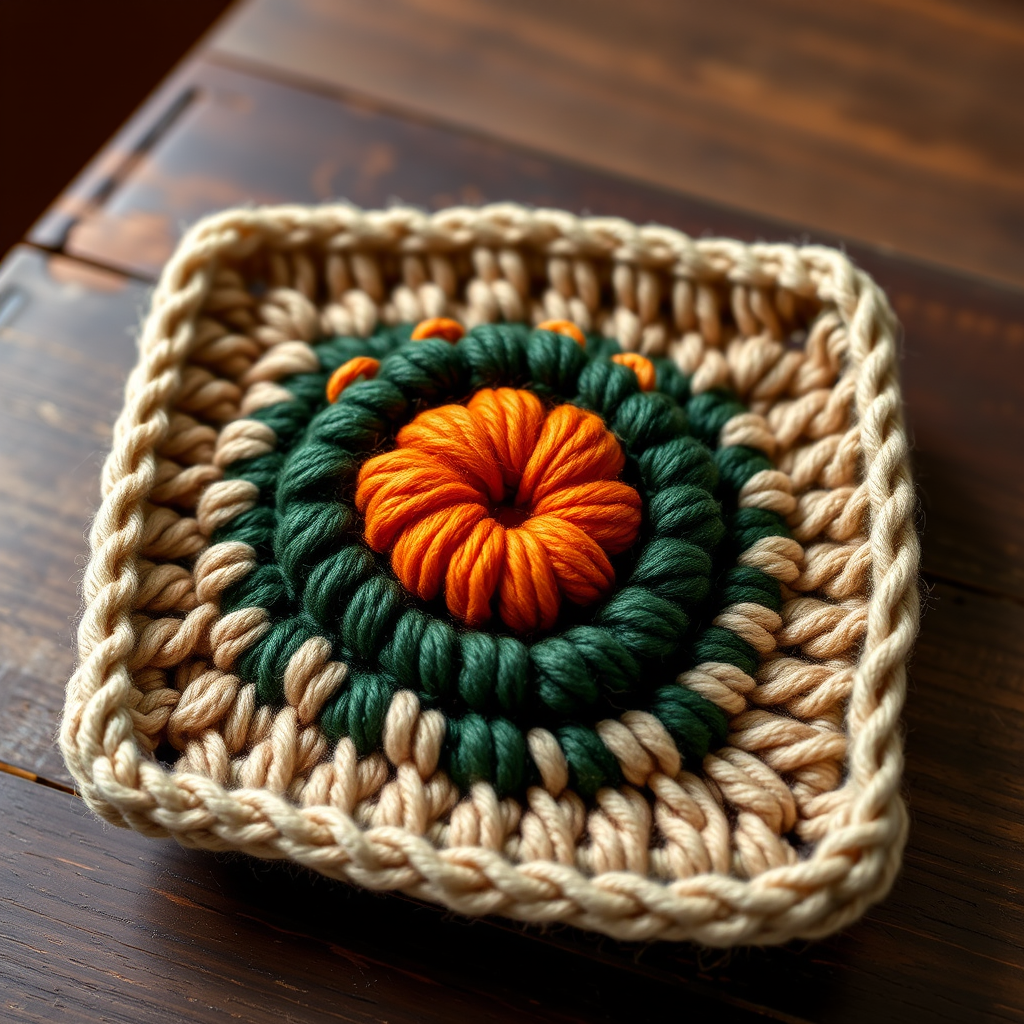
Willowmere Woven Square Free Pattern

The Willowmere Woven Square: A Modern Crochet Motif for Every Maker
Are you ready to elevate your crochet game with a pattern that beautifully blends classic technique with contemporary design? The Willowmere Woven Square is a stunning, textured motif that reimagines the traditional granny square. Featuring a dense, braided-looking woven center and a delicate, fan-shaped scalloped border, this square is as versatile as it is beautiful. Whether you're dreaming of a cozy blanket, a textured throw pillow, or a set of elegant coasters, this pattern is your gateway to creating something truly special. Best of all, it's beginner-friendly, using only basic stitches to achieve a complex, high-end look.
This pattern is worked in the round from the center out, making it a highly portable and satisfying project. The clever use of post stitches creates that signature "woven" texture in the middle, while the final round of shells forms a soft, organic edge that feels both modern and timeless. Let's gather our materials and dive into the step-by-step instructions to bring this beautiful square to life.
Materials Needed for the Willowmere Square
Before you begin, ensure you have all the necessary supplies on hand. This project is perfect for using up worsted weight yarn scraps or for making a coordinated set of squares.
- Yarn: Worsted weight cotton or acrylic blend (e.g., Lion Brand Cotton-Ease) in two contrasting colors:
- Color A (Main): For the center and final border (e.g., soft sage green).
- Color B (Accent): For the texture rounds and scallop base (e.g., cream).
- Crochet Hook: 5 mm (H/8) crochet hook.
- Other Tools: Yarn needle for weaving in ends, scissors.
- Gauge: First 3 rounds = 3 inches across; finished square = 6 inches. (Gauge is important for consistent sizing if you are making multiple squares for a larger project).
Step-by-Step Instructions: Crafting Your Woven Square
This square is worked in the round, starting from the center. We will use a magic ring for a tight, closed center. If you are unfamiliar with the magic ring, you can alternatively chain 4 and slip stitch to form a ring, but the magic ring is recommended for a seamless finish.
Round 1: The Foundation (Color A)
With Color A, make a magic ring.
- Chain 3 (this counts as your first double crochet).
- Work 2 double crochet (dc) into the ring.
- Chain 2 (this forms your first corner space).
- Work *(3 dc, ch 2)* three more times into the ring. You will have a total of four groups of 3 dc separated by ch-2 spaces.
- Join with a slip stitch (sl st) to the top of the beginning chain-3.
Count Check: You should have 12 double crochets and 4 ch-2 spaces.
Round 2: Building the Corners (Color A)
We will now shape the square by working into the corner spaces.
- Slip stitch into the next 2 dc stitches and then into the next ch-2 corner space. This moves your yarn into position.
- Chain 3 (counts as dc).
- In the same corner space, work: 2 dc, ch 2, 3 dc. This creates your first corner.
- Chain 1 (this is the side space).
- Skip the next 3 dc stitches.
- In the next ch-2 corner space, work: *(3 dc, ch 2, 3 dc)*. This is your second corner.
- Repeat from * to * for the remaining two corners.
- For the final corner, you will have already made the first corner. So, after your last ch 1, join with a sl st to the top of the beginning chain-3.
Count Check: You should have 4 corners (each with 6 dc) and 4 ch-1 side spaces.
Round 3: Introducing the Accent Color (Color B)
Switch to Color B. This round begins to fill in the sides.
- Slip stitch into the next 2 dc and into the ch-2 corner space.
- Chain 3 (counts as dc).
- In the same corner space, work: 2 dc, ch 2, 3 dc (corner made).
- Chain 1.
- Work 3 dc into the next ch-1 side space.
- Chain 1.
- In the next corner space, work: *(3 dc, ch 2, 3 dc)*.
- Repeat from * to * around, working 3 dc in each ch-1 side space and corners in the ch-2 spaces.
- End the round by working 3 dc in the last ch-1 side space, ch 1, and join with a sl st to the top of the beginning ch-3.
Count Check: You should have 4 corners and 8 dc groups on the sides (including the corners).
Round 4: Expanding the Sides (Color A)
Switch back to Color A. This round adds more depth to the sides.
- Slip stitch into the next 2 dc and into the ch-2 corner space.
- Chain 3 (counts as dc).
- In the same corner space, work: 2 dc, ch 2, 3 dc (corner made).
- Chain 1.
- Work 3 dc in the next ch-1 space, ch 1.
- Work 3 dc in the next ch-1 space, ch 1.
- In the next corner space, work: *(3 dc, ch 2, 3 dc)*.
- Repeat from * to * around, working 3 dc in each ch-1 space along the sides.
- End with a ch 1 and join with a sl st to the top of the beginning ch-3.
Count Check: You should have 4 corners and 12 dc groups on the sides.
Round 5: Preparing for the Scallop Edge (Color B)
Switch to Color B. This round creates the chain loops that the scallops will be worked into.
- Slip stitch into the next 2 dc and into the ch-2 corner space.
- Chain 1, then work 1 single crochet (sc) in the same corner space.
- Chain 3, skip the next 3 dc.
- Work 1 sc in the next ch-1 space.
- Chain 3, skip the next 3 dc.
- Work 1 sc in the next ch-1 space.
- Chain 3, skip the next 3 dc.
- Work 1 sc in the next ch-1 space.
- Chain 3, skip the next 3 dc.
- Work 1 sc in the next corner ch-2 space.
- Repeat from * to * around, but on the last side, work only 3 ch-3 loops before joining.
- Join with a sl st to the first sc.
Count Check: You should have a total of 16 ch-3 loops.
Round 6: The Scalloped Border (Color A)
Switch to Color A for the final decorative round.
- Slip stitch into the first ch-3 loop.
- Chain 1.
- In the same loop, work a shell: (sc, hdc, dc, hdc, sc).
- Chain 1.
- In the next ch-3 loop, work another shell: *(sc, hdc, dc, hdc, sc)*.
- Repeat from * to * around, working a shell in each ch-3 loop.
- Chain 1 and join with a sl st to the first sc.
- Fasten off and weave in all ends securely.
Count Check: You should have 16 shells total.
Finishing Touches for a Professional Look
To ensure your Willowmere Woven Square lies perfectly flat and has a crisp, professional shape, it is highly recommended to block it. Wet blocking or steam blocking will help open up the stitches, define the scalloped edges, and set the dimensions to the specified 6 inches. Simply pin the square to a blocking mat, mist it with water (or use a steam iron on a low setting without touching the yarn), and allow it to dry completely. Once dry, weave in any remaining ends, and your beautiful square is ready to be admired or joined with others to create a stunning larger project.
This pattern is a joy to work up, and the contrasting textures between the woven center and the delicate shells make it a standout piece. Whether you use it as a coaster, a motif for a blanket, or a building block for a bag, the Willowmere Woven Square is sure to become a favorite in your crochet repertoire. Happy hooking!