Whispering Pines Oversized Cardigan Free Pattern – Chunky Knit Cocoon
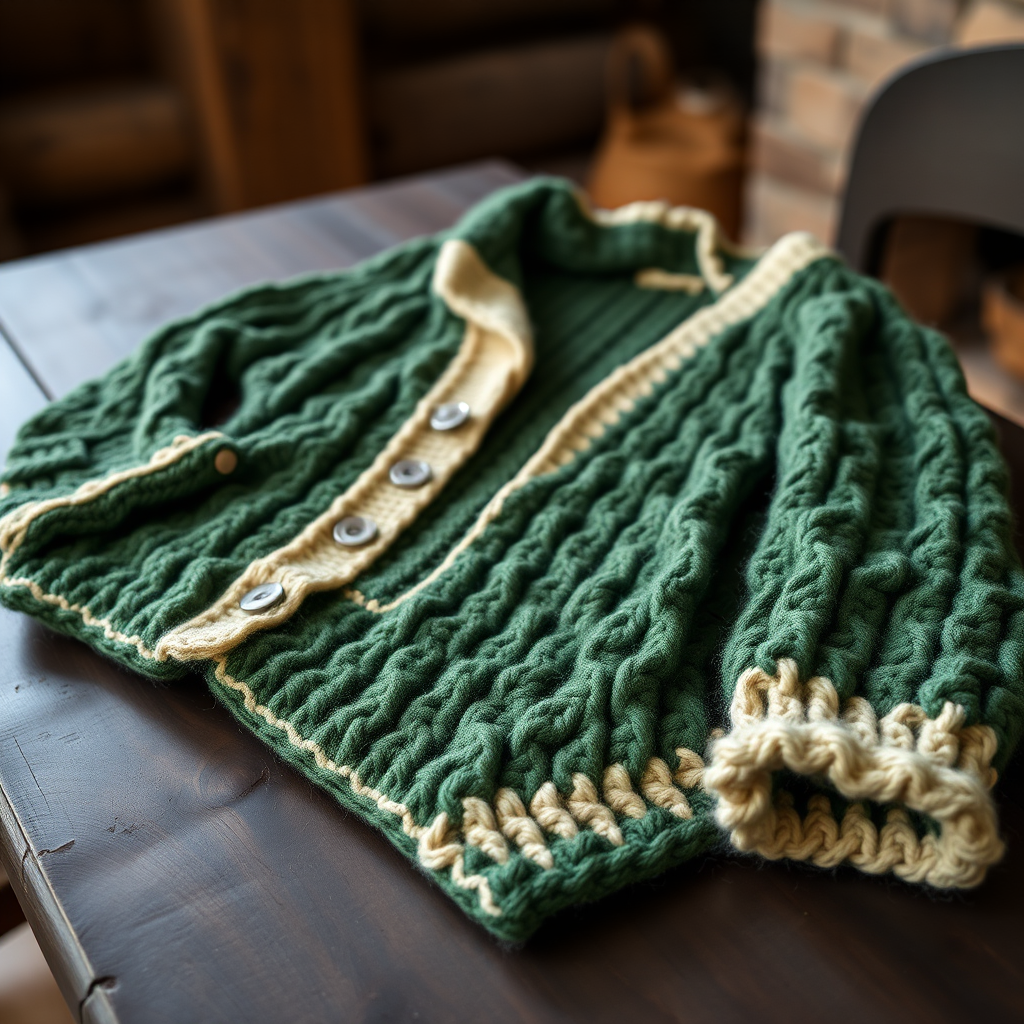
Whispering Pines Oversized Cardigan: A Cozy Chunky Knit Cocoon
Wrap yourself in the forest's embrace with this oversized, chunky knit cardigan that drapes like a cozy cloud. The textured moss stitch and deep pine green hue create a modern, organic silhouette perfect for layering over everything from simple tees to flowing dresses. This free knitting pattern is designed for beginners and experienced makers alike, offering a relaxing, repetitive rhythm that results in a stunning, wearable statement piece. The relaxed, cocoon-like silhouette with dropped shoulders and wide sleeves makes it the ultimate comfort garment for chilly evenings, reading nooks, and woodland walks.
This pattern is perfect for those looking to create a luxurious, handmade cardigan without complicated shaping. The simple moss stitch creates a dense, bumpy texture that resembles soft moss on a forest floor, while the optional contrasting trim adds a touch of modern sophistication. Let's dive into creating your own Whispering Pines cardigan!
Materials Needed
Before you begin, gather the following materials to ensure a smooth and enjoyable knitting experience. The quality of your materials will directly impact the final look and feel of your cardigan.
Yarn
- Super Bulky Weight Yarn (Size 6): Approximately 1200-1400 yards. A great choice is Lion Brand Wool-Ease Thick & Quick in 'Pine' (or another deep forest green) for the main body. For a contrasting trim, consider 'Oatmeal' or a similar light neutral.
Needles & Notions
- Circular Knitting Needles: US 15 (10 mm) with a 32-inch cable. The long cable is essential for holding the large number of stitches for the back panel.
- Stitch Markers: To mark shaping points and seams.
- Tapestry Needle: For weaving in ends and seaming the pieces together.
- Scissors: For cutting yarn.
Gauge
8 stitches and 10 rows = 4 inches in moss stitch (k1, p1, alternating every row). Always knit a swatch to check your gauge. If your gauge is off, your finished cardigan will not match the intended measurements. Adjust your needle size up or down as needed to achieve the correct gauge.
Step-by-Step Instructions
This pattern is worked in flat pieces and seamed together. The construction is straightforward, making it an excellent project for building confidence. Follow each step carefully, and you'll have a beautiful, custom-fit cardigan in no time.
Sizes & Measurements
This pattern is written for sizes S/M (M/L).
- Finished Chest: 50 (56) inches
- Finished Length: 28 (30) inches
Abbreviations
- k = knit
- p = purl
- k2tog = knit two together (decrease)
- pm = place marker
- sm = slip marker
- BO = bind off
- RS = right side
- WS = wrong side
Moss Stitch Pattern (Multiple of 2 + 1)
This is the core pattern for the entire cardigan. It creates a beautiful, textured fabric.
- Row 1: *K1, p1; repeat from * to last st, k1.
- Row 2: *P1, k1; repeat from * to last st, p1.
Repeat Rows 1 and 2 for the pattern. This creates a "seed" or "moss" stitch where the knits and purls alternate every row, forming a dense, bumpy fabric.
Back Panel
- Cast On: Cast on 101 (113) stitches.
- Body: Work in the Moss Stitch Pattern until the piece measures 28 (30) inches from the cast-on edge. This is the full length of the cardigan back.
- Bind Off: Bind off all stitches loosely. A loose bind-off is crucial to prevent the edge from being too tight and pulling in. You can use a larger needle to bind off if needed.
Left Front Panel
- Cast On: Cast on 51 (57) stitches.
- Body: Work in the Moss Stitch Pattern until the piece measures 24 (26) inches from the cast-on edge. This is slightly shorter than the back to allow for the neckline shaping.
- Shape Neck: You will now decrease stitches at the neck edge to create the V-neck or scoop shape. The neck edge is at the beginning of the Right Side (RS) rows.
- At the beginning of the next RS row, bind off 8 stitches once.
- At the beginning of the next RS row, bind off 3 stitches once.
- At the beginning of the next RS row, bind off 2 stitches once.
- Continue: Continue working in the moss stitch pattern on the remaining 38 (44) stitches until the piece measures 28 (30) inches from the cast-on edge, matching the back panel length.
- Bind Off: Bind off all stitches loosely.
Right Front Panel
- Cast On: Cast on 51 (57) stitches.
- Body: Work in the Moss Stitch Pattern until the piece measures 24 (26) inches from the cast-on edge.
- Shape Neck: The neck edge is at the end of the Right Side (RS) rows (the opposite edge from the Left Front Panel).
- At the end of the next RS row, bind off 8 stitches once.
- At the end of the next RS row, bind off 3 stitches once.
- At the end of the next RS row, bind off 2 stitches once.
- Continue: Continue working in the moss stitch pattern on the remaining 38 (44) stitches until the piece measures 28 (30) inches from the cast-on edge.
- Bind Off: Bind off all stitches loosely.
Sleeves (Make 2)
- Cast On: Cast on 41 (45) stitches.
- Increase Section: Work in the Moss Stitch Pattern, increasing 1 stitch at each edge every 6 rows until you have 61 (65) stitches on your needle. To increase, you can knit into the front and back of the first and last stitch of the row. This creates a gentle, sloping sleeve shape.
- Continue Even: Continue working in the moss stitch pattern without further increases until the sleeve measures 18 (19) inches from the cast-on edge.
- Bind Off: Bind off all stitches loosely.
Assembly
Now it's time to bring all the pieces together. Use a tapestry needle and a length of yarn to sew the seams.
- Shoulder Seams: Sew the shoulder seams, matching the bound-off edges of the back panel to the bound-off edges of the front panels. Sew approximately 4-5 inches from the outside edge inward on each side, leaving the center open for the neckline.
- Mark Armholes: Mark the center of the back panel's top edge. This is your shoulder seam reference point.
- Set in Sleeves: Place the center of the sleeve's bound-off edge (the sleeve cap) at the shoulder seam. Pin or use stitch markers to hold it in place. Sew the sleeve cap to the armhole edges, working from the shoulder seam down approximately 10 inches on each side. The sleeve should fit into the armhole opening smoothly.
- Side Seams: Sew the side seams from the underarm down to the hem. This connects the front and back panels.
- Sleeve Seams: Sew the sleeve seams from the underarm down to the cuff.
Finishing
- Pick Up Stitches: With the right side facing you, using your circular needle, pick up and knit 1 stitch for every row along the front edges and neckline. This will be approximately 120 stitches. The exact number isn't critical, but it should be even and consistent. This creates the trim.
- Work Trim: Work in the Moss Stitch Pattern for 4 rows. If you are using a contrasting color for the trim, this is the time to switch to your 'Oatmeal' yarn.
- Bind Off: Bind off all stitches loosely. This will form the shawl collar and front bands.
- Weave in Ends: Use your tapestry needle to weave in all loose yarn ends securely on the wrong side of the fabric.
- Blocking: Block the cardigan lightly to shape. Lay it flat on a towel, gently pat it into the correct dimensions, and allow it to dry completely. This will even out the stitches and give your cardigan a professional finish.
Congratulations! You've completed your Whispering Pines Oversized Cardigan. This beautiful, cozy garment is perfect for snuggling up on cool evenings. The chunky knit and moss stitch texture make it a timeless piece you'll reach for again and again. Enjoy wearing your handmade creation!


