Whimsical Woodland Gnome Home Free Pattern
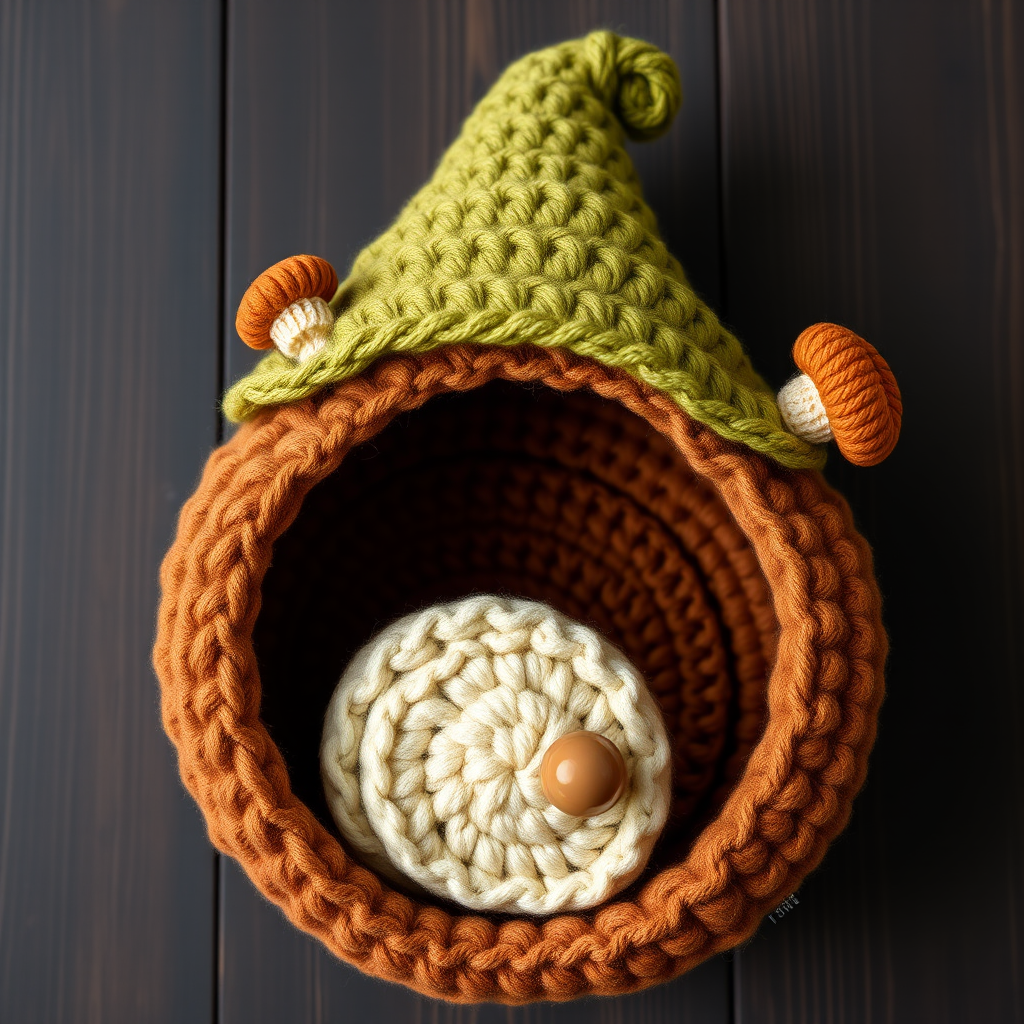
Whimsical Woodland Gnome Home: A Free Crochet Pattern for Cozy Storybook Decor
Imagine a tiny, soft dwelling straight out of a fairy tale—a place where woodland creatures might gather and where your imagination can run wild. This Whimsical Woodland Gnome Home is exactly that: a charming, storybook-inspired creation that brings a touch of magic to any shelf, nursery, or cozy corner. With its textured brown walls, a leafy green roof, and adorable terracotta mushroom accents, this free crochet pattern is perfect for both beginners looking for a fun project and seasoned crafters seeking a delightful new make. Using simple double crochet stitches worked in the round, you'll build a soft, plush home that's as enjoyable to create as it is to display. Let's get started on this enchanting journey!
Materials Needed
Before you begin, gather these supplies to ensure a smooth and enjoyable crocheting experience. All materials are readily available at your local craft store or online.
- Yarn: Worsted weight yarn in earthy tones:
- Brown (for the walls) – approximately 150 yards
- Cream (for the door) – small amount
- Moss Green (for the roof) – approximately 100 yards
- Terracotta (for mushroom accents) – small amount
- Crochet Hook: G/6 (4.0 mm) hook
- Yarn Needle: For sewing pieces together and weaving in ends
- Polyester Fiberfill: For stuffing the walls
- Stitch Marker: To keep track of your rounds
- Scissors: For cutting yarn
Gauge: 8 stitches and 4 rows = 2 inches in double crochet. (Gauge is not critical for this project, but maintaining consistent tension will help your pieces fit together neatly.)
Abbreviations Used
- ch: chain
- sc: single crochet
- dc: double crochet
- sl st: slip stitch
- inc: increase (2 sc in same stitch)
- dec: decrease (sc two stitches together)
- Rnd: round
Step-by-Step Instructions
Follow these detailed instructions carefully, and you'll have your very own gnome home in no time. Work each round as directed, and don't forget to place your stitch marker at the beginning of each round to keep your place.
Part 1: The Base (Bottom of Home)
We'll start by creating a sturdy, circular base using brown yarn. This will be the foundation of your gnome home.
- Rnd 1: With brown yarn, make a magic ring. Ch 2 (counts as first dc), work 11 dc into the ring. Sl st to the top of the ch-2 to join. (12 dc)
- Rnd 2: Ch 2, dc in the same stitch. Work 2 dc in each stitch around. Sl st to join. (24 dc)
- Rnd 3: Ch 2, dc in the same stitch, dc in the next stitch. *2 dc in next stitch, dc in next stitch* repeat from * to * around. Sl st to join. (36 dc)
- Rnd 4: Ch 2, dc in the same stitch, dc in the next 2 stitches. *2 dc in next stitch, dc in next 2 stitches* repeat from * to * around. Sl st to join. (48 dc)
- Rnd 5: Ch 2, dc in the same stitch, dc in the next 3 stitches. *2 dc in next stitch, dc in next 3 stitches* repeat from * to * around. Sl st to join. (60 dc)
- Rnd 6: Ch 2, dc in the same stitch, dc in the next 4 stitches. *2 dc in next stitch, dc in next 4 stitches* repeat from * to * around. Sl st to join. (72 dc)
Fasten off and weave in the ends securely. Your base should be a flat, circular disc.
Part 2: The Walls
Now we'll build the walls upward from the base, creating the cylindrical body of the home. Continue with brown yarn.
- Rnd 7: Attach brown yarn to any stitch on the last round of the base. Ch 2, dc in each stitch around. Sl st to join. (72 dc)
- Rnds 8-18: Repeat Rnd 7 for 11 more rounds, working dc in each stitch around. (72 dc each round)
After completing Rnd 18, fasten off and weave in the ends. The walls should now be a tall, open cylinder.
Part 3: The Door
This charming cream-colored door is worked flat and then sewn onto the front of the home. It adds a welcoming touch to your gnome's abode.
- Row 1: With cream yarn, ch 8. Sc in the 2nd ch from the hook and across. (7 sc)
- Row 2: Ch 1, turn. Sc in each stitch across. (7 sc)
- Rows 3-10: Repeat Row 2 for 8 more rows. (7 sc each row)
Fasten off, leaving a long tail (about 12 inches) for sewing the door onto the walls.
Part 4: The Roof
This is the most exciting part—the leafy, moss-green roof! It's worked in the round with increases to create a wide, flat-topped cone that will sit beautifully on top of the walls.
- Rnd 1: With moss green yarn, make a magic ring. Ch 2, work 11 dc into the ring. Sl st to join. (12 dc)
- Rnd 2: Ch 2, dc in the same stitch. 2 dc in each stitch around. Sl st to join. (24 dc)
- Rnd 3: Ch 2, dc in the same stitch, dc in the next stitch. *2 dc in next stitch, dc in next stitch* repeat from * to * around. Sl st to join. (36 dc)
- Rnd 4: Ch 2, dc in the same stitch, dc in the next 2 stitches. *2 dc in next stitch, dc in next 2 stitches* repeat from * to * around. Sl st to join. (48 dc)
- Rnd 5: Ch 2, dc in the same stitch, dc in the next 3 stitches. *2 dc in next stitch, dc in next 3 stitches* repeat from * to * around. Sl st to join. (60 dc)
- Rnd 6: Ch 2, dc in the same stitch, dc in the next 4 stitches. *2 dc in next stitch, dc in next 4 stitches* repeat from * to * around. Sl st to join. (72 dc)
- Rnd 7: Ch 2, dc in the same stitch, dc in the next 5 stitches. *2 dc in next stitch, dc in next 5 stitches* repeat from * to * around. Sl st to join. (84 dc)
- Rnd 8: Ch 2, dc in the same stitch, dc in the next 6 stitches. *2 dc in next stitch, dc in next 6 stitches* repeat from * to * around. Sl st to join. (96 dc)
- Rnd 9: Ch 2, dc in the same stitch, dc in the next 7 stitches. *2 dc in next stitch, dc in next 7 stitches* repeat from * to * around. Sl st to join. (108 dc)
- Rnd 10: Ch 2, dc in the same stitch, dc in the next 8 stitches. *2 dc in next stitch, dc in next 8 stitches* repeat from * to * around. Sl st to join. (120 dc)
Fasten off, leaving a long tail (about 18 inches) for sewing the roof to the walls.
Part 5: Mushroom Accents (Make 2)
These adorable terracotta mushrooms add the perfect whimsical touch to the roof. They're quick to make and easy to attach.
- Rnd 1: With terracotta yarn, make a magic ring. Ch 2, work 11 dc into the ring. Sl st to join. (12 dc)
- Rnd 2: Ch 2, dc in the same stitch. 2 dc in each stitch around. Sl st to join. (24 dc)
- Rnd 3: Ch 2, dc in the same stitch, dc in the next stitch. *2 dc in next stitch, dc in next stitch* repeat from * to * around. Sl st to join. (36 dc)
Fasten off, leaving a long tail (about 10 inches) for sewing each mushroom onto the roof.
Assembly: Bringing It All Together
Now that all your pieces are complete, it's time to assemble your gnome home. Take your time with this step to ensure everything is securely attached and looks beautiful.
- Attach the Door: Position the cream door on the front of the brown walls, centered and about 2 inches above the base. Using the long tail from the door, sew it securely onto the walls with a whip stitch or running stitch. Weave in the end.
- Stuff the Walls: Fill the cylindrical walls with polyester fiberfill. Stuff firmly, but not so much that the shape becomes distorted. You want it to be soft and squishy, yet sturdy enough to hold its shape.
- Attach the Roof: Place the moss green roof on top of the stuffed walls, aligning the edges. Using the long tail from the roof, sew the roof to the walls. Work your needle around the entire circumference, using a whip stitch or mattress stitch, ensuring the roof is securely attached. Weave in the end.
- Add the Mushrooms: Position the two terracotta mushrooms on opposite sides of the roof. Using their long tails, sew each one securely onto the roof. Weave in all ends.
Finishing Touches & Customization Ideas
Your Whimsical Woodland Gnome Home is now complete! But don't stop there—here are a few ideas to make it uniquely yours:
- Add a Chimney: Crochet a small cylinder (e.g., 6 rounds of 12 dc) and attach it to one side of the roof for extra charm.
- Embellish the Door: Create a tiny wreath using a small ring of green yarn and a few miniature flowers, or add a tiny doorknob with a small bead.
- Add Windows: Embroider small, circular windows onto the walls using embroidery thread or a contrasting yarn color.
- Create a Scene: Make a few tiny gnomes or woodland animals to sit beside the home for a complete storybook display.
This project is a wonderful way to practice your crochet skills while creating a piece of whimsical decor that will be cherished for years. Whether it's a gift for a loved one or a treat for yourself, this gnome home is sure to bring a smile to anyone who sees it. Happy crocheting!



