Whimsical Woodland Gnome Home Free Crochet Pattern
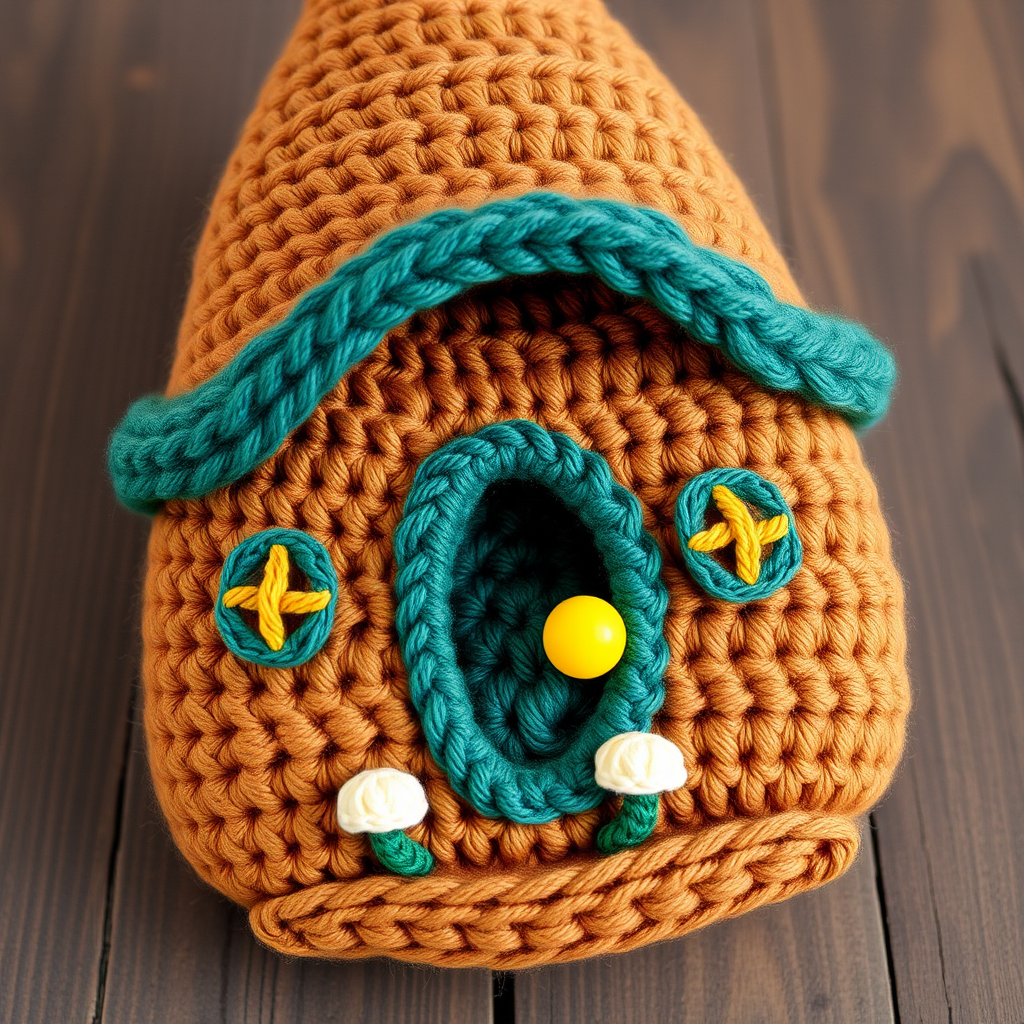
Whimsical Woodland Gnome Home: A Free Crochet Pattern for Cozy, Storybook Decor
Imagine a tiny, magical dwelling nestled among the ferns—a place where garden fairies might rest after a long day of spreading pollen. With this free crochet pattern, you can bring that storybook charm to life! This Whimsical Woodland Gnome Home is a delightful amigurumi project that uses super bulky yarn, making it a quick, satisfying make that feels both rustic and incredibly cozy. Whether it graces your bookshelf, mantelpiece, or a special spot in your garden, this handmade gnome home is sure to spark joy and imagination. Let's gather our supplies and start creating a little piece of magic!
Materials Needed
Before we begin our enchanting project, let's make sure you have all the necessary tools and yarns. This project is wonderfully tactile thanks to the super bulky yarn, which works up fast and creates a wonderfully squishy, plush texture.
- Yarn: Super Bulky (Weight 6) yarn in the following colors:
- Warm Brown: Main body of the home
- Forest Green: The roof
- Deep Teal: The door
- Cream: Windows and small decorative accents
- Mustard Yellow: Doorknob and window crossbars
- Crochet Hook: 6.0 mm (J/10) crochet hook
- Stitch Marker: To keep track of your rounds
- Yarn Needle: For sewing pieces together and weaving in ends
- Fiberfill Stuffing: For lightly stuffing the roof
- Scissors: For cutting yarn
Gauge: 4 sc x 4 rows = 4 inches (10 cm) in single crochet. While gauge isn't critical for this project, maintaining consistent tension will ensure your pieces fit together nicely.
Step-by-Step Instructions
This pattern is worked in continuous spirals unless otherwise noted. It is crucial to use a stitch marker to keep track of your rounds, as the spiral will not have a visible seam. Let's begin with the foundation of our gnome's home!
Base and Walls (Worked in Warm Brown)
We'll start by creating a flat, circular base that will gradually build up into the cylindrical walls of the home.
- Round 1: Make a magic ring, work 6 single crochet (sc) into the ring. (6 sts)
- Round 2: Increase (inc) in each stitch around. (12 sts)
- Round 3: (Sc in next st, inc) around. (18 sts)
- Round 4: (Sc in next 2 sts, inc) around. (24 sts)
- Round 5: (Sc in next 3 sts, inc) around. (30 sts)
- Round 6: (Sc in next 4 sts, inc) around. (36 sts)
- Round 7: (Sc in next 5 sts, inc) around. (42 sts)
- Round 8: (Sc in next 6 sts, inc) around. (48 sts)
- Round 9: (Sc in next 7 sts, inc) around. (54 sts)
- Round 10: (Sc in next 8 sts, inc) around. (60 sts)
- Round 11: Single crochet in each stitch around. (60 sts)
- Rounds 12-20: Repeat Round 11 for 9 more rounds, or until the walls measure about 4 inches (10 cm) high from the base. Fasten off and weave in the ends securely.
The Roof (Worked in Forest Green)
Now we'll create the whimsical, cone-shaped roof. This piece is worked separately and will be stuffed lightly before attaching to the base.
- Round 1: With green yarn, make a magic ring, work 6 sc into ring. (6 sts)
- Round 2: Inc in each st around. (12 sts)
- Round 3: (Sc in next st, inc) around. (18 sts)
- Round 4: (Sc in next 2 sts, inc) around. (24 sts)
- Round 5: (Sc in next 3 sts, inc) around. (30 sts)
- Round 6: (Sc in next 4 sts, inc) around. (36 sts)
- Round 7: (Sc in next 5 sts, inc) around. (42 sts)
- Round 8: (Sc in next 6 sts, inc) around. (48 sts)
- Round 9: (Sc in next 7 sts, inc) around. (54 sts)
- Round 10: (Sc in next 8 sts, inc) around. (60 sts)
- Round 11: Sc in each st around. (60 sts)
- Round 12: (Sc in next 8 sts, decrease (dec)) around. (54 sts)
- Round 13: (Sc in next 7 sts, dec) around. (48 sts)
- Round 14: (Sc in next 6 sts, dec) around. (42 sts)
- Round 15: (Sc in next 5 sts, dec) around. (36 sts)
- Round 16: (Sc in next 4 sts, dec) around. (30 sts)
- Round 17: (Sc in next 3 sts, dec) around. (24 sts)
- Round 18: (Sc in next 2 sts, dec) around. (18 sts)
- Round 19: (Sc in next st, dec) around. (12 sts)
- Round 20: Dec around. (6 sts) Fasten off, leaving a long tail for sewing. Before closing the final hole completely, stuff the roof lightly with fiberfill to give it a soft, plush shape.
The Door (Worked in Deep Teal)
This charming arched door is crocheted flat and then sewn onto the front of the base.
- Row 1: With teal yarn, chain (ch) 8.
- Row 2: Sc in the 2nd ch from the hook and across. (7 sts) Ch 1, turn.
- Rows 3-8: Sc in each st across. (7 sts) Ch 1, turn. At the end of Row 8, fasten off, leaving a long tail for sewing.
- Assembly: Sew the door onto the front of the base, centered, about 1 inch above the bottom edge. Use a whip stitch or mattress stitch for a neat finish.
The Windows (Worked in Cream)
These simple circular windows will add a friendly, inviting glow to the home. You will make two of these.
- Round 1: With cream yarn, make a magic ring, work 6 sc into ring. (6 sts)
- Round 2: Inc in each st around. (12 sts) Fasten off, leaving a long tail for sewing.
- Assembly: Sew one window onto the wall to the left of the door, and the other on the right side. Position them at a similar height to the top of the door for visual balance.
Finishing Touches & Decoration
Now for the fun part—bringing your gnome home to life with charming details!
- Doorknob & Crossbars: Using the mustard yellow yarn and a yarn needle, embroider a small doorknob in the center of the door. Then, create crossbars on each window by stitching a vertical and horizontal line across the center of each cream circle.
- Base Accents: With the cream yarn, embroider small mushrooms or delicate flowers around the lower edge of the base. Use French knots for mushroom spots or small flowers, and simple straight stitches for stems or petals. Let your creativity guide you!
- Attaching the Roof: Place the roof on top of the base, aligning the edges carefully. Using the long tail left from the roof, sew the roof securely to the base. Stitch through both layers, working your way around the entire circumference. Make sure it's attached firmly.
- Weave in Ends: Finally, weave in all remaining yarn ends with your yarn needle to give your project a clean, professional finish.
Congratulations! You've just created your very own Whimsical Woodland Gnome Home. This project is perfect for using up those lovely chunky yarns in your stash and makes a wonderful, heartfelt gift. Display it proudly and let it remind you of the simple magic that a little yarn and creativity can bring into the world. Happy crocheting!



