Whimsical Woodland Cross Stitch Makeup Bag Pouch Free Pattern
Whimsical Woodland Cross Stitch Makeup Bag Pouch – Free Pattern
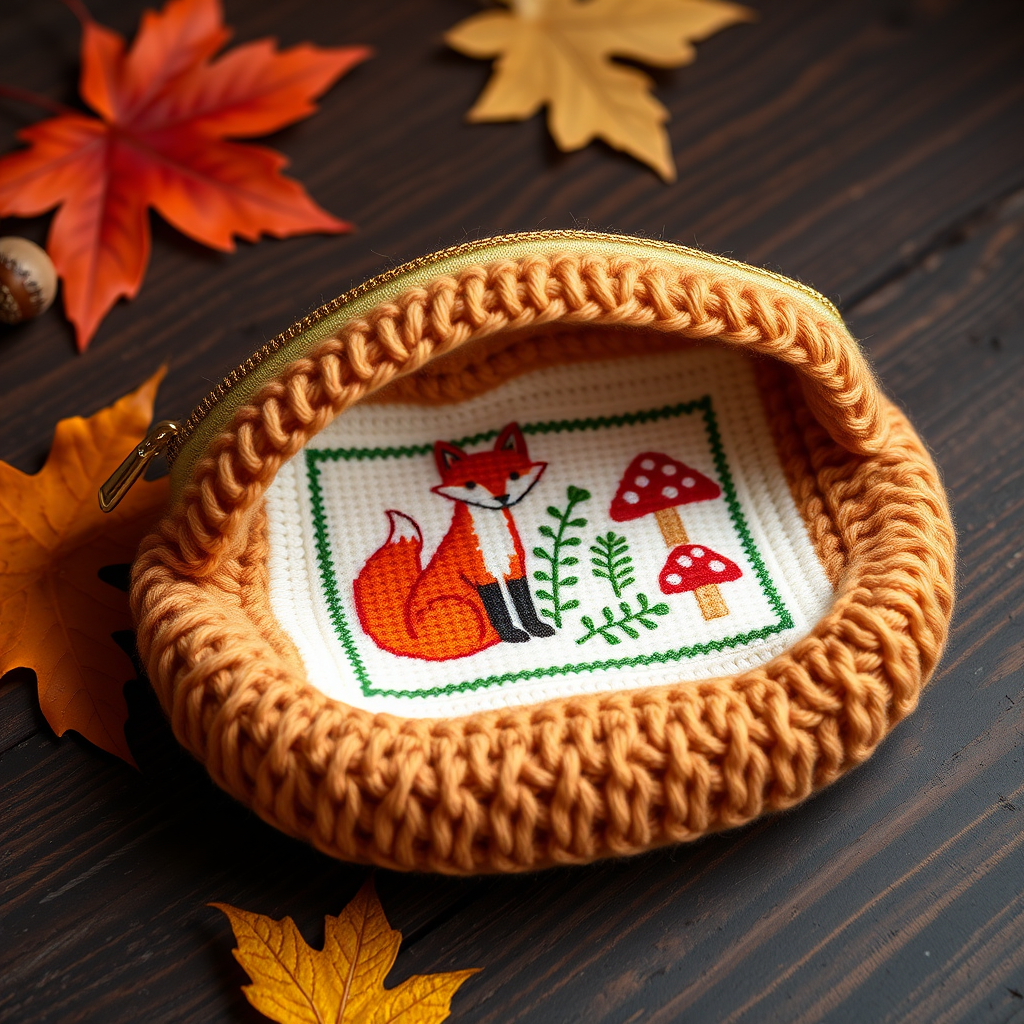
Bring a touch of enchanted forest charm to your daily routine with this delightful cross stitch makeup bag pouch. Featuring a cute orange fox, red-capped mushrooms, and lush green ferns, this project is perfect for both beginners and seasoned stitchers. The finished piece is a cozy, handmade accessory that adds a warm, rustic vibe to your vanity or travel kit. Best of all, this is a free pattern that you can easily recreate at home with just a few materials and a little patience.
Why You'll Love This Pattern
This whimsical woodland design is stitched on soft cream Aida cloth, framed by a simple green border. The earthy tones of orange, green, red, and brown create a charming, storybook aesthetic. Whether you're making it for yourself or as a thoughtful handmade gift, this pouch is both practical and beautiful. The step-by-step instructions below are detailed and beginner-friendly, so you can confidently complete every stitch.
Materials Needed
Before you begin, gather the following supplies. All items are readily available at craft stores or online.
- Fabric: 14-count Aida cloth (14 stitches per inch), cut to 12x12 inches
- Embroidery Floss: DMC stranded cotton (or any brand) in these colors:
- 310 (black)
- 801 (coffee brown)
- 977 (golden brown)
- 742 (light orange)
- 740 (orange)
- 922 (light terracotta)
- 304 (red)
- 321 (bright red)
- 890 (dark green)
- 987 (forest green)
- 989 (light green)
- 3821 (straw)
- 738 (tan)
- 739 (light tan)
- 3865 (winter white)
- 3799 (pewter gray)
- Needle: Size 24 tapestry needle
- Embroidery hoop (optional, but recommended for tension)
- Scissors
- Pins
- Cotton fabric for lining (12x12 inches)
- 9-inch zipper (gold or coordinating color)
- Sewing needle and thread (matching the lining)
- Iron and pressing cloth
Step-by-Step Instructions
Follow these clear, detailed steps to create your own whimsical woodland makeup bag. Take your time and enjoy the process!
Step 1: Prepare Your Fabric
Cut a piece of 14-count Aida cloth to 12x12 inches. Fold it in half both ways to find the exact center. Mark the center point with a pin or a light pencil mark on the edge. This will be your starting point for stitching.
Step 2: Set Up Your Embroidery Hoop
Place the fabric in an embroidery hoop, with the center mark in the middle of the hoop. Pull the fabric taut but not stretched too tightly—it should feel like a drumhead. This will keep your stitches even and prevent puckering.
Step 3: Understand the Cross Stitch Basics
If you're new to cross stitch, here's a quick refresher:
- Thread your tapestry needle with two strands of floss for cross stitches. Use one strand for backstitching.
- Bring the needle up from the back of the fabric at the lower left corner of a square.
- Cross diagonally to the upper right corner and push the needle down.
- Come up at the lower right corner and cross to the upper left corner, completing the "X".
- Always make the bottom leg of the "X" go in the same direction (e.g., from lower left to upper right) for a uniform, neat finish.
Step 4: Start Stitching from the Center
Begin at the center of the pattern (your marked point) and work outward. This ensures your design is perfectly centered on the fabric. You can work row by row or color by color—whichever feels more comfortable. Refer to your chart: each symbol represents a specific DMC color. Keep a legend nearby to avoid confusion.
Step 5: Follow the Chart Carefully
The pattern is read from the center out. As you stitch, count carefully to avoid mistakes. If you make an error, simply unpick the stitches with your needle and redo them. It's better to fix mistakes early than to discover them later.
Step 6: Complete All Cross Stitches
Continue stitching until the entire woodland scene—the fox, mushrooms, ferns, and border—is complete. Remember to use two strands of floss for these stitches. Keep your tension even; don't pull too tight or leave loops on the back.
Step 7: Add Backstitch Details
Once all cross stitches are done, switch to one strand of floss for backstitching. Use this technique to outline the fox, mushrooms, leaves, and any other details for extra definition. Backstitch is simple: bring the needle up at point A, go down at point B, then come up at point C (just ahead of B) and go down at point A again. This creates a continuous line.
Step 8: Remove from Hoop and Trim
When your stitching is complete, carefully remove the fabric from the hoop. Trim the excess Aida cloth, leaving a 1-inch border around the stitched area. This border is essential for seam allowance.
Step 9: Assemble the Pouch
Place the stitched fabric right side down on a flat surface. Fold the top edge over by 1/4 inch and press with an iron to create a crisp fold. Then, fold the bottom edge up to create a pouch shape, leaving the top open. The stitched design should be on the front. Pin the side seams in place.
Step 10: Sew the Side Seams
Using a needle and thread (or a sewing machine), sew the side seams with a whip stitch or a straight stitch. Start at the bottom fold and sew up to the top opening. Make sure the stitches are secure and the seams are neat. Turn the pouch right side out to check the shape.
Step 11: Add a Lining
Cut a piece of cotton fabric to the same size as your stitched piece (about 10x10 inches after trimming). Fold and press the edges by 1/4 inch. Place the lining inside the pouch, right side facing the back of the stitching. Sew the lining in place along the top edge, covering the raw edges of the Aida cloth. This gives a professional finish and protects the back of your work.
Step 12: Attach the Zipper
Pin a 9-inch zipper along the top opening of the pouch. The zipper should be centered, with the pull tab on the outside. Using a zipper foot on your sewing machine (or hand-sewing with a backstitch), sew the zipper in place. Make sure the zipper opens and closes smoothly before securing the ends.
Step 13: Final Touches
Turn the pouch right side out. Press gently with an iron (on a low setting, avoiding the zipper) to smooth out any wrinkles. Trim any loose threads. Your whimsical woodland makeup bag is now ready to use or gift!
Tips for a Perfect Finish
- Keep your floss organized: Use a floss organizer or small bobbins to prevent tangling.
- Wash your hands before stitching: This prevents oils from dirtying the fabric.
- Take breaks: Cross stitching can be repetitive; rest your eyes and hands to maintain accuracy.
- Customize it: Feel free to swap colors or add extra details like tiny acorns or stars to make it uniquely yours.
This free pattern is a joy to stitch and a pleasure to use. The combination of practical design and whimsical woodland imagery makes it a standout accessory. Whether you're a beginner or an experienced crafter, this project is sure to bring a smile to your face. Happy stitching!