Twilight Ember Cowl Free Pattern
Introduction
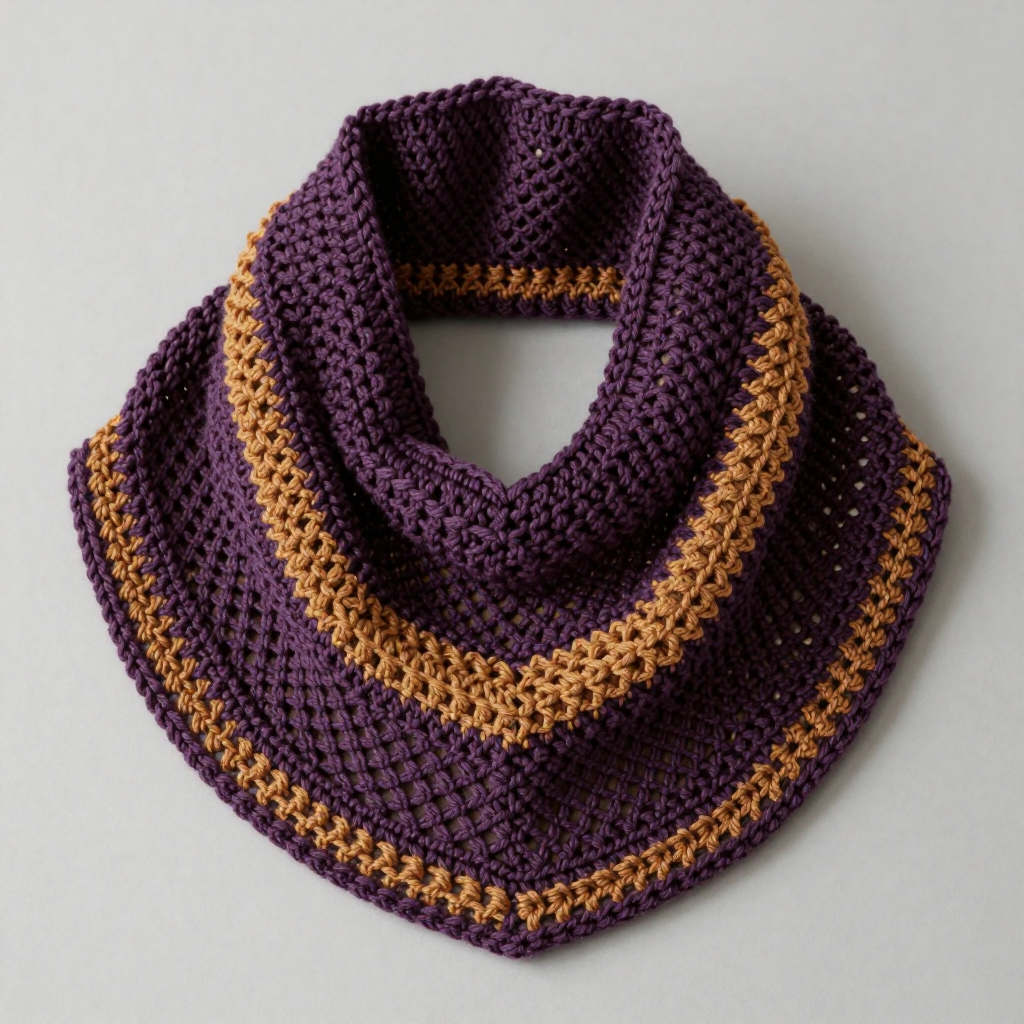
Welcome to the Twilight Ember Cowl, a project that is absolutely perfect for anyone who has never picked up a crochet hook before. This cozy, lightweight cowl blends deep plum and glowing amber in a lacy V-stitch pattern that looks far more complicated than it actually is. When you finish, you will have a soft, airy loop about 26 inches around and 9 inches tall that drapes gently around your neck and keeps you warm without feeling bulky. The open, diamond-shaped eyelets give it a beautiful handmade texture, and the simple single-crochet border along the top and bottom edges makes everything look neat and even. If you can make a chain and a double crochet, you can make this cowl, and I will walk you through every single stitch.
Materials Needed
- Yarn: Fine (2) weight yarn, approximately 350–400 yards total. The sample uses a deep plum (Color A) and a warm amber (Color B) in a soft wool-blend or acrylic fine yarn. You will need roughly 175–200 yards of each color.
- Crochet hook: 4.5 mm (US 7) crochet hook.
- Stitch markers: At least 2, to mark the beginning of each round and to mark your first V-stitch.
- Tapestry needle: A blunt-tipped needle with a large eye, for weaving in your yarn ends.
- Scissors: Any sharp pair for cutting yarn.
- Measuring tape: For checking your gauge and finished size.
- Finished size: One size, adjustable. Approximately 26 inches in circumference and 9 inches tall.
Abbreviations and Beginner Glossary
- ch – chain. Make a loop of yarn on your hook (a slip knot), then wrap the yarn over the hook and pull it through the loop on your hook. That is one chain. Chains look like tiny sideways V shapes.
- dc – double crochet. Wrap the yarn over your hook, insert the hook into the stitch or space, pull up a loop (you now have 3 loops on your hook), wrap the yarn over again, pull it through the first 2 loops (2 loops remain), wrap the yarn over once more, and pull it through the last 2 loops. One double crochet made.
- v-st – V-stitch. This is a group of stitches worked all into the same stitch or space: one double crochet, then one chain, then one more double crochet — written as (dc, ch 1, dc). It looks like a little letter V.
- sl st – slip stitch. Insert your hook into the stitch, wrap the yarn over, and pull it through both the stitch and the loop on your hook at the same time. It makes a tiny, flat joining stitch.
- sp – space. The little gap or hole between stitches, usually the hole made by a chain. When a pattern says “ch-1 sp,” it means the hole created by a single chain.
- sc – single crochet. Insert your hook into the stitch, pull up a loop (2 loops on your hook), wrap the yarn over, and pull it through both loops. One single crochet made.
- st / sts – stitch / stitches. One completed stitch, or several of them.
- round – one complete trip all the way around the circle of your cowl.
- join – connecting the last stitch of a round to the first stitch with a slip stitch so the round closes into a circle.
- fasten off – cut the yarn a few inches from your work and pull the tail all the way through the last loop so it does not unravel.
- weave in ends – threading your yarn tails onto a tapestry needle and sewing them back and forth through the fabric so they are hidden and secure.
Gauge
8 stitches and 10 rows = 4 inches in double crochet V-stitch.
Gauge simply means how big your stitches turn out. If your stitches are looser or tighter than mine, your finished cowl will be bigger or smaller than 26 inches around. To check your gauge, crochet a small practice square: chain 20, then work the V-stitch pattern back and forth in rows until the square is about 4 inches tall. Lay it flat and measure 4 inches across the middle — you should count about 8 stitches (each V-stitch counts as one stitch for this measurement) and about 10 rows. If you have more stitches than 8 in 4 inches, your stitches are too tight — try a larger hook. If you have fewer, your stitches are too loose — try a smaller hook. Because this cowl is a relaxed, drapey accessory, being close to gauge is enough; it does not need to be perfect.
Beginner Tips Before You Start
- Use a stitch marker at the start of every round. Place a marker in the top of your beginning ch 3 so you always know where to join. Move the marker up each round.
- Do not pull your yarn too tight. Beginners often grip the yarn hard, which makes tiny, stiff stitches. Keep a relaxed, even tension so the lacy V-stitches stay open and airy.
- Count your V-stitches at the end of every round. You should always have 26 V-stitches. Counting as you go saves you from discovering a mistake many rounds later.
- Make sure your starting chain is not twisted. Before you join the chain into a ring, lay it flat on the table and check that all the little V shapes face the same way. A twist here cannot be fixed later.
- Work your V-stitches into the ch-1 space, not into the stitches beside it. The ch-1 space is the little hole in the middle of each V from the round below. Going into the hole keeps the pattern lacy and even.
- Change colors on the very last yarn over of the joining slip stitch. This hides the color change neatly so no stray loop of the old color shows.
Step-by-Step Instructions
The cowl is worked in joined rounds from the bottom up. Each round begins with a ch 3 (which counts as your first double crochet) and ends with a sl st to the top of that beginning ch 3. Every V-stitch is worked into the ch-1 space of the V-stitch from the round below.
Setup
Setup: With Color A, ch 52. Being careful not to twist the chain, join with a sl st to the first ch to form a ring.
Body
Round 1: Ch 3 (counts as first dc), dc in the same ch as joining. *Skip next ch, work (dc, ch 1, dc) in next ch. Repeat from * around, ending with skip last ch, sl st to top of beginning ch 3. (26 V-stitches)
Round 2: Ch 3, dc in the first ch-1 sp. *(dc, ch 1, dc) in next ch-1 sp. Repeat from * around. Sl st to top of beginning ch 3. (26 V-stitches)
Round 3: Repeat Round 2 exactly: Ch 3, dc in the first ch-1 sp, then (dc, ch 1, dc) in each ch-1 sp around, sl st to top of beginning ch 3. (26 V-stitches)
Round 4 (Color change): Change to Color B by pulling the new color through on the last yarn over of the sl st that joins Round 3. Ch 3, dc in the first ch-1 sp. Work (dc, ch 1, dc) in each ch-1 sp around. Sl st to top of beginning ch 3. (26 V-stitches)
Round 5: With Color B, ch 3, dc in the first ch-1 sp, then (dc, ch 1, dc) in each ch-1 sp around, sl st to top of beginning ch 3. (26 V-stitches)
Round 6: With Color B, repeat Round 5 exactly. (26 V-stitches)
Round 7 (Color change): Change back to Color A on the joining slip stitch. Ch 3, dc in the first ch-1 sp, then (dc, ch 1, dc) in each ch-1 sp around, sl st to top of beginning ch 3. (26 V-stitches)
Round 8: With Color A, ch 3, dc in the first ch-1 sp, then (dc, ch 1, dc) in each ch-1 sp around, sl st to top of beginning ch 3. (26 V-stitches)
Round 9: With Color A, repeat Round 8 exactly. (26 V-stitches)
Round 10 (Color change): Change to Color B on the joining slip stitch. Ch 3, dc in the first ch-1 sp, then (dc, ch 1, dc) in each ch-1 sp around, sl st to top of beginning ch 3. (26 V-stitches)
Round 11: With Color B, ch 3, dc in the first ch-1 sp, then (dc, ch 1, dc) in each ch-1 sp around, sl st to top of beginning ch 3. (26 V-stitches)
Round 12: With Color B, repeat Round 11 exactly. (26 V-stitches)
Round 13 (Color change): Change back to Color A on the joining slip stitch. Ch 3, dc in the first ch-1 sp, then (dc, ch 1, dc) in each ch-1 sp around, sl st to top of beginning ch 3. (26 V-stitches)
Round 14: With Color A, ch 3, dc in the first ch-1 sp, then (dc, ch 1, dc) in each ch-1 sp around, sl st to top of beginning ch 3. (26 V-stitches)
Round 15: With Color A, repeat Round 14 exactly. (26 V-stitches)
Final Border
Round 16 (Final round): Ch 1, sc in each dc and in each ch-1 sp around. Sl st to first sc. Fasten off and weave in all ends. (78 sc)
Why 78? Each V-stitch has two double crochets plus one ch-1 space, so 26 V-stitches × 3 = 78 single crochets around the top edge.
Assembly and Finishing
Weaving in ends: Thread each yarn tail onto your tapestry needle. Turn the cowl inside out and sew the tail back and forth through the back of several stitches, changing direction once or twice so it cannot work loose. Trim the tail close to the fabric. Do this for every color-change tail and the final tail.
Blocking: Lightly dampen the cowl with cool water and gently press out the extra water in a towel — do not wring or twist it. Lay the cowl flat on a towel or blocking mat and gently pat the V-stitches open so the diamond eyelets show evenly. Do not over-stretch; you only want to even out the fabric and open the lace. Let it dry completely flat before wearing.
Final check: Give the cowl a gentle tug all around to make sure the top and bottom edges are even, and snip any tiny fuzz or loose fibers.
Pro Tips and Variations
- Change the colors: Try any two colors you love — a soft gray and cream, or teal and mustard. Keep the same stripe sequence (two rounds of each color) for a balanced look, or make wider bands by working three or four rounds per color.
- Adjust the size: To make the cowl wider or narrower, begin with a multiple of 2 chains (for example 48, 52, or 56). To make it taller or shorter, add or remove repeat rounds in the color sequence, always keeping the final single-crochet round as the very last round.
- Substitute yarn: A sport or DK weight yarn will also work beautifully — just check your gauge first and adjust your hook size so you still get about 8 stitches per 4 inches. A wool blend gives warmth, while acrylic is easy to wash.
- Add a little sparkle: Work the final single-crochet border in a metallic or sparkly fine yarn for a subtle twilight shimmer that catches the light.


