Hedwig's Moonlit Nest Free Pattern – Knit a Celestial Owl Amigurumi
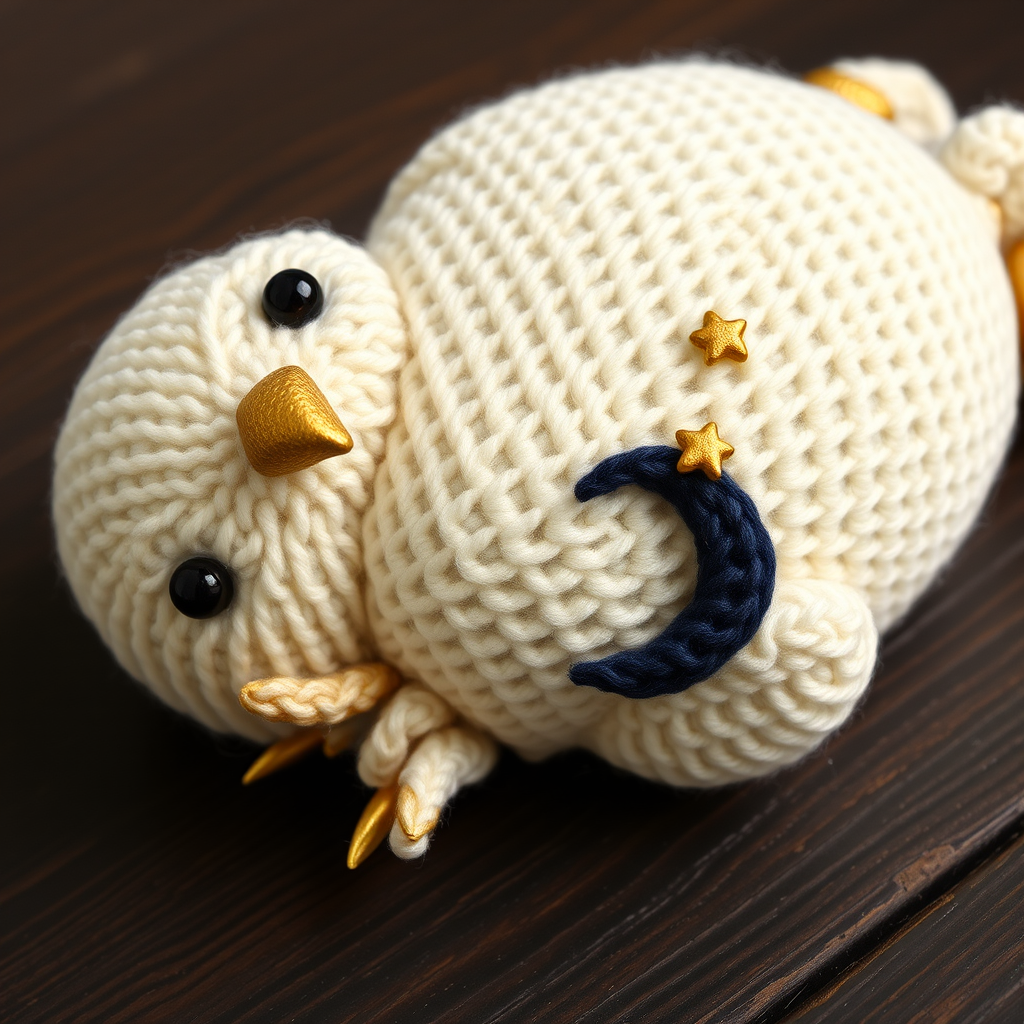
Hedwig's Moonlit Nest: A Celestial Owl Amigurumi Knitting Pattern
There's something truly magical about creating a soft, handmade companion that carries a touch of whimsy. Today, I'm thrilled to share a pattern that combines the cozy charm of knitted amigurumi with the enchanting allure of a starry night sky. Introducing Hedwig's Moonlit Nest—a celestial owl amigurumi inspired by the wizarding world's most beloved messenger. This plush friend features a cream-colored body, a tiny gold beak, and is adorned with a deep navy crescent moon and twinkling stars. Whether you're a seasoned knitter or just starting your crafting journey, this beginner-friendly project is the perfect way to add a little magic to your shelf, nursery, or gift-giving repertoire.
This pattern is worked flat in simple stockinette stitch and seamed together, making it an approachable project for knitters of all levels. The result is a soft, huggable owl with a rounded head, plump body, and delicate celestial details that evoke a peaceful night sky. Let's gather our supplies and begin this delightful crafting adventure!
Materials Needed
Before we dive into the stitches, let's ensure you have everything you need to bring your celestial owl to life. Here's the complete list of materials:
- Yarn: Worsted weight yarn in the following colors:
- Cream (main body and head)
- Warm gold (beak, feet, and stars)
- Deep navy (crescent moon and accents)
- Black (for embroidered eyes)
- Knitting Needles: US Size 4 (3.5 mm) knitting needles, or the size needed to obtain gauge
- Tapestry Needle: For seaming pieces and weaving in ends
- Fiberfill: Polyester stuffing for a soft, plush finish
- Scissors: For cutting yarn
- Stitch Markers (optional): To help keep track of rows
Gauge: 5 stitches and 7 rows = 1 inch in stockinette stitch. Gauge is not critical for amigurumi, but maintaining consistent tension throughout your work will ensure your pieces fit together neatly.
Step-by-Step Instructions
This pattern is knitted flat in pieces and seamed together. Work in stockinette stitch (knit on the right side, purl on the wrong side) unless otherwise noted. Use the long-tail cast-on method for all pieces. Let's begin!
Head (Make 1)
The head forms the rounded, expressive face of your owl. Follow these steps carefully:
- Cast on 6 stitches in cream yarn.
- Row 1 (RS): Knit all stitches.
- Row 2: Purl all stitches.
- Row 3: Knit front and back (kfb) in each stitch across the row. You will now have 12 stitches.
- Row 4: Purl all stitches.
- Row 5: (Kfb, k1) repeat to end of row. You will now have 18 stitches.
- Row 6: Purl all stitches.
- Rows 7-14: Work even in stockinette stitch (knit on RS, purl on WS) for 8 rows. This creates the height of the head.
- Row 15: (K2tog, k1) repeat to end of row. You will now have 12 stitches.
- Row 16: Purl all stitches.
- Row 17: K2tog across the row. You will now have 6 stitches.
- Cut the yarn, leaving a long tail (approximately 12 inches). Thread the tail through a tapestry needle, then pass it through the remaining 6 stitches on your needle. Pull tight to close the top of the head. Set aside.
Body (Make 1)
The body is the plump, huggable centerpiece of your owl. Let's create it:
- Cast on 8 stitches in cream yarn.
- Row 1 (RS): Knit all stitches.
- Row 2: Purl all stitches.
- Row 3: Kfb in each stitch across the row. You will now have 16 stitches.
- Row 4: Purl all stitches.
- Row 5: (Kfb, k1) repeat to end of row. You will now have 24 stitches.
- Rows 6-18: Work even in stockinette stitch for 13 rows. This creates the body's height.
- Row 19: (K2tog, k1) repeat to end of row. You will now have 16 stitches.
- Row 20: Purl all stitches.
- Row 21: K2tog across the row. You will now have 8 stitches.
- Cut the yarn, leaving a long tail. Thread the tail through the remaining 8 stitches and pull tight to close the top. Before pulling completely closed, stuff the body firmly with fiberfill. Once stuffed to your desired firmness, pull the yarn tight to close the opening completely. Set aside.
Wings (Make 2)
These small triangular wings add character and charm to your owl. Here's how to knit them:
- Cast on 4 stitches in cream yarn.
- Row 1 (RS): Knit all stitches.
- Row 2: Purl all stitches.
- Row 3: Kfb, k2, kfb. You will now have 6 stitches.
- Rows 4-8: Work even in stockinette stitch for 5 rows.
- Row 9: K2tog, k2, k2tog. You will now have 4 stitches.
- Row 10: Purl all stitches.
- Bind off all stitches. Leave a long tail (approximately 10 inches) for sewing the wing to the body.
Beak (Make 1)
A tiny gold beak gives your owl its adorable expression. Let's knit it:
- Cast on 3 stitches in gold yarn.
- Row 1 (RS): Knit all stitches.
- Row 2: Purl all stitches.
- Row 3: Kfb, k1, kfb. You will now have 5 stitches.
- Row 4: Purl all stitches.
- Row 5: K2tog, k1, k2tog. You will now have 3 stitches.
- Bind off all stitches. Leave a tail for sewing.
Feet (Make 2)
These simple gold feet complete your owl's silhouette. Here's the pattern:
- Cast on 3 stitches in gold yarn.
- Row 1 (RS): Knit all stitches.
- Row 2: Purl all stitches.
- Row 3: Kfb, k1, kfb. You will now have 5 stitches.
- Row 4: Purl all stitches.
- Bind off all stitches. Leave a tail for sewing.
Crescent Moon (Make 1)
This celestial accent adds a touch of night-sky magic to your owl's chest:
- Cast on 5 stitches in navy yarn.
- Row 1 (RS): Knit all stitches.
- Row 2: Purl all stitches.
- Row 3: Kfb, k3, kfb. You will now have 7 stitches.
- Row 4: Purl all stitches.
- Row 5: K2tog, k3, k2tog. You will now have 5 stitches.
- Row 6: Purl all stitches.
- Bind off all stitches. Leave a tail for sewing.
Stars (Make 3)
Three tiny gold stars complete the celestial theme. Knit them as follows:
- Cast on 3 stitches in gold yarn.
- Row 1 (RS): Knit all stitches.
- Row 2: Purl all stitches.
- Row 3: Kfb, k1, kfb. You will now have 5 stitches.
- Row 4: Purl all stitches.
- Row 5: K2tog, k1, k2tog. You will now have 3 stitches.
- Bind off all stitches. Leave a tail for sewing.
Assembly: Bringing Your Owl Together
Now that all your pieces are knitted, it's time to transform them into a beautiful celestial owl. Follow these assembly steps carefully for a polished finish:
- Attach the Head to the Body: Position the head on top of the body, aligning the cast-on edges. Using the tail from the head piece, sew the head securely to the body with a whip stitch. Before closing completely, stuff the head lightly with fiberfill to give it shape and softness. Finish seaming and secure the yarn.
- Attach the Wings: Position the wings on either side of the body, slightly angled upward for a lively look. Using the tails from the wings, sew them securely to the sides of the body. Weave in the ends.
- Sew on the Beak: Place the beak in the center of the head, just below where the eyes will be. Using the tail from the beak, sew it securely in place. Weave in the ends.
- Attach the Feet: Position the feet at the bottom front of the body, slightly apart. Using the tails from the feet, sew them securely to the body. Weave in the ends.
- Embroider the Eyes: Using black yarn and a tapestry needle, create the eyes. You can make two small French knots or satin stitches on the head, spaced about 1 inch apart. Position them just above the beak for a cute, expressive face. Secure the yarn on the inside of the head and weave in the ends.
- Add the Celestial Details: Sew the crescent moon onto the center of the body, just below the head. Then, sew the three small stars onto the body or wings as desired. Use the tails from each piece and weave in all ends securely.
- Final Touches: Once everything is sewn, gently shape your owl and fluff the fiberfill to ensure an even distribution. Weave in any remaining loose ends to give your creation a clean, professional finish.
And there you have it—your very own Hedwig's Moonlit Nest celestial owl amigurumi! This magical companion is perfect for adding a touch of whimsy to any room, making a thoughtful handmade gift, or simply enjoying the satisfaction of creating something beautiful with your own hands. The soft stockinette texture and charming celestial details make this owl a truly special keepsake.
I hope you enjoyed this knitting adventure as much as I enjoyed sharing it with you. Remember, every stitch you make is a step toward creating something magical. Happy knitting, and may your days be filled with cozy creativity and starry-eyed wonder!



