Celestial Harvest Bat & Moon Placemat Free Pattern – Textured Knit with Star Accents
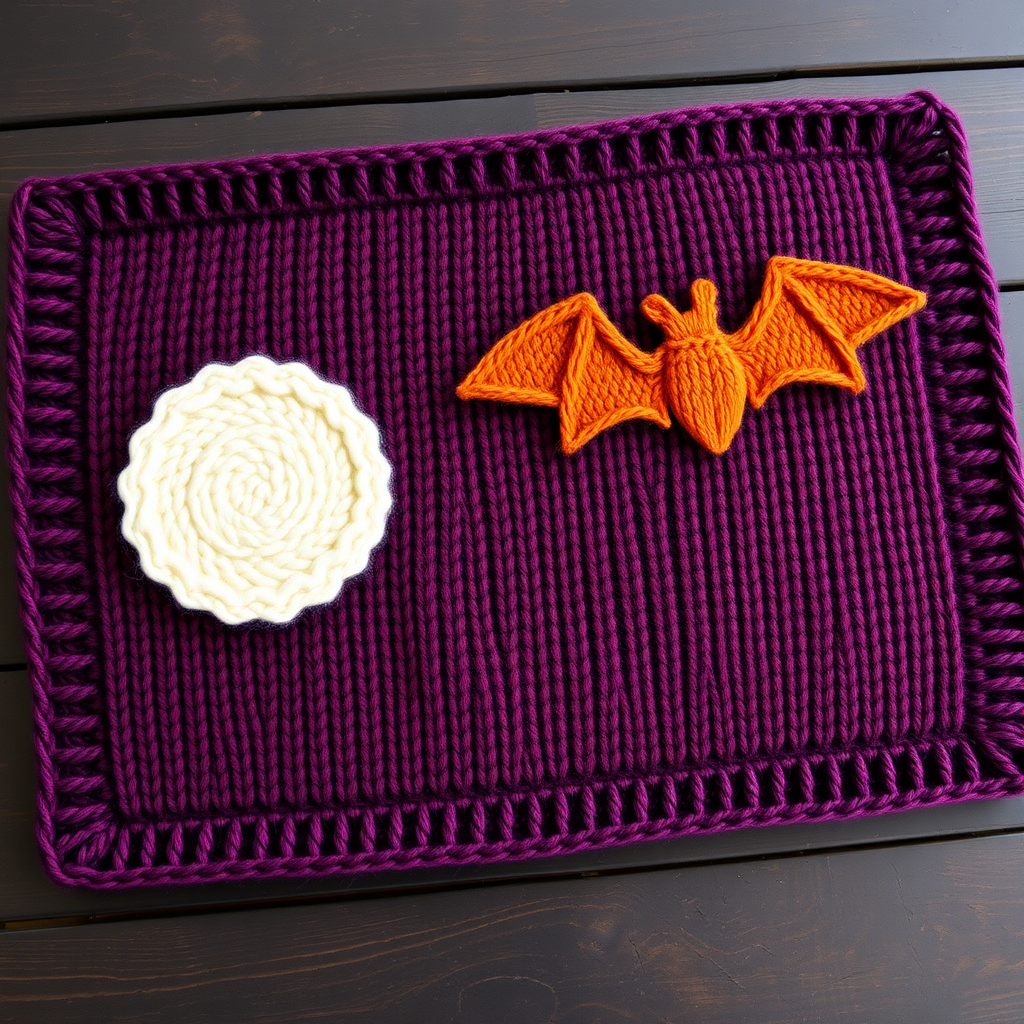
Celestial Harvest Bat & Moon Placemat: A Free Knitting Pattern for Cozy Autumn Tables
As the leaves begin to turn and the evenings grow crisp, there's nothing quite like adding a handmade touch to your home. This Celestial Harvest Bat & Moon Placemat is the perfect project to welcome the autumn season. It combines the whimsy of a crescent moon with the playful silhouette of a bat, all knit into a rich, plush fabric that will add warmth and texture to your dining space. Whether you're a seasoned knitter looking for a fun colorwork challenge or a confident beginner ready to try something new, this free pattern is designed to guide you through every step. Let's cast on and create a piece of seasonal magic together!
Materials Needed
Before you begin, gather your supplies. This project uses simple, readily available materials to create a stunning result.
- Yarn: Worsted weight cotton yarn in three colors: deep plum (main color), cream (for the moon), and burnt orange (for the bat). You will need approximately 200g total.
- Needles: US 7 (4.5 mm) knitting needles. You can use straight or circular needles, whichever you prefer for flat knitting.
- Notions: A tapestry needle for weaving in ends, scissors, and a ruler or measuring tape for checking gauge.
- Optional: Stitch markers to help keep track of your colorwork sections.
Gauge
To ensure your placemat comes out the correct size, it's important to check your gauge. In stockinette stitch (knit one row, purl one row), you should have 20 stitches and 26 rows = 4 inches. If your gauge is off, try switching to a different needle size until you achieve the correct tension.
Step-by-Step Instructions
This pattern is worked flat from the bottom up. We'll start with a garter stitch border, move into the main stockinette body, incorporate the bat and moon motif using simple colorwork, and finish with another garter border. Don't be intimidated by the colorwork—we'll break it down into manageable rows.
Abbreviations
- CO: Cast on
- K: Knit
- P: Purl
- St(s): Stitch(es)
- RS: Right side (the front of the work)
- WS: Wrong side (the back of the work)
Getting Started: The Base (Deep Plum)
We'll begin with a sturdy, neat border and the main body of the placemat.
- Cast On: With your deep plum yarn, CO 60 stitches.
- Garter Border: Work Rows 1-6 in garter stitch. This means you will knit every row, back and forth. This creates a ridged, non-curling border.
- Stockinette Body: Now we'll switch to stockinette stitch. This is where you knit the right side (RS) rows and purl the wrong side (WS) rows. Work Rows 7-20 in stockinette stitch. This gives you 14 rows of smooth, plum-colored fabric to set the stage for our motif.
Creating the Bat & Moon Motif
This is the fun part! We'll use a technique called intarsia, where you use separate balls of yarn for each color section. This is easier than it sounds—you simply twist the yarns together when you change colors to prevent holes. We will work the motif over Rows 21-50.
Row 21 (RS): K10 plum, switch to cream, K40 cream, switch to plum, K10 plum.
Row 22 (WS): P10 plum, P40 cream, P10 plum.
You have now established the cream section. We will shape the crescent moon and the bat over the next several rows. The instructions below are simplified to create the shapes without a complex chart. Remember to twist your yarns at every color change to keep the fabric intact.
Shaping the Crescent Moon (Left Side)
We will increase the cream stitches gradually to form the crescent's curve, then decrease them back down.
- Row 23 (RS): K10 plum, K2 cream, K18 plum, K20 burnt orange, K10 plum.
- Row 24 (WS): P10 plum, P20 burnt orange, P18 plum, P2 cream, P10 plum.
- Row 25 (RS): K10 plum, K4 cream, K16 plum, K20 burnt orange, K10 plum.
- Row 26 (WS): P10 plum, P20 burnt orange, P16 plum, P4 cream, P10 plum.
Continue in this manner, increasing the cream section by 2 stitches on every RS row (and correspondingly decreasing the plum section between the moon and bat by 2 stitches). Keep the burnt orange section at 20 stitches for now. Do this until you have 10 cream stitches. This will be around Row 31.
Once you have 10 cream stitches, you will begin to decrease the cream section by 2 stitches on every RS row, shaping the other side of the crescent. Continue decreasing until you are back to 2 cream stitches by Row 50. The plum section between the moon and bat will increase back to 18 stitches.
Shaping the Bat (Right Side)
While you are working on the moon, you'll also be shaping the bat on the right side. The bat is worked symmetrically, starting with the wings.
- Row 23 (RS): K10 plum, K2 cream, K18 plum, K2 burnt orange, K16 plum, K2 burnt orange, K10 plum.
- Row 24 (WS): P10 plum, P2 burnt orange, P16 plum, P2 burnt orange, P18 plum, P2 cream, P10 plum.
- Row 25 (RS): K10 plum, K4 cream, K16 plum, K4 burnt orange, K12 plum, K4 burnt orange, K10 plum.
- Row 26 (WS): P10 plum, P4 burnt orange, P12 plum, P4 burnt orange, P16 plum, P4 cream, P10 plum.
Continue increasing the burnt orange wing sections by 2 stitches on every RS row, decreasing the plum section in the middle of the bat accordingly. Do this until you have 8 stitches in each wing section (around Row 31). The center plum section will now be 4 stitches.
Now you will work the bat's body. For the next few rows, keep the 8 wing stitches on each side, and knit the center 4 plum stitches with burnt orange to form the body. For example:
Row 33 (RS): K10 plum, K8 cream, K12 plum, K8 burnt orange, K4 burnt orange (body), K8 burnt orange, K10 plum.
After working the body for about 6 rows, you will begin to decrease the wing sections by 2 stitches on every RS row, working your way back down to 2 stitches in each wing by Row 50. The center plum section will increase back to 16 stitches.
Tip: This simplified motif is forgiving. As long as you maintain the rhythm of increasing and decreasing, your crescent moon and bat will form beautifully. Don't stress about perfect symmetry—handmade charm is part of the appeal!
Finishing the Placemat
You've completed the motif! Now we'll finish the placemat to match the beginning.
- Stockinette Body: Work Rows 51-64 in stockinette stitch using only the deep plum yarn. This gives you 14 rows of plum fabric below the motif.
- Garter Border: Work Rows 65-70 in garter stitch (knit every row).
- Bind Off: Bind off all 60 stitches loosely. You don't want the edge to be too tight.
Finishing Touches
Your placemat is almost complete! Just a few final steps to make it perfect.
- Weave in Ends: Using your tapestry needle, carefully weave in all the loose yarn ends from your color changes. Make sure to weave them in securely on the wrong side of the work.
- Blocking: This is a crucial step for a professional finish. Soak your placemat in lukewarm water with a little wool wash for about 15 minutes. Gently squeeze out the excess water (don't wring!), then lay it flat on a towel. Roll it up to remove more water, then shape it to the correct dimensions (12 x 18 inches) and pin it down to dry. Blocking will even out your stitches and make the motif crisp.
- Optional Fringe: For an extra touch of autumn charm, you can add a simple fringe to the short ends. Cut several 6-inch lengths of plum yarn. Fold each piece in half, pull the loop through the edge of the placemat, and pull the ends through the loop. Repeat across the short edges.
And there you have it—a beautiful, handcrafted Celestial Harvest placemat that's sure to be a conversation starter. This project is a wonderful way to practice colorwork and create a unique piece of seasonal decor. Enjoy your creation, and happy knitting!


