Canyon Sunset Vertical Stripe Scarf Free Pattern – A Chunky Knit Ombre Wrap
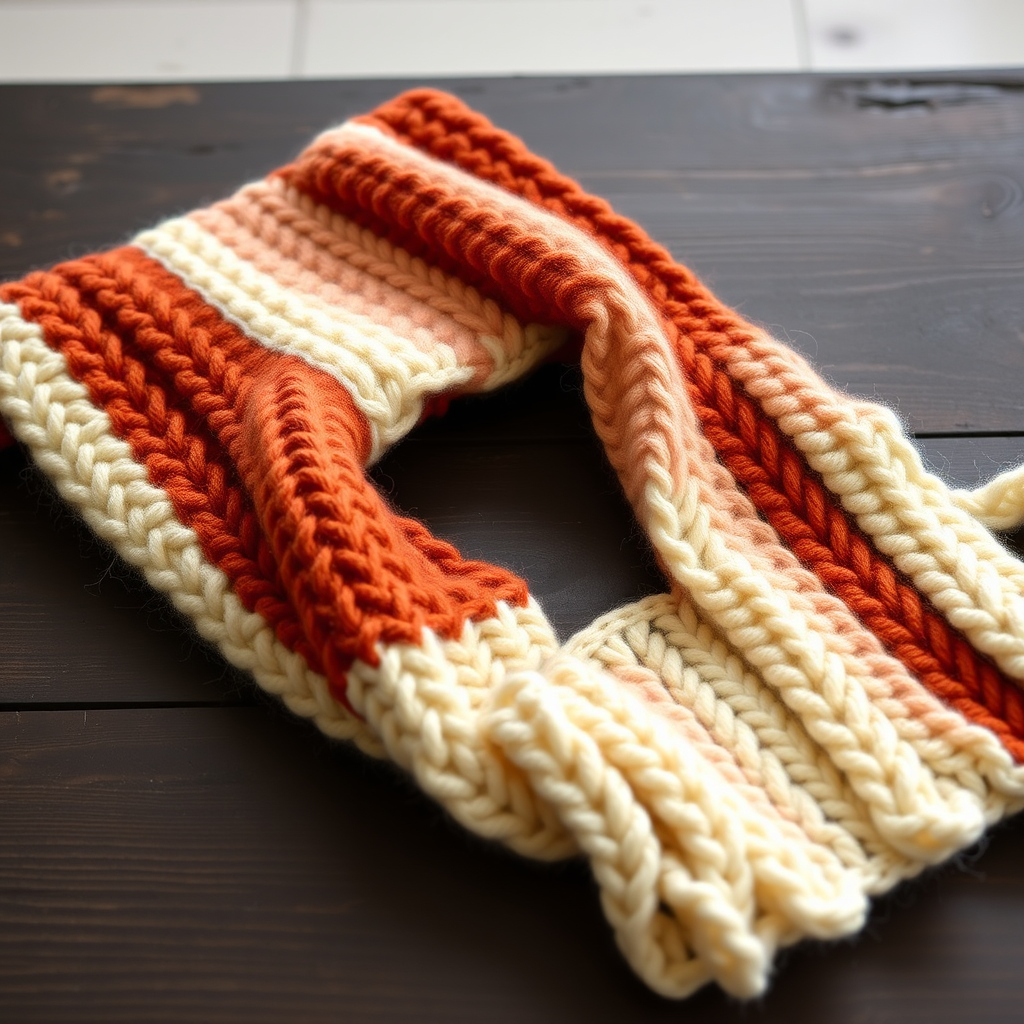
Canyon Sunset Vertical Stripe Scarf Free Pattern – A Chunky Knit Ombre Wrap
Wrap yourself in the warm hues of a desert sunset with this chunky knit scarf, featuring bold vertical stripes that cascade in a gradient of terracotta, amber, and dusty rose. This cozy accessory is a modern take on classic striping, perfect for adding a pop of color to any winter wardrobe. The best part? This pattern is completely beginner-friendly, using simple knit and purl stitches with an easy intarsia technique to create those stunning vertical stripes. Whether you're a seasoned knitter looking for a quick weekend project or a newbie ready to tackle your first colorwork, this scarf is the perfect choice.
With its plush, super bulky yarn and dramatic ombre fade, this scarf isn't just an accessory—it's a statement piece. The gradient transitions from a deep terracotta at one end, through a glowing amber, into a dusty rose, and finally to a creamy off-white at the other end, mimicking the breathtaking colors of a canyon sunset. Get ready to create a handmade treasure that will keep you warm and stylish all season long.
Materials Needed
Before you begin, gather the following materials to ensure a smooth and enjoyable knitting experience:
- Yarn: Super Bulky Weight Yarn (Size 6) in 4 colors:
- Color A: Terracotta (approximately 150g)
- Color B: Amber (approximately 150g)
- Color C: Dusty Rose (approximately 150g)
- Color D: Cream (approximately 150g)
- Needles: US Size 13 (9.0 mm) knitting needles
- Notions: Tapestry needle for weaving in ends, scissors
Gauge: 8 stitches and 10 rows = 4 inches in stockinette stitch (knit on RS, purl on WS). Be sure to check your gauge before starting to ensure your scarf matches the intended dimensions.
Step-by-Step Instructions
This scarf is worked flat in one piece, using a simple intarsia technique to create vertical stripes. The pattern is written for a scarf that is 10 inches wide and 60 inches long, but you can easily adjust the width by casting on more or fewer stitches (in multiples of 10).
Abbreviations
- K = Knit
- P = Purl
- St(s) = Stitch(es)
- RS = Right Side
- WS = Wrong Side
Cast On
With Color A (Terracotta), cast on 20 stitches loosely. A loose cast-on is essential to prevent the edges from curling or pulling tight. You can use the long-tail cast-on method or any stretchy cast-on you prefer.
Foundation Rows
Work the first four rows in solid Color A to create a clean base for your stripes:
- Row 1 (RS): With Color A, K20.
- Row 2 (WS): With Color A, P20.
- Row 3 (RS): With Color A, K20.
- Row 4 (WS): With Color A, P20.
Begin Vertical Stripes
Now you will work with multiple colors in the same row. Use a separate ball or bobbin of yarn for each stripe section. When changing colors, twist the yarns around each other on the WS to avoid holes and keep the fabric intact.
- Row 5 (RS): With Color A, K5; with Color B (Amber), K5; with Color C (Dusty Rose), K5; with Color D (Cream), K5. (20 sts)
- Row 6 (WS): With Color D, P5; with Color C, P5; with Color B, P5; with Color A, P5.
- Row 7 (RS): With Color A, K5; with Color B, K5; with Color C, K5; with Color D, K5.
- Row 8 (WS): With Color D, P5; with Color C, P5; with Color B, P5; with Color A, P5.
Repeat Rows 7 and 8 until the scarf measures 55 inches from the cast-on edge, ending with a WS row. This will create the main body of the scarf with even, five-stitch-wide vertical stripes.
Create the Gradient Fade
To achieve the beautiful ombre effect, you will gradually transition the colors. Over the next 10 rows, you will shift the stripe boundaries by 1 stitch every 2 rows. This subtle change creates a smooth, flowing gradient that mimics a sunset.
- Row 9 (RS): With Color A, K4; with Color B, K6; with Color C, K5; with Color D, K5. (20 sts)
- Row 10 (WS): With Color D, P5; with Color C, P5; with Color B, P6; with Color A, P4.
- Row 11 (RS): With Color A, K3; with Color B, K7; with Color C, K5; with Color D, K5.
- Row 12 (WS): With Color D, P5; with Color C, P5; with Color B, P7; with Color A, P3.
- Row 13 (RS): With Color A, K2; with Color B, K8; with Color C, K5; with Color D, K5.
- Row 14 (WS): With Color D, P5; with Color C, P5; with Color B, P8; with Color A, P2.
- Row 15 (RS): With Color A, K1; with Color B, K9; with Color C, K5; with Color D, K5.
- Row 16 (WS): With Color D, P5; with Color C, P5; with Color B, P9; with Color A, P1.
- Row 17 (RS): With Color B, K10; with Color C, K5; with Color D, K5.
- Row 18 (WS): With Color D, P5; with Color C, P5; with Color B, P10.
At this point, Color A has been completely phased out, and you now have three stripes: a wider Amber stripe (10 stitches) flanked by Dusty Rose and Cream (5 stitches each).
Continue with the New Stripe Pattern
Work the following rows to establish the new stripe configuration:
- Row 19 (RS): With Color B, K10; with Color C, K5; with Color D, K5.
- Row 20 (WS): With Color D, P5; with Color C, P5; with Color B, P10.
Repeat Rows 19 and 20 until the scarf measures 58 inches from the cast-on edge, ending with a WS row. This section will be approximately 3 inches long, giving the scarf a beautiful asymmetric fade.
Final Border
To finish the scarf neatly, work a few more rows in the current stripe pattern:
- Row 21 (RS): With Color B, K10; with Color C, K5; with Color D, K5.
- Row 22 (WS): With Color D, P5; with Color C, P5; with Color B, P10.
- Row 23 (RS): With Color B, K10; with Color C, K5; with Color D, K5.
- Row 24 (WS): With Color D, P5; with Color C, P5; with Color B, P10.
Bind Off
With Color B, bind off all stitches loosely on the RS. A loose bind-off is crucial to maintain the stretch and drape of the scarf. You can use a standard bind-off but be careful not to pull too tightly, or use a stretchy bind-off method like the "Jeny's Surprisingly Stretchy Bind-Off" for extra elasticity.
Finishing
Weave in all loose ends with a tapestry needle. Take your time to weave in ends securely, especially at the color changes, to ensure the scarf holds up well over time. Block the scarf gently to even out the stitches and enhance the drape. To block, soak the scarf in lukewarm water with a mild wool wash, gently squeeze out excess water (do not wring), and lay flat on a towel to dry. Shape it to the correct dimensions while it's damp. Once completely dry, your Canyon Sunset Vertical Stripe Scarf is ready to wear or gift!
This chunky knit scarf is not only a joy to create but also a stunning addition to any wardrobe. The combination of bold vertical stripes and the subtle ombre fade makes it a truly unique piece. Whether you're making it for yourself or as a heartfelt handmade gift, this pattern is sure to impress. Happy knitting!


