Aurora Waves Chevron iPad Mini Case Free Knitting Pattern
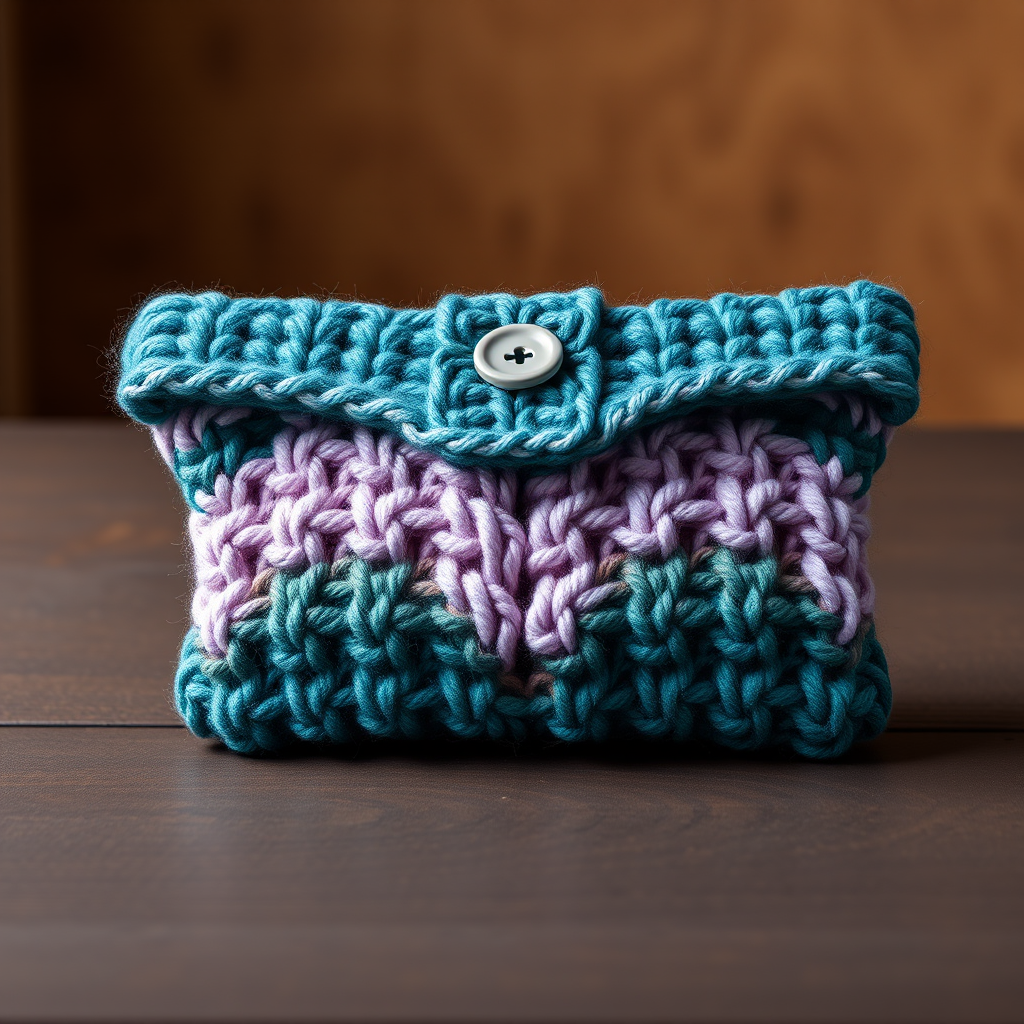
Aurora Waves Chevron iPad Mini Case: A Free Knitting Pattern for Beginners
Imagine wrapping your tablet in the mesmerizing, shifting colors of the northern lights. With the Aurora Waves Chevron iPad Mini Case, you can do just that! This free knitting pattern creates a soft, squishy, and stunningly textured case that’s as delightful to knit as it is to carry. The gentle color transitions—from deep teal to soft lavender to dusty rose—mimic the ethereal glow of the aurora borealis, while the bold chevron ridges add a dimensional, handcrafted charm. Whether you're knitting a gift for a loved one or treating yourself to a cozy accessory, this pattern is perfect for intermediate beginners ready to explore colorwork and texture.
In this comprehensive guide, I’ll walk you through every step, from gathering materials to seaming your finished piece. By the end, you’ll have a beautiful, functional case that fits your iPad Mini like a glove. Let’s dive in!
Materials Needed
Before you begin, gather the following supplies. This project uses simple, readily available materials—no fancy equipment required!
Yarn
- Worsted weight yarn in 3 colors (approximately 100g of each):
- Color A: Deep Teal (for the base and main body)
- Color B: Soft Lavender (for the middle stripe)
- Color C: Dusty Rose (for the top stripe and flap)
Tip: Choose a soft, machine-washable wool or acrylic blend for durability and comfort. The squishy texture comes from the garter-stitch ridges, so a yarn with good stitch definition will showcase the pattern beautifully.
Needles & Notions
- US 7 (4.5 mm) knitting needles (straight or circular—whichever you prefer)
- Tapestry needle (for weaving in ends and seaming)
- Stitch markers (optional, but helpful for tracking chevron points)
- Button or snap (for the flap closure)
- Sewing needle and thread (to attach the button/snap)
Gauge
20 stitches and 28 rows = 4 inches in stockinette stitch (blocked). While exact gauge isn’t critical for a case, matching it ensures a snug fit. If your gauge is off, adjust your needle size accordingly.
Step-by-Step Instructions
This pattern creates a snug, form-fitting case for an iPad Mini (approx. 8.3 x 5.3 inches). The chevron pattern is worked flat in two pieces (front and back) and seamed together. The color changes create a beautiful gradient effect. Follow along carefully, and you’ll have a professional-looking case in no time.
Abbreviations
- CO: Cast on
- K: Knit
- P: Purl
- K2tog: Knit two together (decrease)
- Kfb: Knit into the front and back of the same stitch (increase)
- St(s): Stitch(es)
- RS: Right side
- WS: Wrong side
Pattern Notes
- The chevron pattern is a multiple of 12 stitches + 2 edge stitches.
- Work all slipped stitches as if to purl with yarn in front (wyf) on RS rows, and with yarn in back (wyb) on WS rows. This creates a neat, chain-like edge.
- The color changes are worked in stripes: 4 rows of Color A, 4 rows of Color B, 4 rows of Color C, repeating. This creates a soft, ombre-like effect.
Front Panel (Make 1)
Cast On: With Color A, CO 38 stitches.
Row 1 (RS): Slip 1 stitch wyf, K1, *K2tog, K2, Kfb, K1, Kfb, K2, K2tog, K1; repeat from * to last 2 stitches, K2. (You will have 4 chevron points across.)
Row 2 (WS): Slip 1 stitch wyf, Purl to last stitch, Slip 1 stitch wyf.
Row 3: Repeat Row 1.
Row 4: Repeat Row 2.
Switch to Color B. Repeat Rows 1-4 twice (8 rows total).
Switch to Color C. Repeat Rows 1-4 twice.
Continue in this stripe sequence (4 rows of each color) until the piece measures approximately 8.5 inches from the cast-on edge, ending with a WS row. This forms the main body of the case.
Decrease for Top Flap
Continue in the stripe sequence, but now work the chevron pattern as follows:
Row 1 (RS): Slip 1 stitch wyf, K1, *K2tog, K2, Kfb, K1, Kfb, K2, K2tog, K1; repeat from * to last 2 stitches, K2.
Row 2 (WS): Slip 1 stitch wyf, Purl to last stitch, Slip 1 stitch wyf.
Row 3: Repeat Row 1.
Row 4: Repeat Row 2.
Work even in this pattern for 2 more inches (about 6 rows). This creates the flap that will fold over the top of the case.
Decrease Row 1 (RS): Slip 1 stitch wyf, K1, *K2tog, K2, K2tog, K1, K2tog, K2, K2tog, K1; repeat from * to last 2 stitches, K2. (You will have decreased 2 stitches per chevron point.)
Purl one WS row.
Decrease Row 2 (RS): Slip 1 stitch wyf, K1, *K2tog, K1, K2tog, K1; repeat from * to last 2 stitches, K2. (You will have decreased 1 stitch per chevron point.)
Purl one WS row.
Bind off all stitches loosely. Set aside.
Back Panel (Make 1)
Cast On: With Color A, CO 38 stitches.
Work the same chevron pattern as the front panel (Rows 1-4 in the stripe sequence), but do NOT work the flap decreases. Continue straight until the piece measures the same length as the front panel (including the flap). Bind off all stitches.
Tip: To ensure both panels match perfectly, measure the front panel from cast-on edge to bind-off edge, then knit the back panel to that exact length.
Finishing
Now for the fun part—assembling your case!
- Weave in all ends using your tapestry needle. Be sure to weave them in securely on the wrong side of the fabric.
- Block both pieces flat to the correct measurements. The front panel should be slightly longer due to the flap. Use a spray bottle or steam iron (with a cloth) to gently shape the pieces. Let them dry completely.
- Place the front and back panels together with right sides facing out. The wrong sides should be touching each other.
- Using a tapestry needle and Color A yarn, whip stitch the side seams and bottom seam together, leaving the top open. Start at the bottom corner, work up one side, across the bottom, and up the other side. Keep your stitches even and snug, but not too tight.
- Fold the flap over the top edge to the back of the case. Position it so it covers the opening neatly.
- Sew a button or snap to the center of the flap and the corresponding spot on the back panel. Use a sewing needle and thread for a secure attachment. If using a button, you may want to create a small yarn loop on the back panel for a closure.
- Weave in any remaining ends.
Your Aurora Waves Chevron iPad Mini Case is complete! Slip your tablet inside, snap the flap, and enjoy the cozy, artisanal beauty of your handiwork.
Tips for Success
- Count your stitches after each chevron row to ensure you haven’t accidentally dropped or added a stitch. The pattern is repetitive, so it’s easy to get into a rhythm.
- Use stitch markers between chevron points (after every 12 stitches) to help you keep track of your place.
- Don’t pull your yarn too tightly when changing colors—this can cause the fabric to pucker. Leave a little slack and block the piece afterward to even things out.
- If you’re new to colorwork, practice the stripe sequence on a small swatch first. You’ll get a feel for the rhythm and tension before starting the actual case.
This pattern is a wonderful way to practice chevron stitches, color changes, and simple seaming—all while creating a beautiful, functional accessory. Whether you keep it for yourself or gift it to a fellow tech lover, the Aurora Waves case is sure to impress. Happy knitting!


